Troubleshooting Ecommerce Tracking in Google Analytics
Benjamin Mangold
How to solve ecommerce tracking issues in GA4 (Google Analytics 4) and Google Tag Manager
Ecommerce tracking is a crucial aspect of understanding the performance of your online store. It allows you to track important metrics such as items purchased, transactions, revenue, ecommerce conversion rate, and more. However, depending on your ecommerce platform and how ecommerce tracking is implemented, you might run into unexpected issues. In this blog post, we will go over some common issues that you may encounter when setting up ecommerce tracking in Google Analytics 4 (GA4) and Google Tag Manager and provide some steps to troubleshoot them.
First, you will need to identify how ecommerce tracking has been implemented on your website. In most cases, you will find tracking is set up using one of the following methods:
- Using a platform’s built-in Google Analytics integration. For example, if you’re using Wix or Squarespace, their built-in integration will automatically send order details, including revenue, items, and more.
- Using a plugin. For example, if you’re using WooCommerce, then you might be using a third-party plugin to send details about transactions to Google Analytics.
- Using a modified Google Analytics tracking code. If you’re using the dedicated tracking code, also called the Google Tag (gtag.js), then you can modify this code to send purchase details to Google Analytics once a transaction has taken place on your website.
- Using Google Tag Manager and the ecommerce data layer. This is generally the best approach, as you can pass transaction details to multiple tags, including Google Analytics, Google Ads, and other third-party analytics platforms.
We’re going to focus on the last option – using Google Tag Manager, but if you’re using a built-in integration or a plugin, then I recommend contacting support, as they should be able to help you identify any issues that are preventing ecommerce tracking from working on your website.
When it comes to Google Tag Manager, there are two key areas you should focus on first when troubleshooting your ecommerce tracking. These are the data layer, and the trigger used to fire your tracking tag (or tags). Let’s look at the data layer first.
Checking the Data Layer
The data layer needs to contain all of the information about the transaction that’s taken place on your website. Without all of the correct information in the data layer, you’re not going to be able to send the transaction details to Google Analytics. To check your data layer, you will need to complete a test transaction on your website.
If your store is running on Shopify and you’re using a custom pixel (also called a ‘customer event’) to add Google Tag Manager and the data layer, you won’t be able to use Google Tag Assistant to check your tags. This is because custom pixels run in a ‘sandbox’ which means they’re added separately to your store to maintain security. We will come back to this in a moment.
If you’re not using a Shopify custom pixel to implement Google Tag Manager and the data layer, I recommend using Tag Assistant. You can access tag assistant by heading to your Google Tag Manager container and clicking ‘Preview’.
Once you’ve completed a transaction and are on the confirmation page, you can view Tag Assistant to see the data layer events. You should see something like this:
If you don’t see the purchase event being pushed to the data layer, then the transaction details won’t be available to Google Tag Manager, and your tag won’t trigger either.
What should you do if there is no purchase event in the data layer?
It really depends on how you’ve implemented Google Tag Manager and the data layer on your website. You will need to establish how the data layer is being added (or is meant to be added) to your website. If you’re using a plugin, I recommend contacting the developers for support. For example, if you’re using the Google & YouTube App in Shopify, you can contact support to help you identify the issue.
If you’re using the Google & YouTube App, this will automatically add the data layer for you. However, you can also check it is added correctly. After completing a transaction, your data layer should look something like this:
<script>
window.dataLayer = window.dataLayer || [];
dataLayer.push({ ecommerce: null });
dataLayer.push({
  event: "purchase",
  ecommerce: {
    transaction_id: "4923535098040",
    value: 27.50,
    tax: 2.50,
    shipping: 10.00,
    currency: "USD",
    items: [
      {
        item_id: "7092124582072",
        item_name: "Loves Data Mug",
        price: 15.00,
        quantity: 1
      }
    ]
  }
});
</script>
If the purchase event is pushed to the data layer with a different name, for example, if it’s named transaction instead of purchase, then this could be causing the issue. Or if one of the required parameters is missing, this can also lead to issues with ecommerce tracking. For reference, the following parameters are required and need to be included with the purchase event:
- Currency (currency)
- Transaction ID (transaction_id)
- Value (value)
- Plus the items array which needs to contain the item or items for the transaction. Each item needs to include the item_id and item_name parameters at a minimum.
It’s a good idea to complete another test transaction once the data layer has been fixed to check that everything is working as you expect.
Tip: If you're encountering issues with the Google & YouTube App you can try removing and re-adding the app to see if that fixes the issue.
What should I do if I’m using Shopify and there’s a missing or incorrect value?
If you're using an built-in integration or a plugin, you will need to check two things. First, you will need to check if the value is correct or incorrect in the data layer. If the values are correct in the data layer, it means that the issue is most likely with how your tag is configured in Google Tag Manager. For example, if you're using variables to pass information to the tag, then potentially the wrong variable is being used or it's been incorrectly formatted.
However, if the value is incorrect in the data layer, this means the issue is most likely coming from the integration or plugin you're using. In this case you will need to contact the developer of the plugin or integration you're using for assistance.
If you're not using a plugin or built-in integration, then you should check how the data layer is being added. If you're using a Shopify custom pixel, you should check that all of the necessary parameters are included in the custom pixel events and that each parameter has the correct value. The following example include the data layer event for a purchase:
window.dataLayer = window.dataLayer || [];
function gtag(){dataLayer.push(arguments);}

(function(w,d,s,l,i){w[l]=w[l]||[];w[l].push({'gtm.start':
new Date().getTime(),event:'gtm.js'});var f=d.getElementsByTagName(s)[0],
j=d.createElement(s),dl=l!='dataLayer'?'&l='+l:'';j.async=true;j.src=
'https://www.googletagmanager.com/gtm.js?id='+i+dl;f.parentNode.insertBefore(j,f);
})(window,document,'script','dataLayer', 'GTM-EXAMPLE');

analytics.subscribe("checkout_completed", (event) => {
  dataLayer.push({ ecommerce: null });
  const items = event.data?.checkout?.lineItems?.map((item) => {
    return {
      item_id: item.variant.product.id,
      item_name: item.variant.product.title,
      price: item.variant.price.amount,
      quantity: item.quantity
    }
  });
  dataLayer.push({
    event: "purchase",
    url: event.context.document.location.href,
    ecommerce: {
      currency: event.data?.checkout?.currencyCode,
      value: event.data?.checkout?.subtotalPrice?.amount,
      transaction_id: event.data?.checkout?.order?.id,
      coupon: event.data?.checkout?.discountAllocations,
      shipping: event.data?.checkout?.shippingLine?.price?.amount,
      tax: event.data?.checkout?.totalTax?.amount,
      items: items
    }
  });
});
If you do encounter this issue, I recommend checking how the data layer is being added.
You should also complete a test transaction and check the data layer values by viewing the source code and using Google Tag Assistant. You will need to check that values are being populated for the required parameters. This includes currency, value, item_id, item_name, and transaction_id. If they're not, you will run into issues.
What if I’m using Shopify and I’ve added Google Tag Manager to my store using a custom pixel?
If you’re using a custom pixel, you can’t use Google Tag Assistant or the Console in Chrome to check everything is working. Instead, you can use one of the following options to check your implementation:
- Open the custom pixel in Shopify and click 'Test' at the top. This will load your Shopify store with the Shopify Pixel Helper. This lets you see if the custom pixel has fired for particular events.
- Adjust the custom pixel so that particular events are logged to the browser console. For example, if you want to test the Shopify 'product_viewed' event that pushes the 'view_item' data layer event. You can add
console.log('Product viewed:', event);to then see details in your browser console. - You can enable debug mode directly in the Google Tag for Google Analytics you’ve implemented using Google Tag Manager. Adding the
debug_modeparameter with a value oftruewill send all of the events to the DebugView in Google Analytics. This allows you to check all of the events and their parameters. - Chrome’s Developer Tools can be used to check the network requests for Google Analytics. This lets you view the hits (including events and parameters) sent to Google Analytics.
As you’re using one of these methods to test your implementation, you should also check the following:
- Double-check that the Shopify Custom Pixel code is correctly added to your Shopify store.
- Check that the Shopify Custom Pixel code includes the correct Google Tag Manager container ID.
- Ensure that the Google Tag Manager container has been published. Since you can’t use Tag Assistant when using a Shopify Custom Pixel, it means the container needs to be published for the events to be sent to Google Analytics.
- Check that the
value,currency,transaction_id, anditemsparameters are sending the correct information to Google Analytics. - Ensure that there are no duplicate tags firing for the same event. Multiple tags can potentially lead to double-counting and inaccurate data.
- Ensure that other scripts or tags on your site do not interfere with your ecommerce tracking.
- Complete test transactions to verify that all stages of the ecommerce funnel (including product views, add to cart, checkout, and purchase) are being tracked correctly.
Apart from these troubleshooting steps that are specifically for the Shopify Custom Pixel, you should also review the other recommendations included in this article. This includes the recommendations for checking the trigger and tag in Google Tag Manager.
What should I do if there are other ecommerce events missing from the data layer?
Apart from purchase events, you can also send other ecommerce events to Google Analytics. This includes when people add an item to their cart, starting to checkout, viewing items, and more. So what should you do if they’re not appearing in the data layer?
Well, this comes back to how they’ve been implemented. The first thing you should do is check that the events are being pushed to the data layer. If they’re not, you will need to check how they’ve been implemented (just like we covered when we checked the purchase event previously). So again, if you’re using a plugin or a built-in integration and you’re not seeing the data layer events, I suggest contacting the developer for support. And if you’ve implemented the data layer yourself for these events, take time to check the naming and that the required parameters are being included. You can find details on Google Developers for what’s required.
One issue that occasionally pops up is add-to-cart events firing multiple times. If this is something you’re seeing, then I recommend talking to the developer of the theme you’re using. I’ve found that some website themes using AJAX for the add to cart button means that events are triggered multiple times. So if you’re seeing this, I recommend contacting the developer of your website’s theme to see what they recommend.
How should Google Tag Manager be configured for ecommerce tracking?
If you're using Google Tag Manager to send data to Google Analytics and other platforms, you will need to check your trigger and tag. Your trigger is what's listening for events, like purchase events, as they're pushed to the data layer. When your trigger is combined with a tag, this will send data to Google Analytics.
If you're not 100% sure if your Google Tag Manager ecommerce implementation is correct, I recommend downloading my pre-configured GTM ecommerce container. This container includes everything you need to get up and running.
The GA4 event tag allows you to automatically capture all of the ecommerce information that's available in the data layer. We will cover this in a moment. However, for other platforms, you will need to create separate variables for each piece of information you want to collect. So if you're sending data to a third-party platform you should check that you have variables correctly configured.
Checking the Trigger
Once the purchase event is correctly pushed to the data layer, the next thing to check is the Google Tag Manager trigger. I recommend using a single trigger that is configured to identify all of the ecommerce events that can be pushed to the data layer. This means you don’t need to create multiple triggers. However, you can create individual triggers for each ecommerce event in the data layer.
Here’s an example of a trigger that uses a regular expression to match all of the ecommerce events:
If you only want to capture purchase events, then you could use a trigger like this instead:
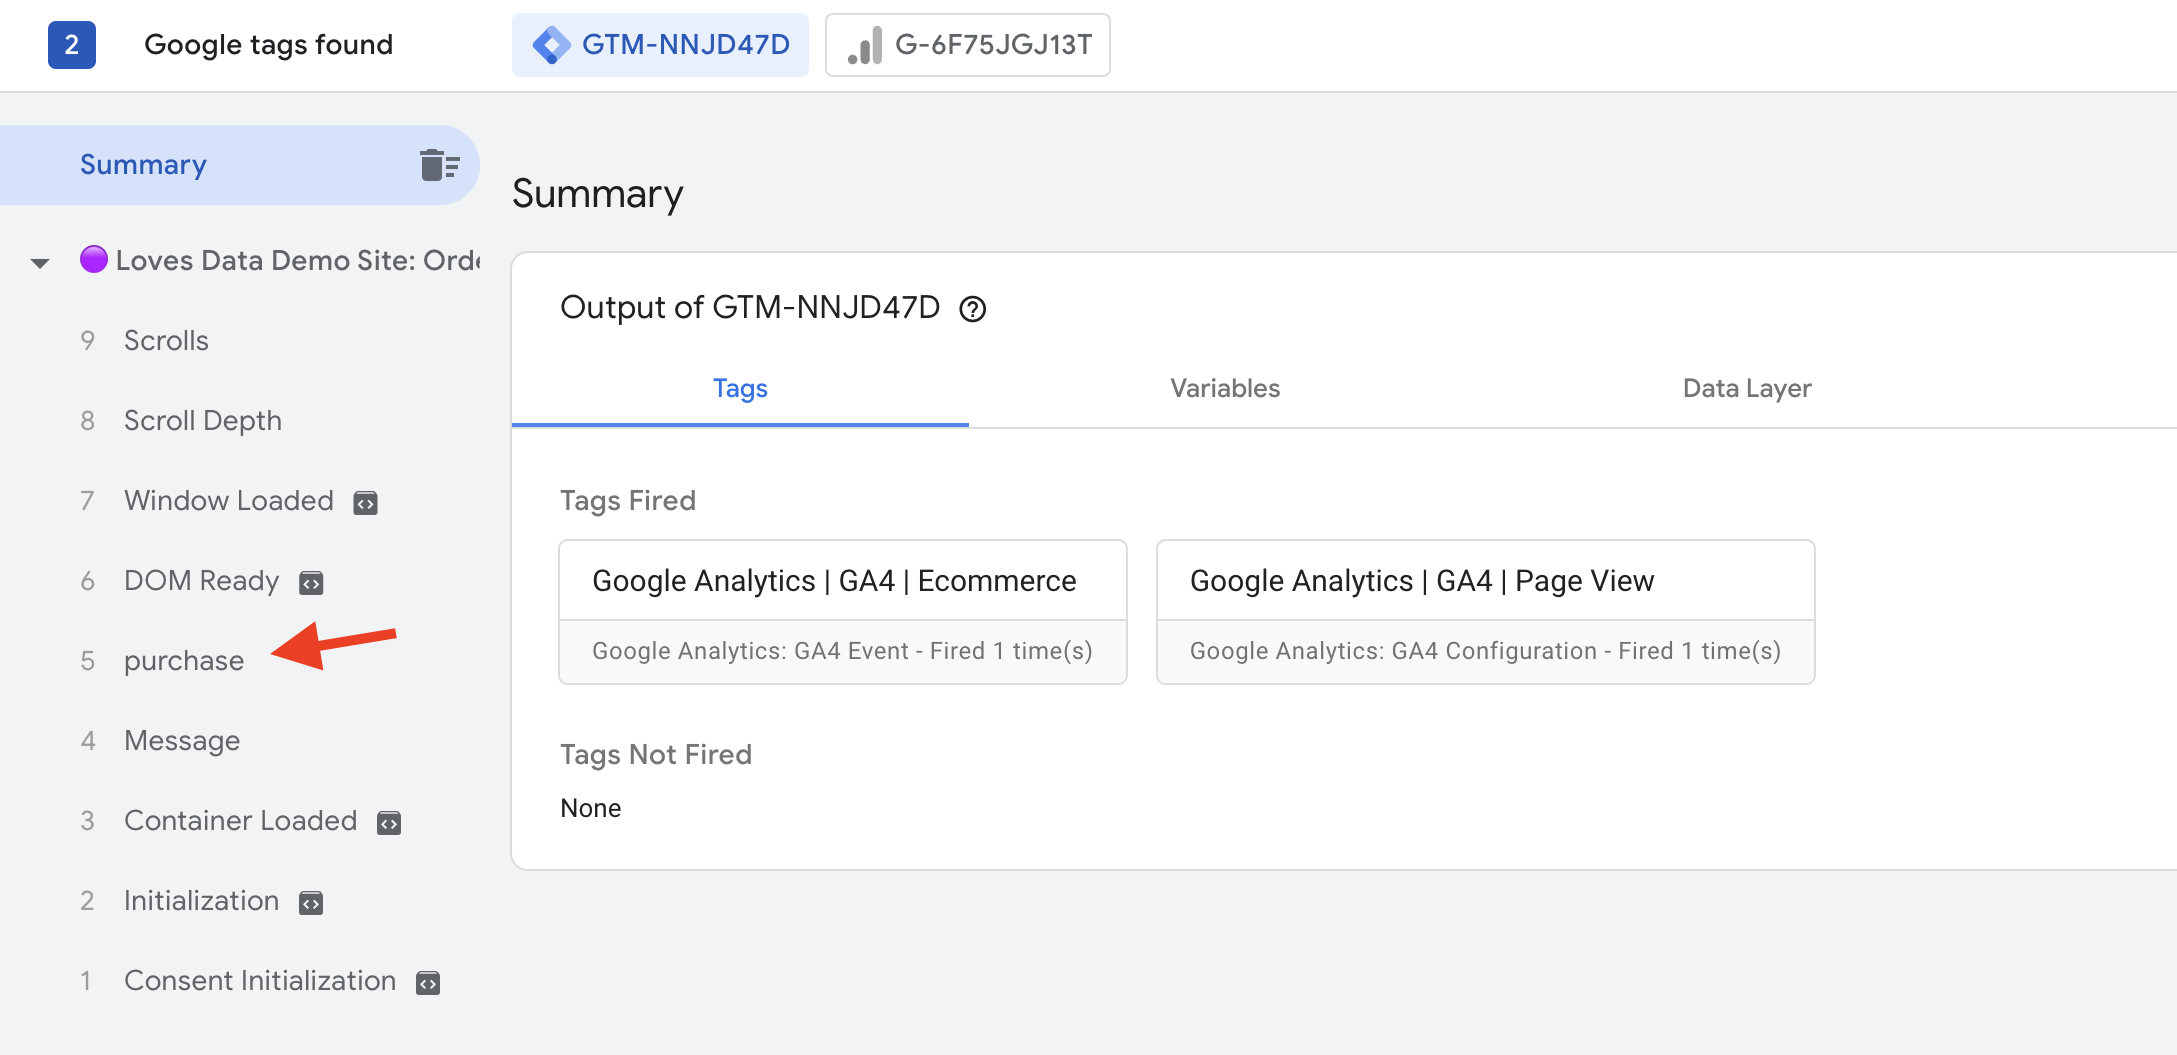
Once you’ve checked the configuration of the trigger in Google Tag Manager, it’s time to complete another test transaction on your website. Once the trigger has fired your tag, you should see something like this in Tag Assistant:
If the trigger doesn’t fire your tag, you’ll need to check your trigger again. Remember that you need the purchase event correctly implemented in the data layer and a correctly configured trigger for your tag to fire. If one of these isn’t right, your tag won’t send data to Google Analytics.
Checking the Tag
If you’ve tested the trigger and you can see your tag is firing in Google Tag Assistant, then it’s time to head back to Google Tag Manager and check your GA4 tag. Ensure that your tag is configured with the correct measurement ID from your data stream. If your tag is using a different measurement ID, then your purchase events are probably being sent to a different Google Analytics property.
To find your measurement ID in Google Analytics, navigate to ‘Admin’, select ‘Data Streams’, and open your data stream. At the top, you will see the measurement ID for the data stream. It should look something like this:
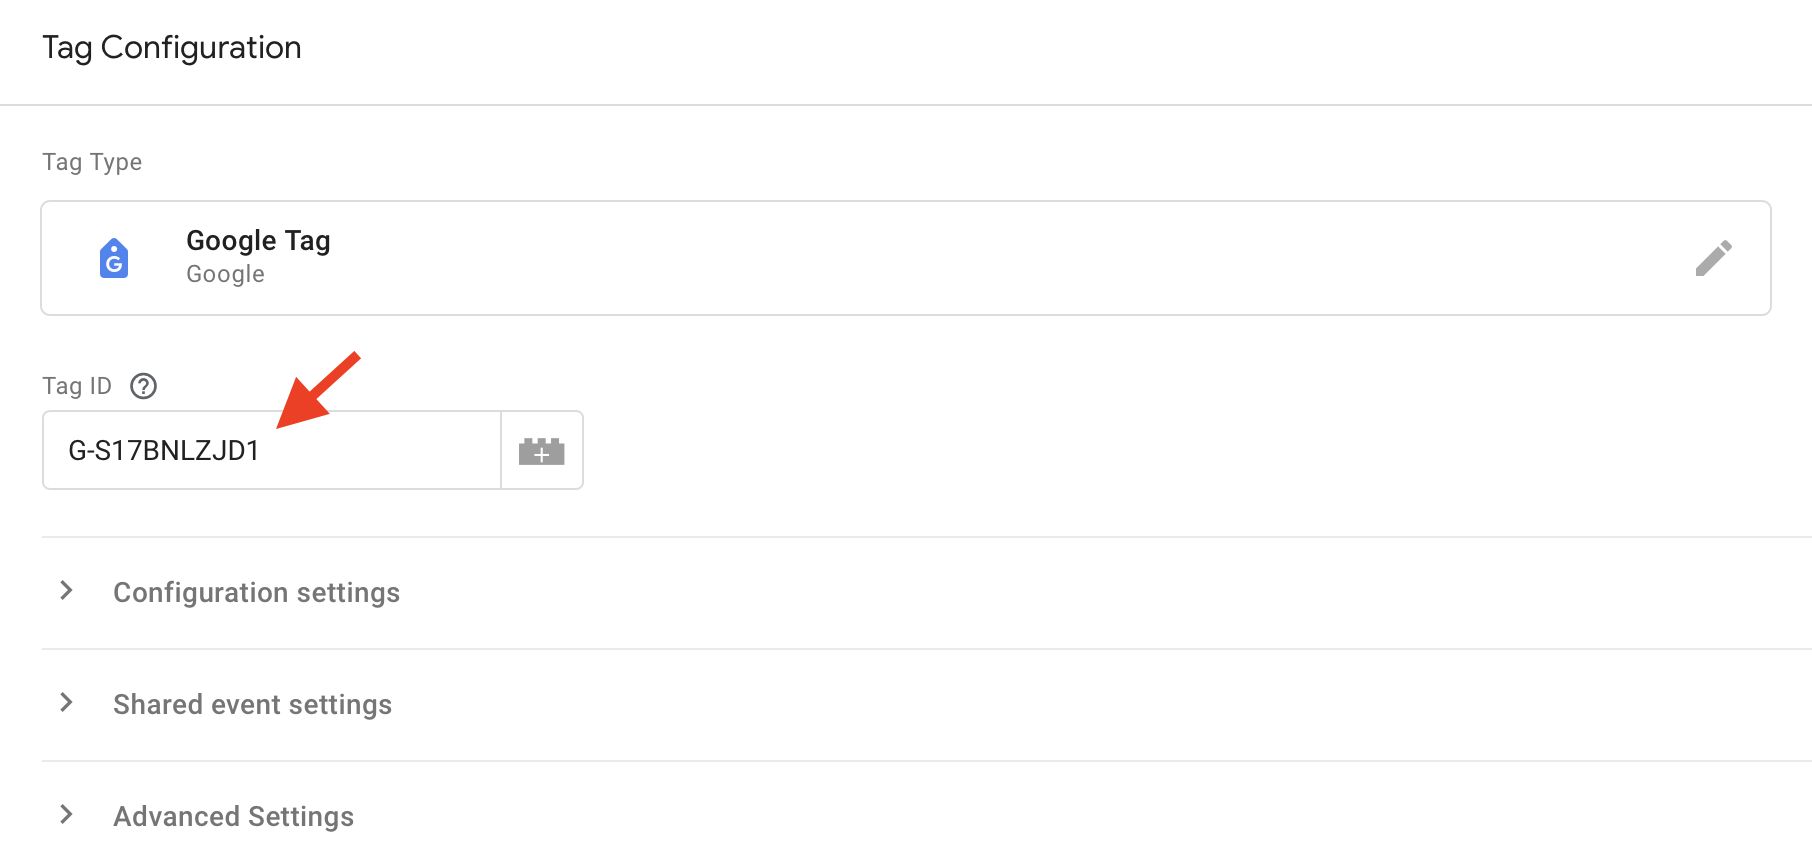
Then head to Google Tag Manager and open your Google Tag (previously this would have been the ‘GA4 configuration tag’). The measurement ID for the configuration tag should match the ID you found in Google Analytics. Here’s an example with the measurement ID added directly to the tag:
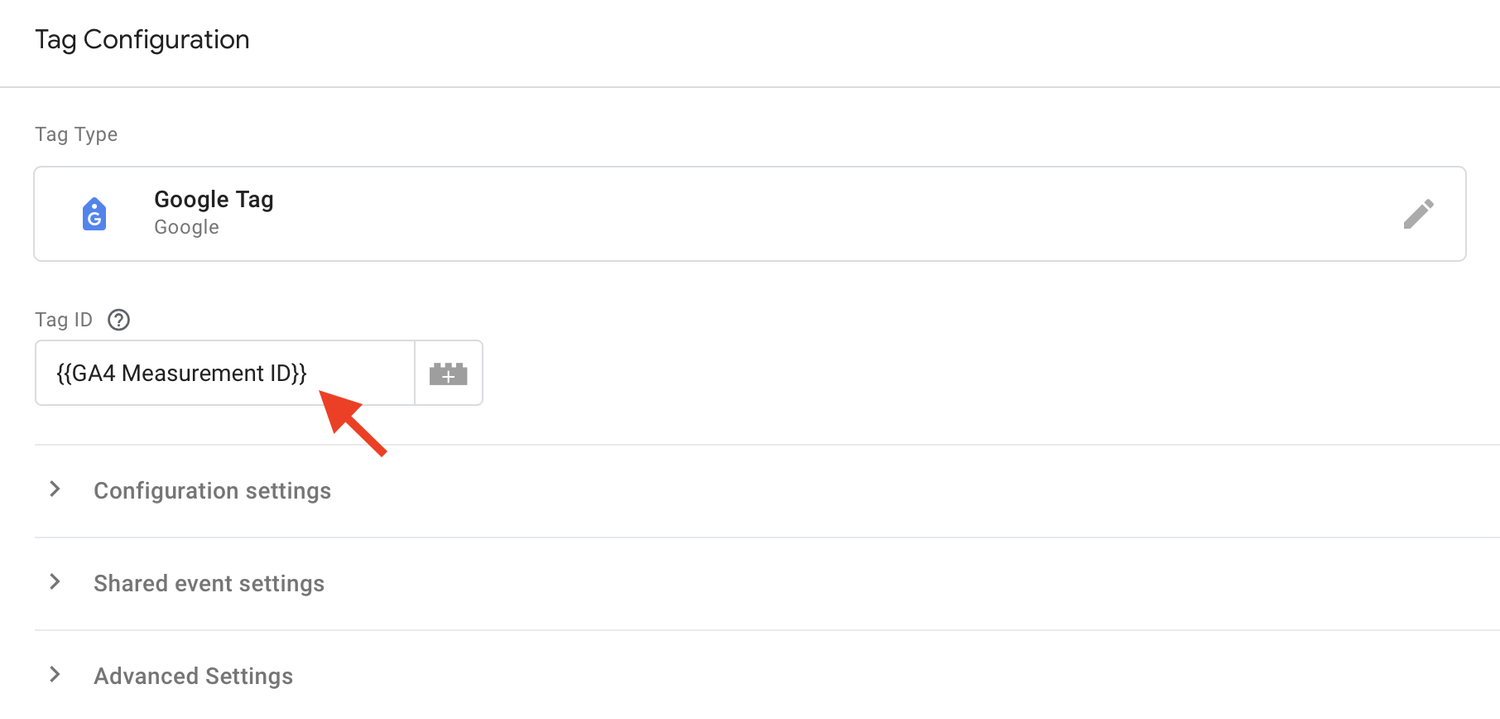
And here’s an example where the measurement ID has been added as a variable. Without getting side-tracked, this allows us to easily reuse the measurement ID in multiple tags. If you would like to learn more about this, then consider joining our Google Tag Manager Course.
If the measurement ID matches, then I recommend taking a moment to check how the tag is sending ecommerce information to Google Analytics. In most cases, the ‘Send Ecommerce Data’ option is the best way to collect information. This option is available when you create a GA4 event tag in Google Tag Manager:

Using this option will automatically send ecommerce information available in the data layer to Google Analytics. To learn more about using this option, you can watch my tutorial on YouTube:
Apart from using the ‘Send Ecommerce Data’ option, you can also configure individual variables for each parameter available in the data layer and then configure these in the event tag. However, this doesn’t provide added benefits if you’re simply sending data to Google Analytics.
Other Things to Check
- Make sure that the correct Google Tag Manager container has been installed on your website. If the wrong container has been installed, you will see the data layer event, but the trigger from your container won’t fire, and the tag won’t send data to Google Analytics.
- If you’re using a third-party payment platform like PayPal, you might find that some transactions aren’t tracked into Google Analytics. This can happen if customers don’t return to your website after they’ve completed the payment. Since they don’t return, your tag isn’t fired, and data isn’t sent to Google Analytics.
- Check that the data layer is formatted correctly. If some special characters have found their way into where your parameter values should be, then you might encounter an issue. For example, transaction_id: "T_"12345", instead of transaction_id: "T_12345", can cause issues. You should also check for missing characters. For example, if you have transaction_id: "T_12345, instead of transaction_id: "T_12345", you will also experience problems with the data layer push.
Inaccurate Ecommerce Metrics
Another issue related to troubleshooting ecommerce implementations is the difference or discrepancy between what you find in Google Analytics and the backend of the ecommerce platform you’re using. This can include lower (or higher) revenue figures, transactions, and other metrics being reported.
If you’re encountering inaccurate revenue and other ecommerce metrics in Google Analytics, here are some things to consider and check:
- Overall, revenue reported in Google Analytics won’t exactly match to actual revenue collected. The acceptable variance is generally +/- 10%.
- Check if any transactions are missing for a particular payment platform (or platforms). For example, is revenue reported for PayPal or are PayPal transactions missing?
- Compare transaction IDs (including revenue per transaction) in Google Analytics to your ecommerce platform to identify missing transactions. Missing transactions can then be compared to look for any similarities.
- If any transactions in Google Analytics are reporting more revenue than what was collected, the tracking code might be implemented in a way that lets it fire multiple times.
- If any transactions are under-reporting revenue, is there anything unusual in these transactions? For example, special characters in product names that are breaking the tracking code.
- Check that the ecommerce code is in the head tag at the top of the page.
- Check if other plugins, add-ons or scripts are causing problems with the ecommerce tracking code.
- Make sure that you are reporting in the same currency in Google Analytics and your ecommerce platform.
- If you have traffic from the EU, are these audience members clicking ‘Deny’ on your consent banner? And if they are, does this explain the difference?
- Do you have a high portion of audience members using ad blockers that are preventing Google Tag Manager from working and Google Analytics from collecting data?
- Have you checked that the data layer and Google Tag Manager implementation are correct?
- You could also try switching to one of the other methods for tracking purchases. For example, if you’re using Shopify and the Google and YouTube App, you could try switching to a custom pixel to implement Google Tag Manager and Google Analytics.
Conclusion
By following these steps, you should be able to troubleshoot most ecommerce tracking issues in Google Analytics 4 (GA4) and Google Tag Manager. However, there will be cases where you might need additional help identifying exactly what is (and it’s working) when it comes to ecommerce tracking. As we’ve touched on, issues can result from how Google Analytics or Google Tag Manager are implemented on your website, how the data layer has been implemented, other scripts installed on your website, your template, and more. If you’re still experiencing issues, it might be useful to read about more ways you can get help with Google Analytics for further assistance.