How to Upgrade to Google Analytics 4
Loves Data
With the release of Google Analytics 4 (GA4), you’re probably thinking about upgrading your Universal Analytics property to the latest version. The process of upgrading is fairly straightforward, but there are some important considerations before you jump in. So let’s walk through the steps you will need to take to upgrade.
Do You Need to Upgrade?
Should You Upgrade?
The short answer is, yes. Yes, you do. Google has announced that Universal Analytics will stop processing data on 1 July 2023, so you have up until this point to upgrade to Google Analytics 4. After this time, you will have ‘read-only’ type access to your Universal Analytics reports until the end of 2023, then you will need to rely solely on Google Analytics 4.
This also means you have until mid-2023 to build up some historical data in Google Analytics 4. If you wait until 30 June 2023 before upgrading, then you will be starting from zero and you won’t be able to compare any historical data in Google Analytics 4.
Apart from data integrity, the new version of Google Analytics also comes with the latest reports and features. Google is continually improving Google Analytics 4. This includes greater flexibility in the way you collect custom data into your reports.
Can I migrate data from Universal Analytics to Google Analytics 4?
No, unfortunately there is no way to migrate or upload your historical data into Google Analytics 4. You’re starting from scratch, so the sooner you add Google Analytics 4 to your website, the more data you will have available for historical comparisons.
How to Upgrade to Google Analytics 4
As I’ve mentioned, the upgrade process is pretty straightforward. If you use the gtag.js version of the tracking code, the process will be extra simple. And if you rely on Google Tag Manager, then adding a new tag will let you start collecting data into your reports.
Confirm You Currently Have Universal Analytics
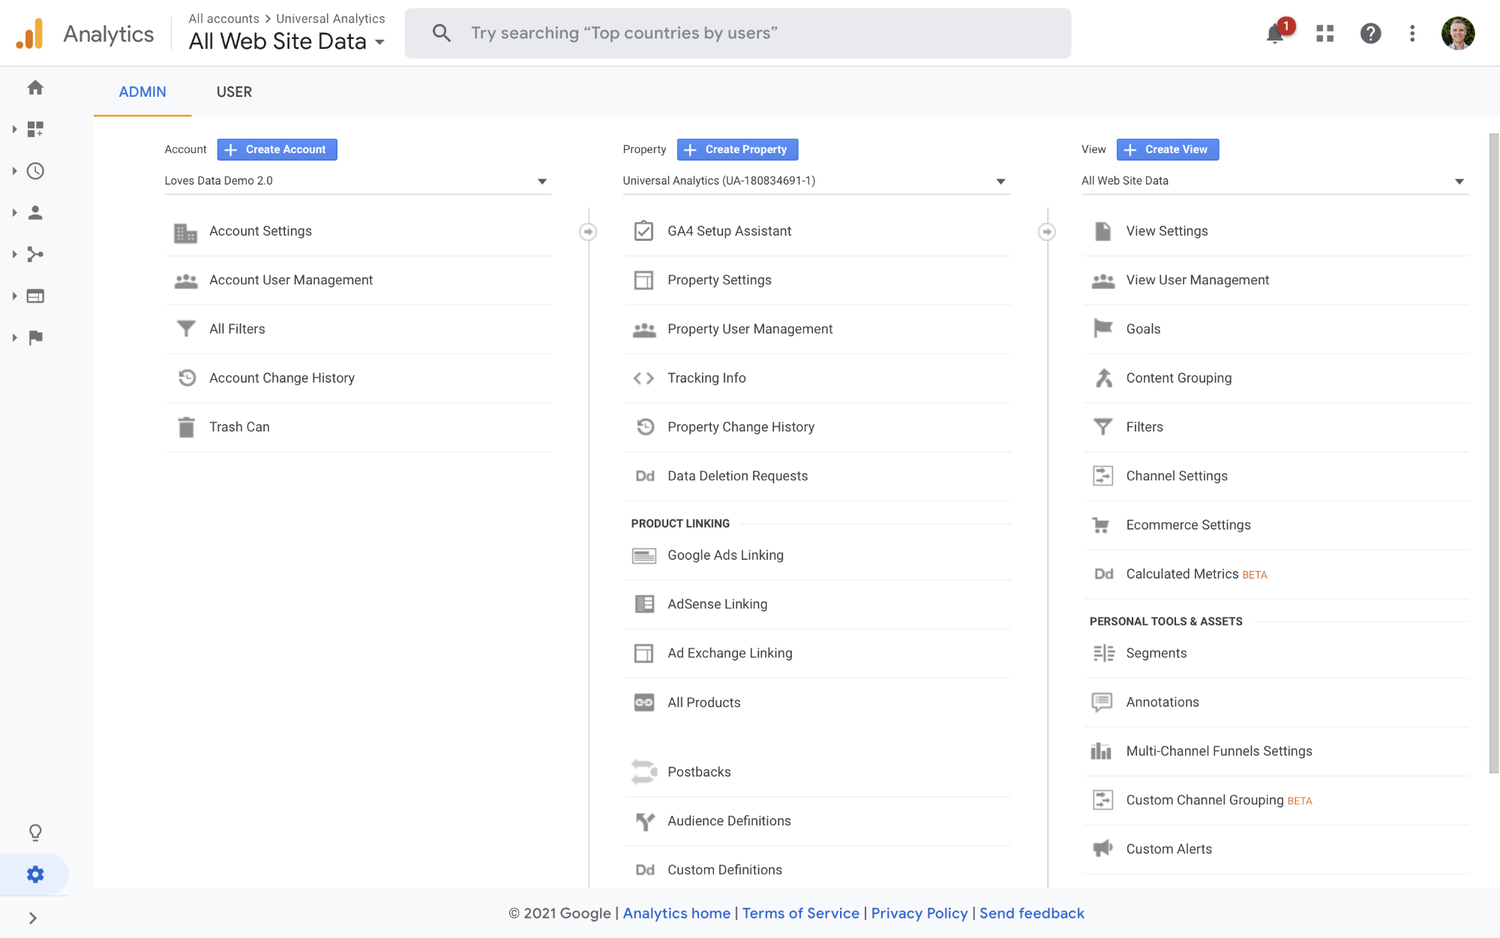
Once you are logged into your Google Analytics account, it is easy to confirm if you are currently using Universal Analytics. Once you’re in the admin area, check to see if there are three columns. There should be an Account, Property, and View column like we can see here:
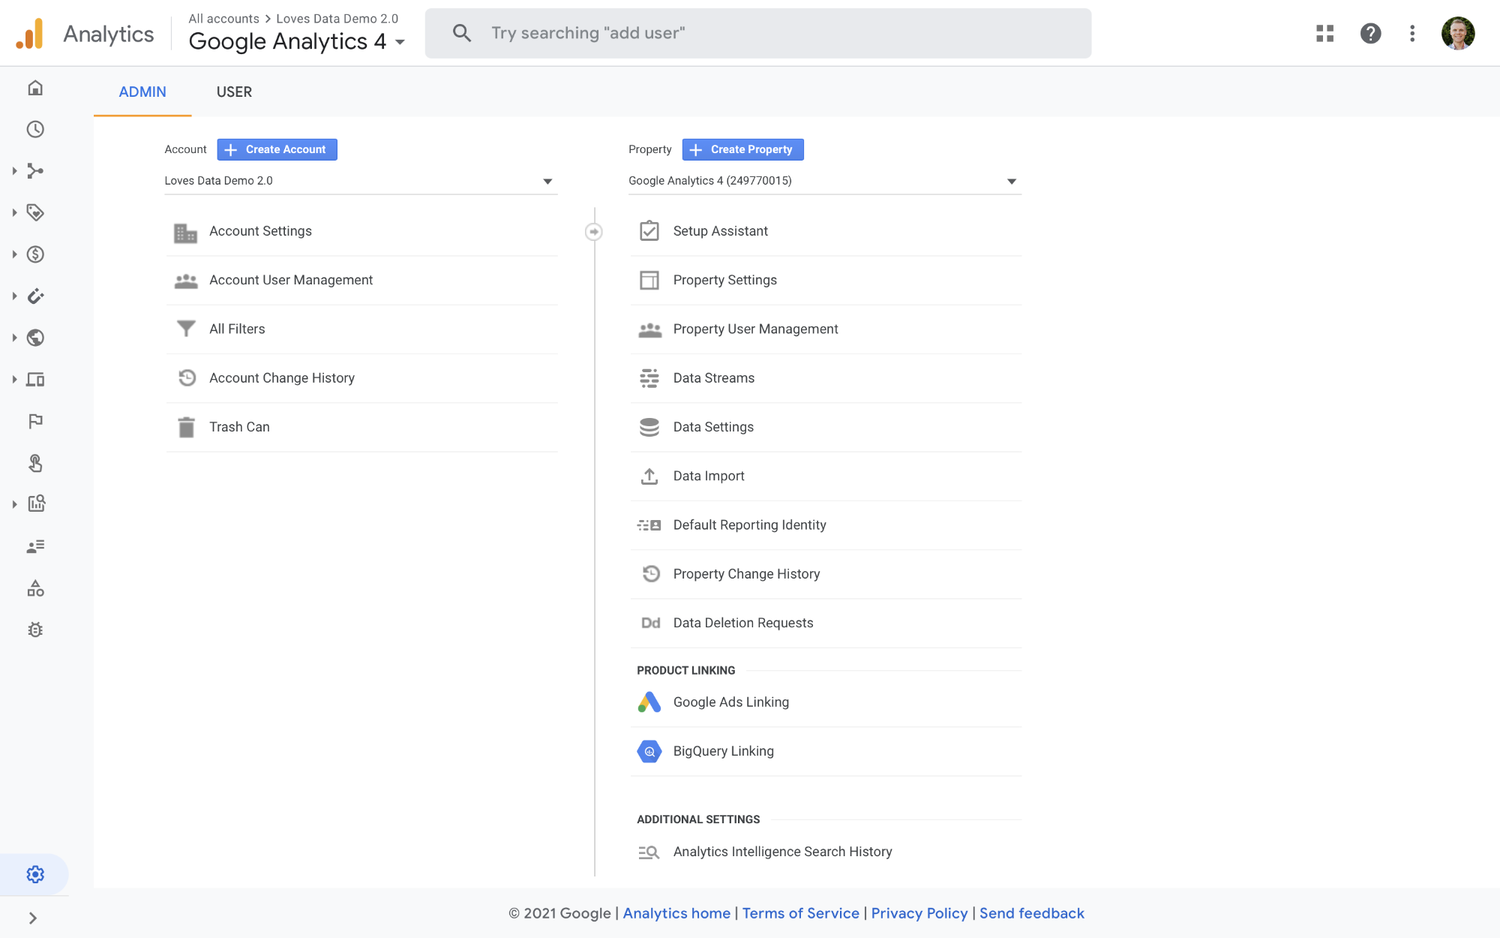
If you’re already using GA4, then you will only see two columns in the admin area. There will be an Account and Property column like we can see in this example:
To summarize, you will notice one of two things:
- You have three columns in the admin area – which means you have Universal Analytics and should keep reading to upgrade.
- You have two columns in the admin area – which means you already have GA4 and are already set, without any need to upgrade.
What Happens When You Upgrade
When you finish upgrading to GA4, your existing reports will be the same (in your Universal Analytics property). This is because the upgrade process creates a new property. You will have Universal Analytics and a GA4 property running in parallel.
Getting Started
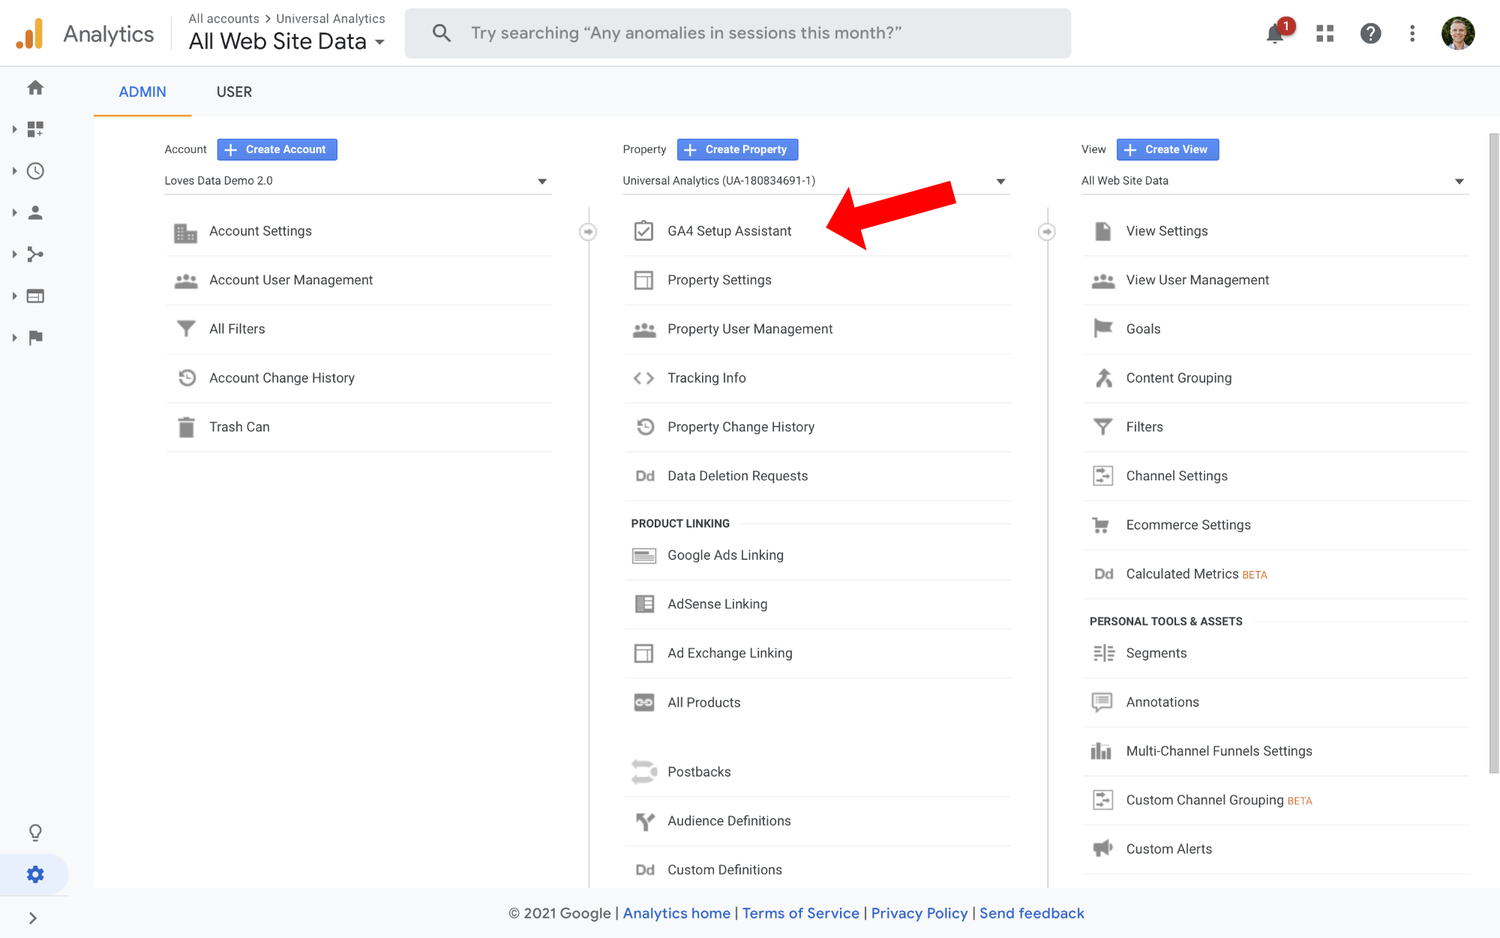
When you are ready to complete the Google Analytics 4 upgrade, head to the admin area and look for the ‘Property’ column. You should see the ‘GA4 Setup Assistant’ at the top of the column. Click on it to launch the upgrade assistant.
You will now have the following two options:
- Create a new GA4 property
- Connect with an existing GA4 property
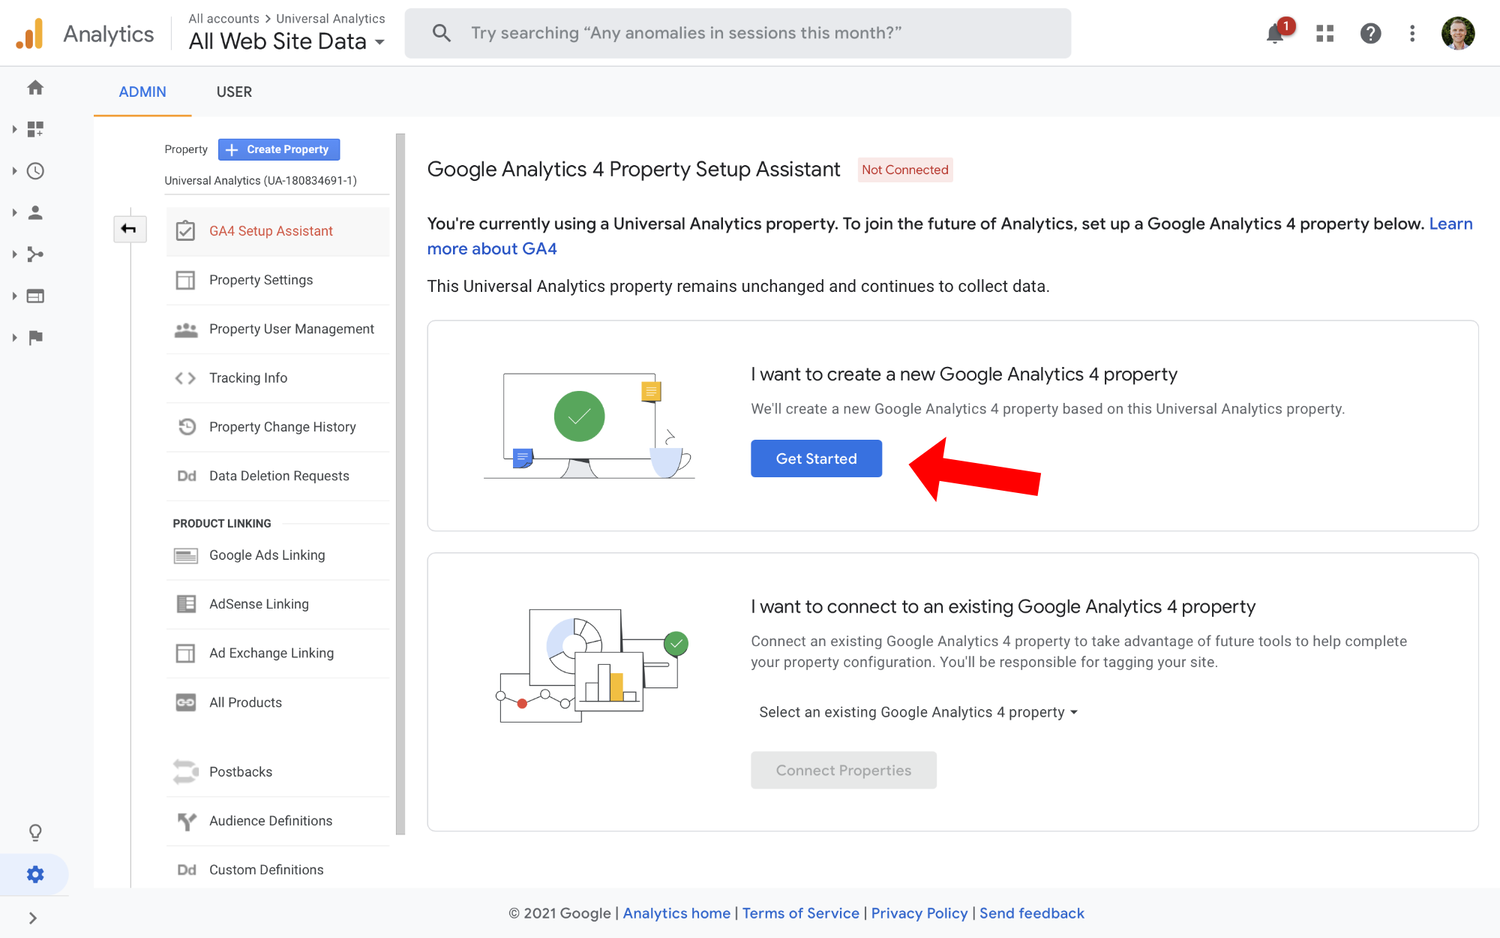
For this tutorial, I’m assuming that you already have a Universal Analytics property, not a GA4 one. So, click ‘Get Started’ under the option to ‘Create a New GA4 Property’.
At this stage, the wizard outlines some important things that you should keep in mind:
- Your new GA4 property won’t have historical data. Because your new property will not have historical data, you will need to keep the Universal Analytics property to view that data.
- It will only copy basic settings. Only the most basic settings will be copied. This means you should not expect it to copy more advanced customizations, such as goals or filters.
- Enhanced Measurement will be enabled. This feature automatically tracks certain actions on your website, including clicking outbound links, watching embedded videos, downloading files, and scrolling. You can learn more about Enhanced Measurement in my dedicated post.
If you use Google Tag Manager, you will see a message telling you that you need to install a new tag:
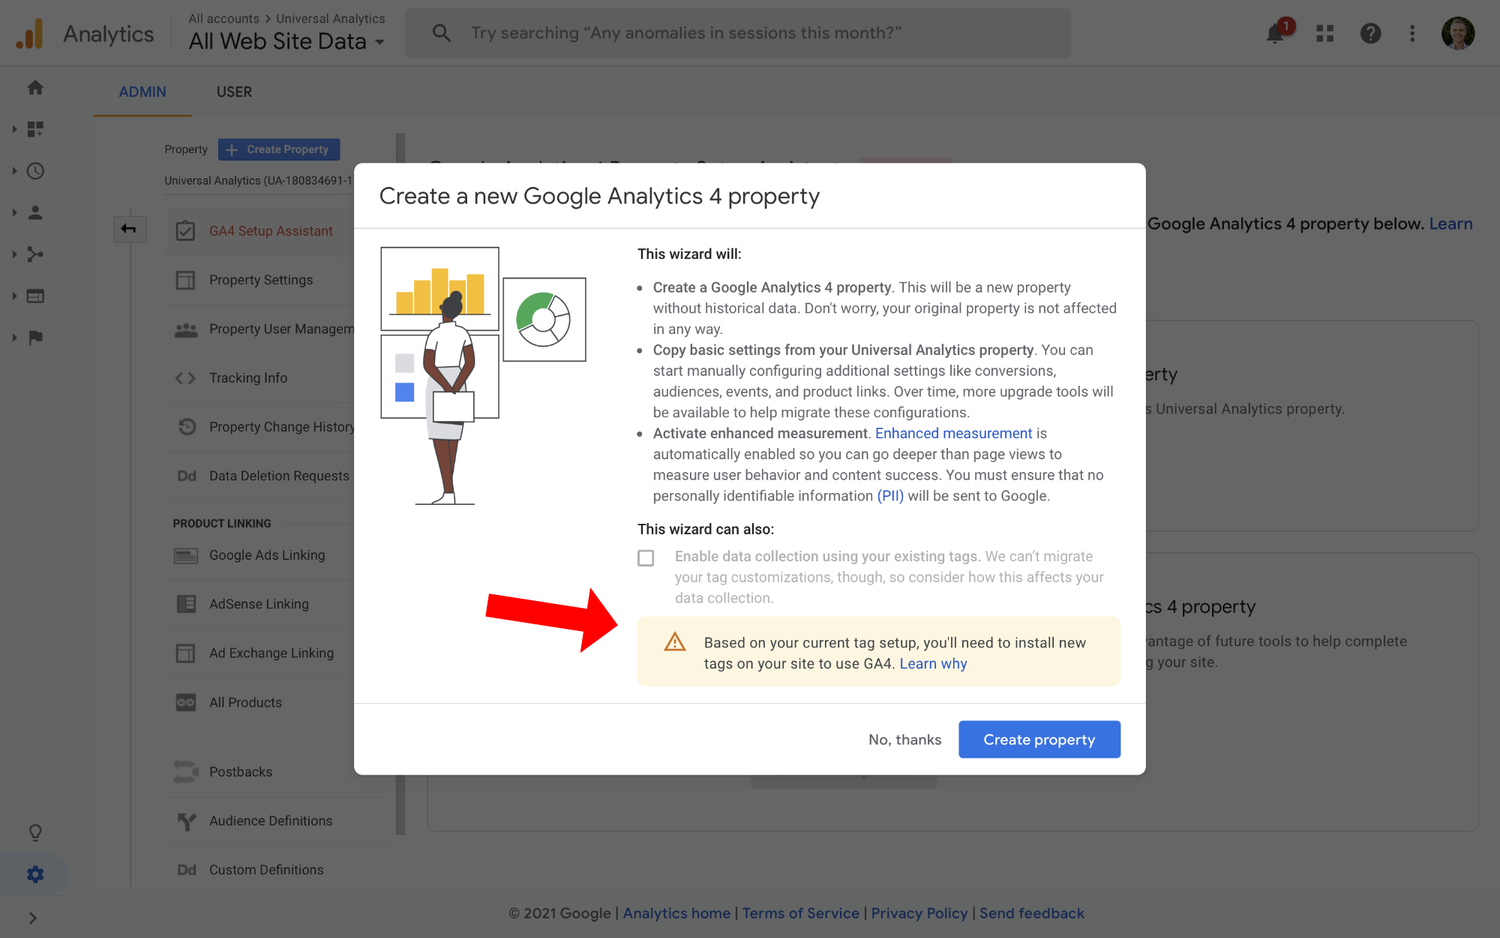
If you’re using the gtag.js version of the tracking code, then you won’t see this message (or need to add a new tag). Instead, you will be able to enable data collection using your existing tag.
Select ‘Create Property’ to continue.
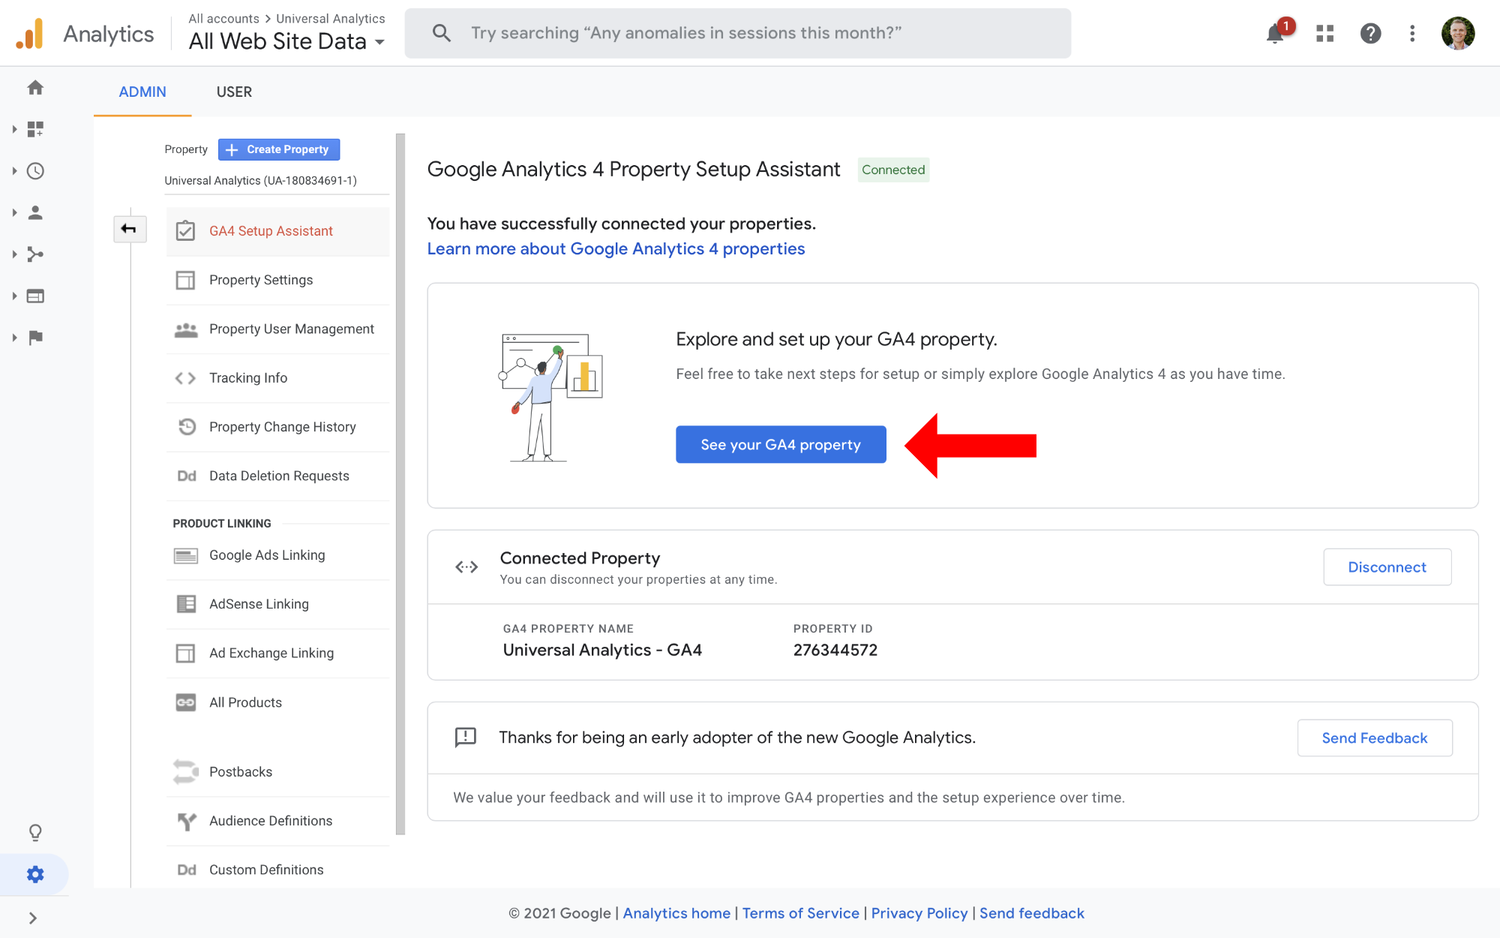
Your new GA4 property has now been created, so it’s time to add the tag to your website.
Adding the GA4 Tag
Click the ‘See Your GA4 Property’ button to view your new property. You can then start adjusting and customizing it.
Start by looking for ‘Tag Installation’ under ‘Collection’.
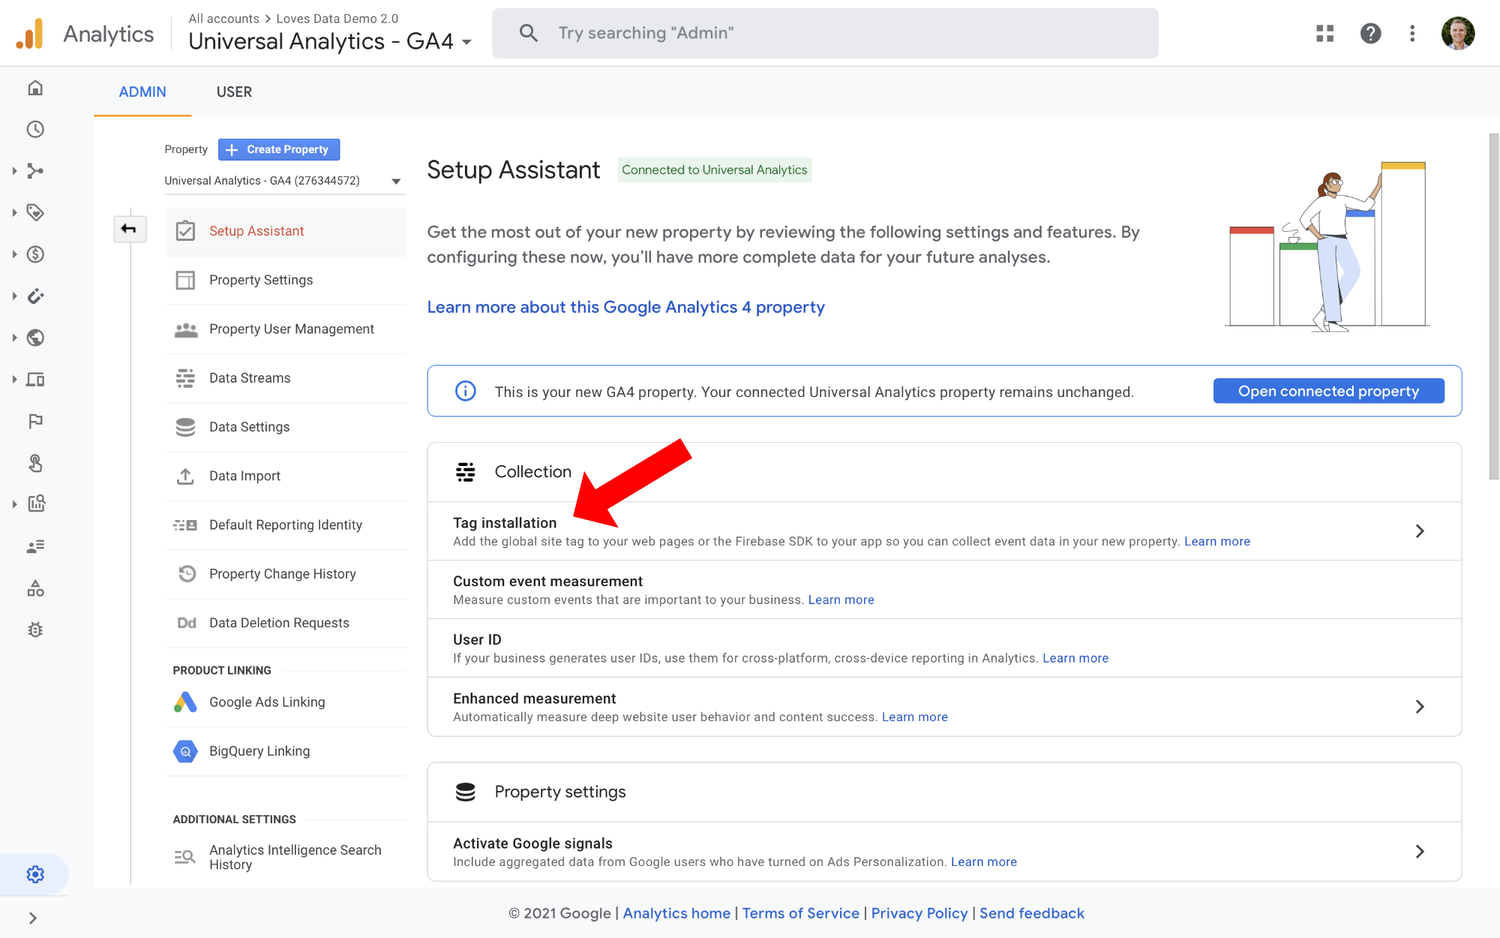
You will now see the data stream that the GA4 Setup Assistant automatically created. You can think of a data stream as the equivalent of the tracking code you are given for each of your Universal Analytics properties.
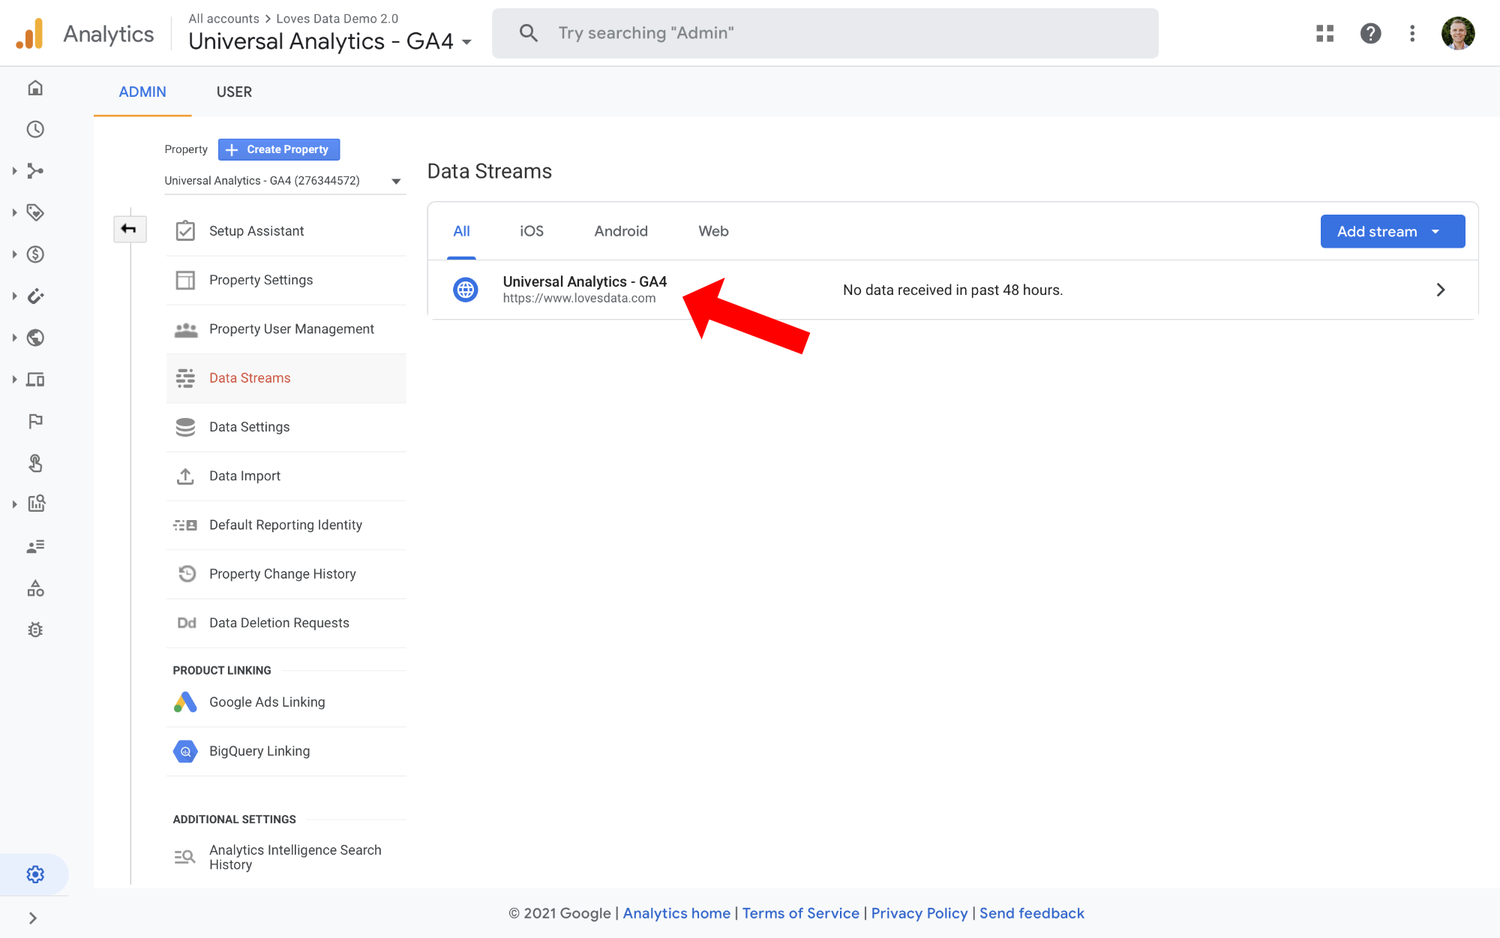
Now you will need to select the data stream. This opens the ‘Web Stream Details’ window. On the top right corner of this window, you will see the Measurement ID, which is the equivalent of the Tracking ID you will find in your Universal Analytics property.
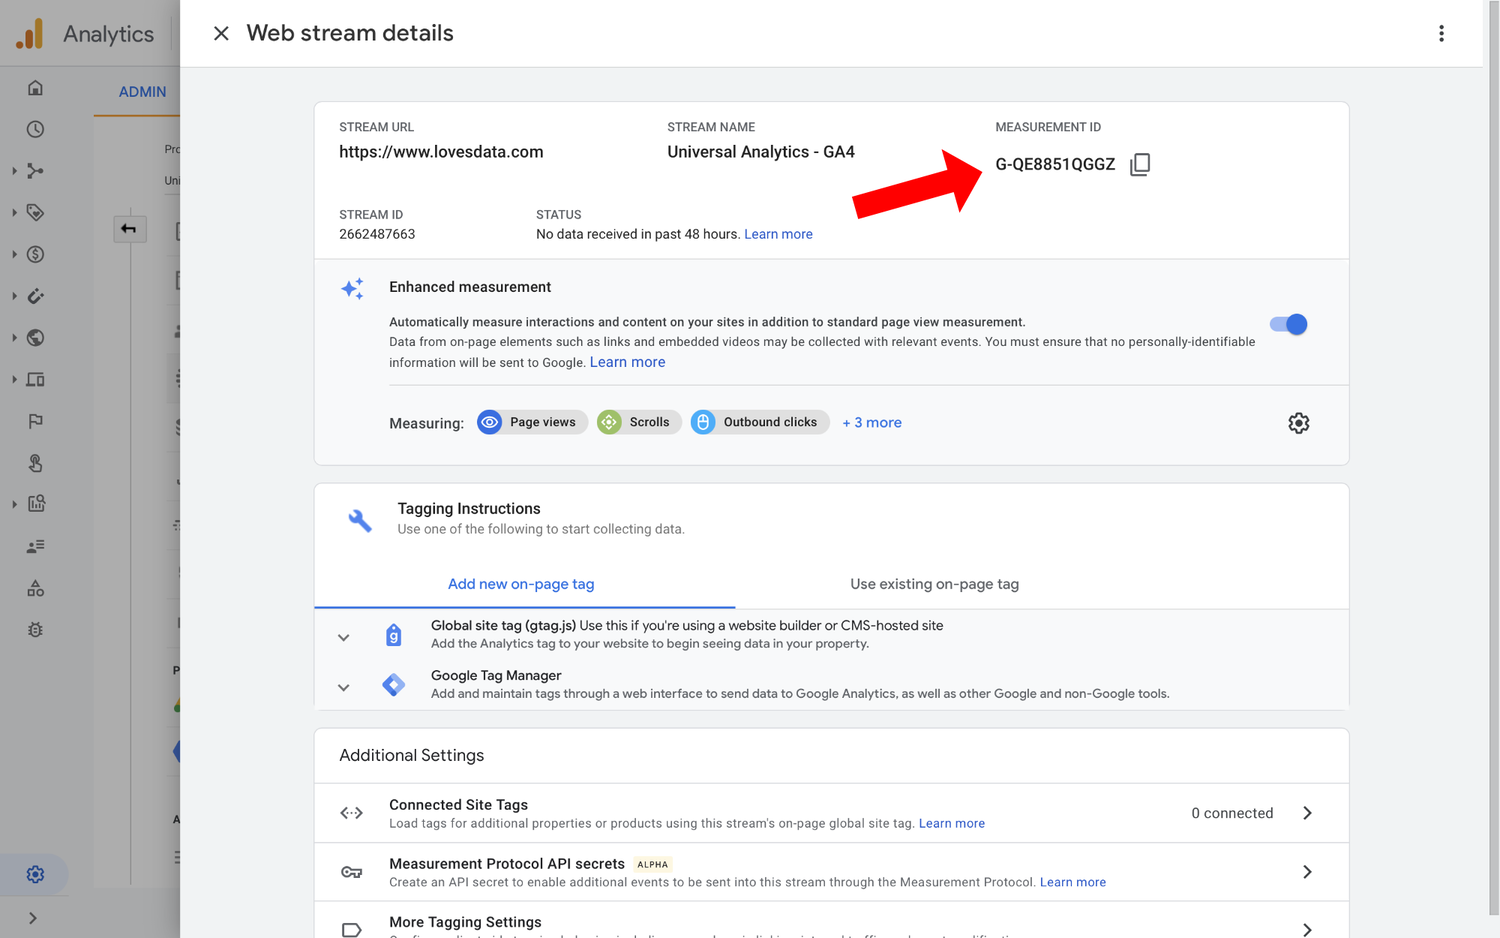
You will need to copy your Measurement ID. For example, the Measurement ID for my GA4 property is G-QE8851QGGZ, but make sure you copy the ID for your data stream.
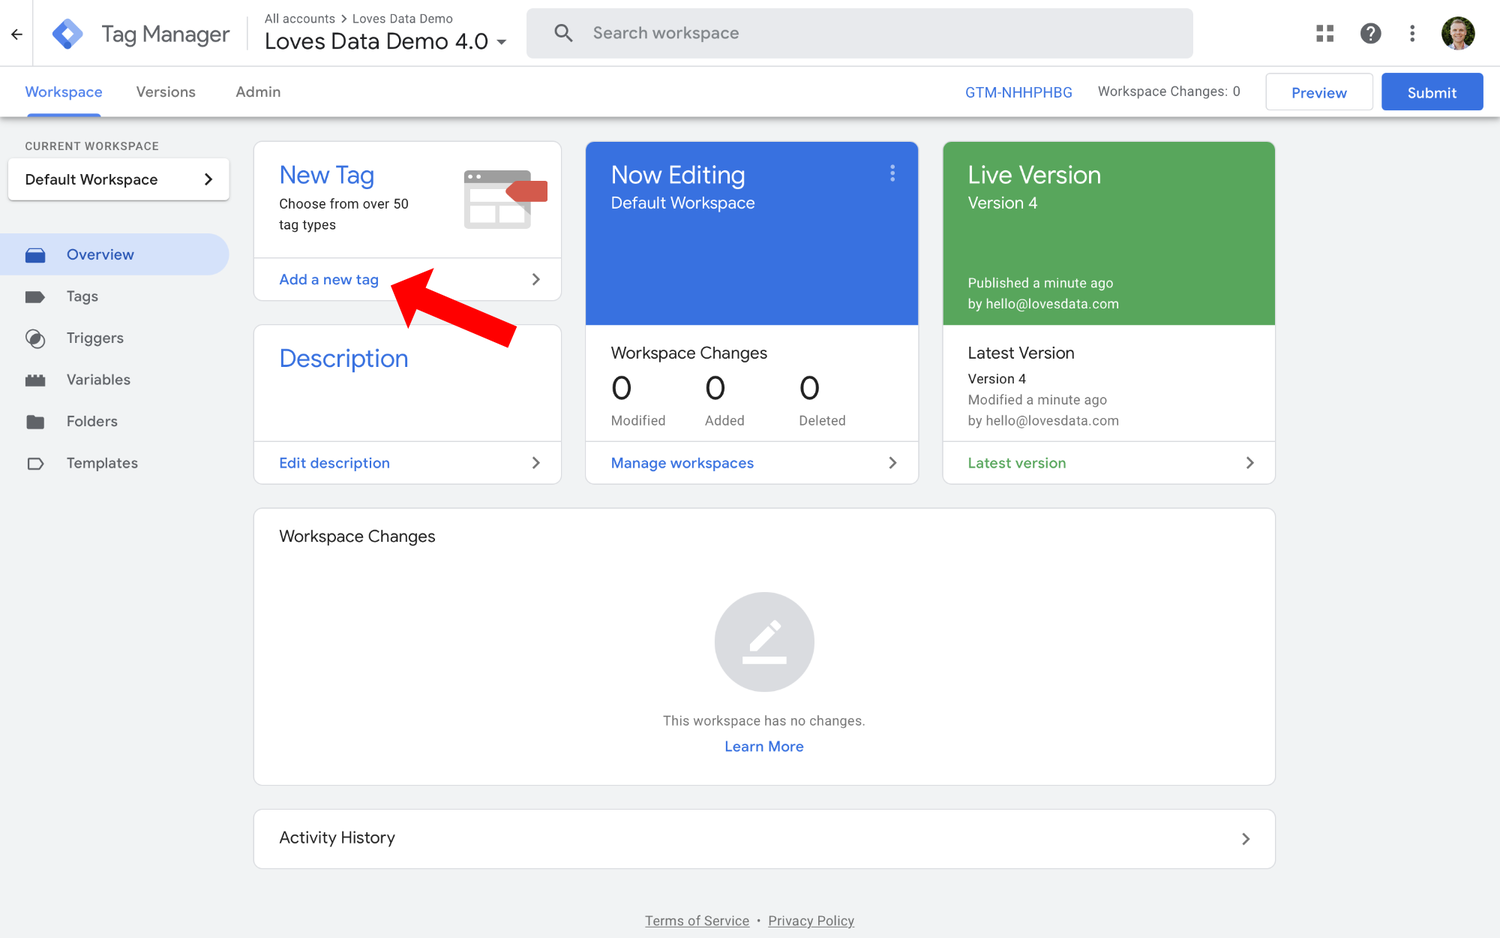
Now it’s time to head to Google Tag Manager and create a new tag for our GA4 property.
Select the option to create a new tag (either on the Overview page as you can see in the image above) or select ‘Tags’ in the menu on the left). You can name the tag anything you like. I like to include “GA4” in the tag’s name to make it quick and easy to identify.
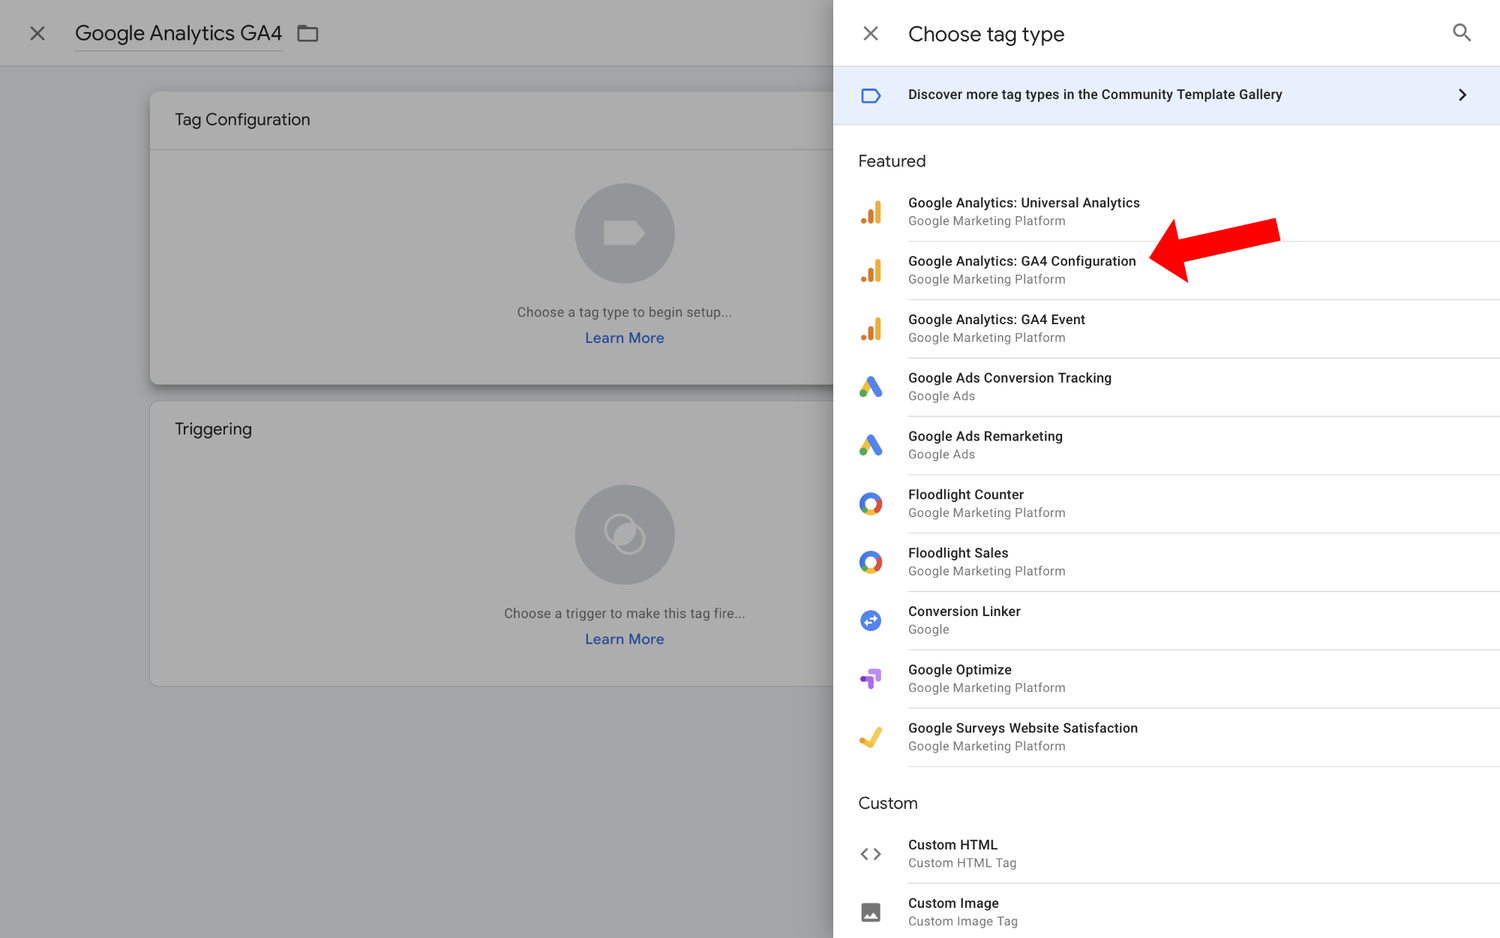
Next, select ‘Tag Configuration’ and choose ‘Google Analytics: GA4 Configuration’ as the tag type.
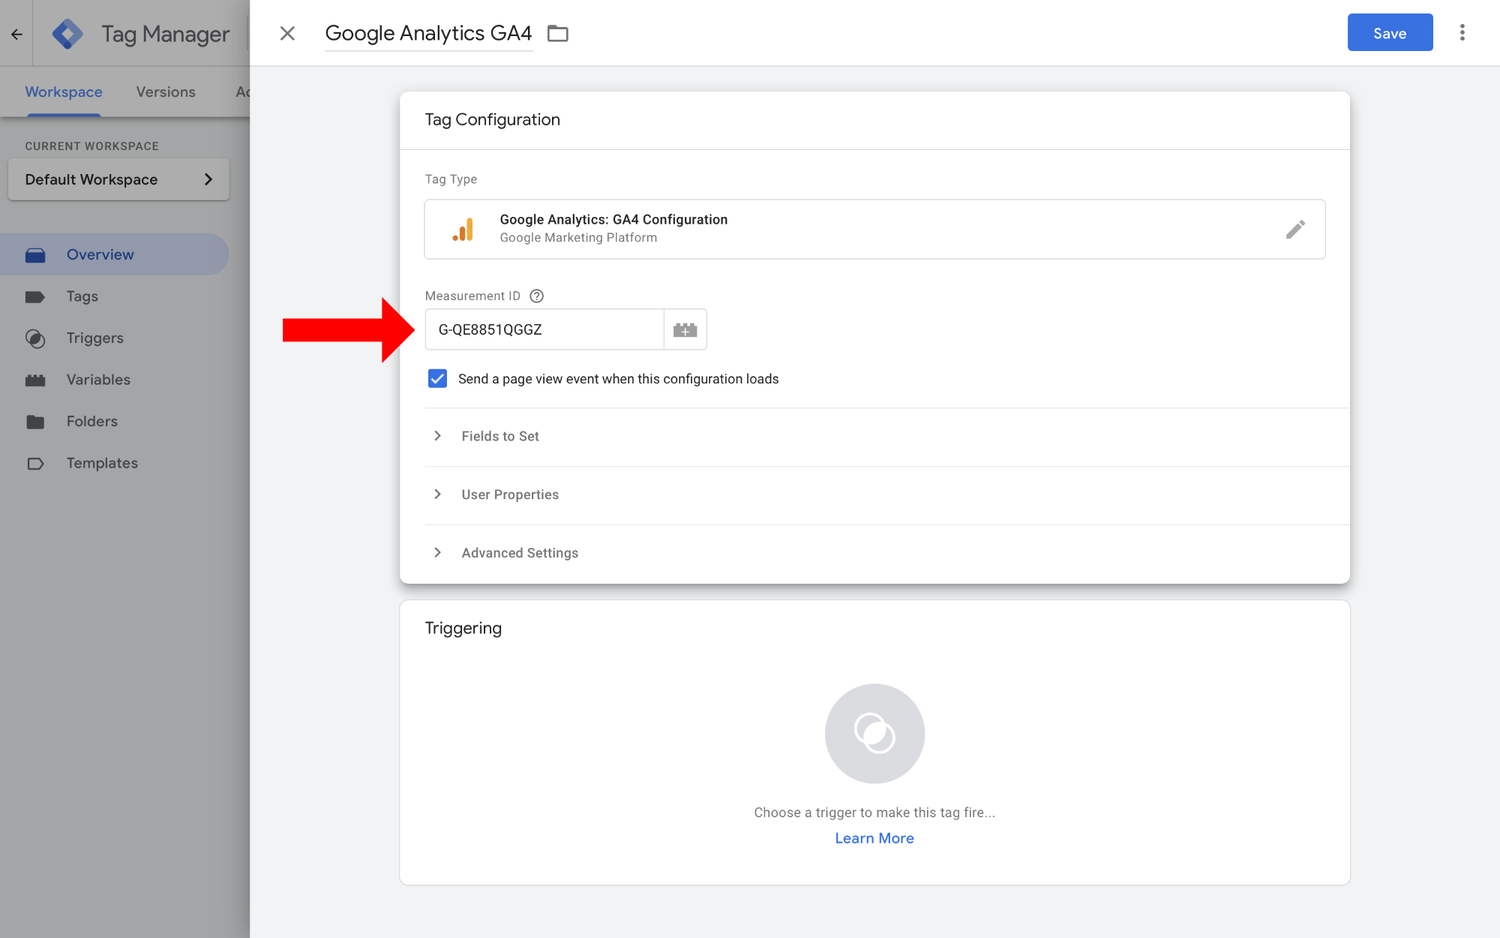
Now you need to paste the Measurement ID you copied from Google Analytics into your new GA4 tag configuration.
Now it’s time to add a trigger (which controls when your GA4 tag will fire). To do this, select ‘Triggering’.
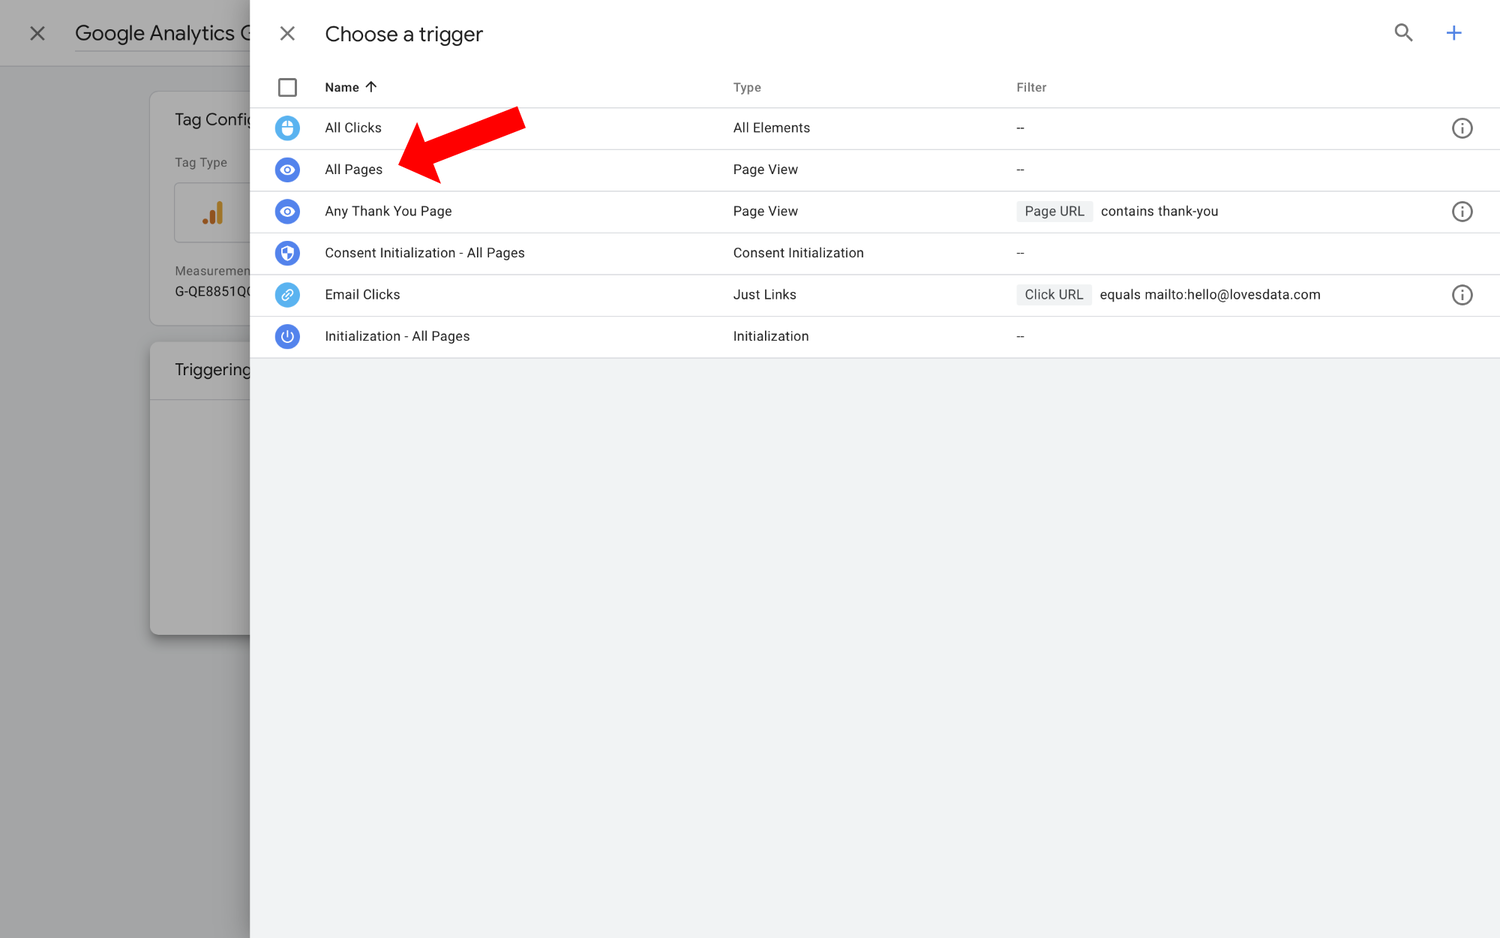
Then select ‘All Pages’ as the trigger. This will add your GA4 tag to every page on your website.
Then click ‘Save’ on the top right corner to save the tag.
Previewing the Tags
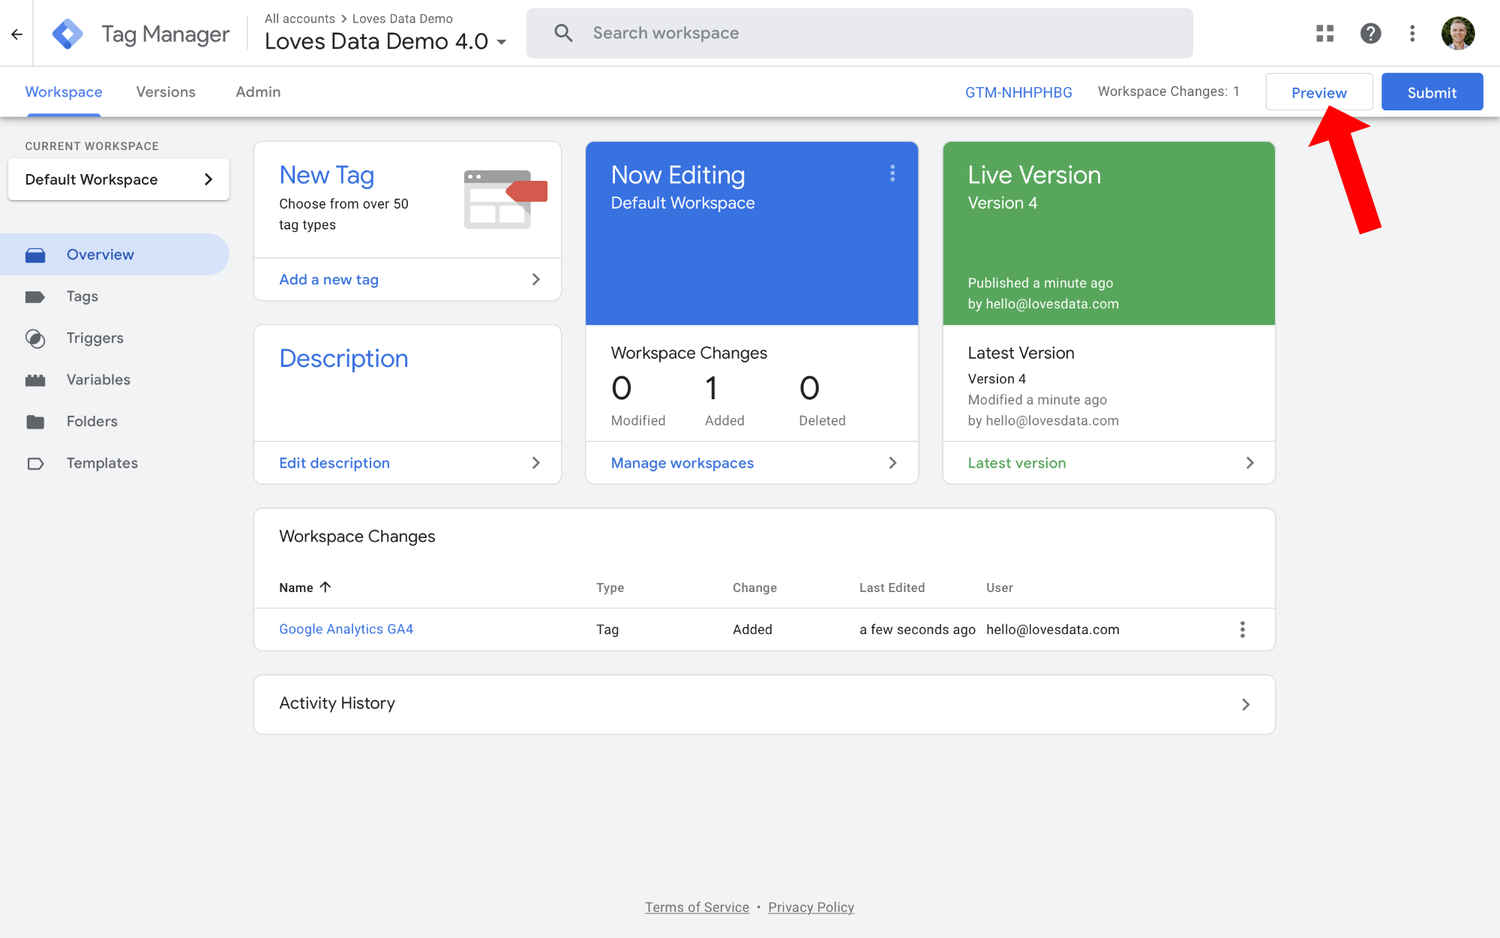
Now it’s time to confirm that your tag fires correctly on your website. To do this, select ‘Preview’ on the top right corner of the window.
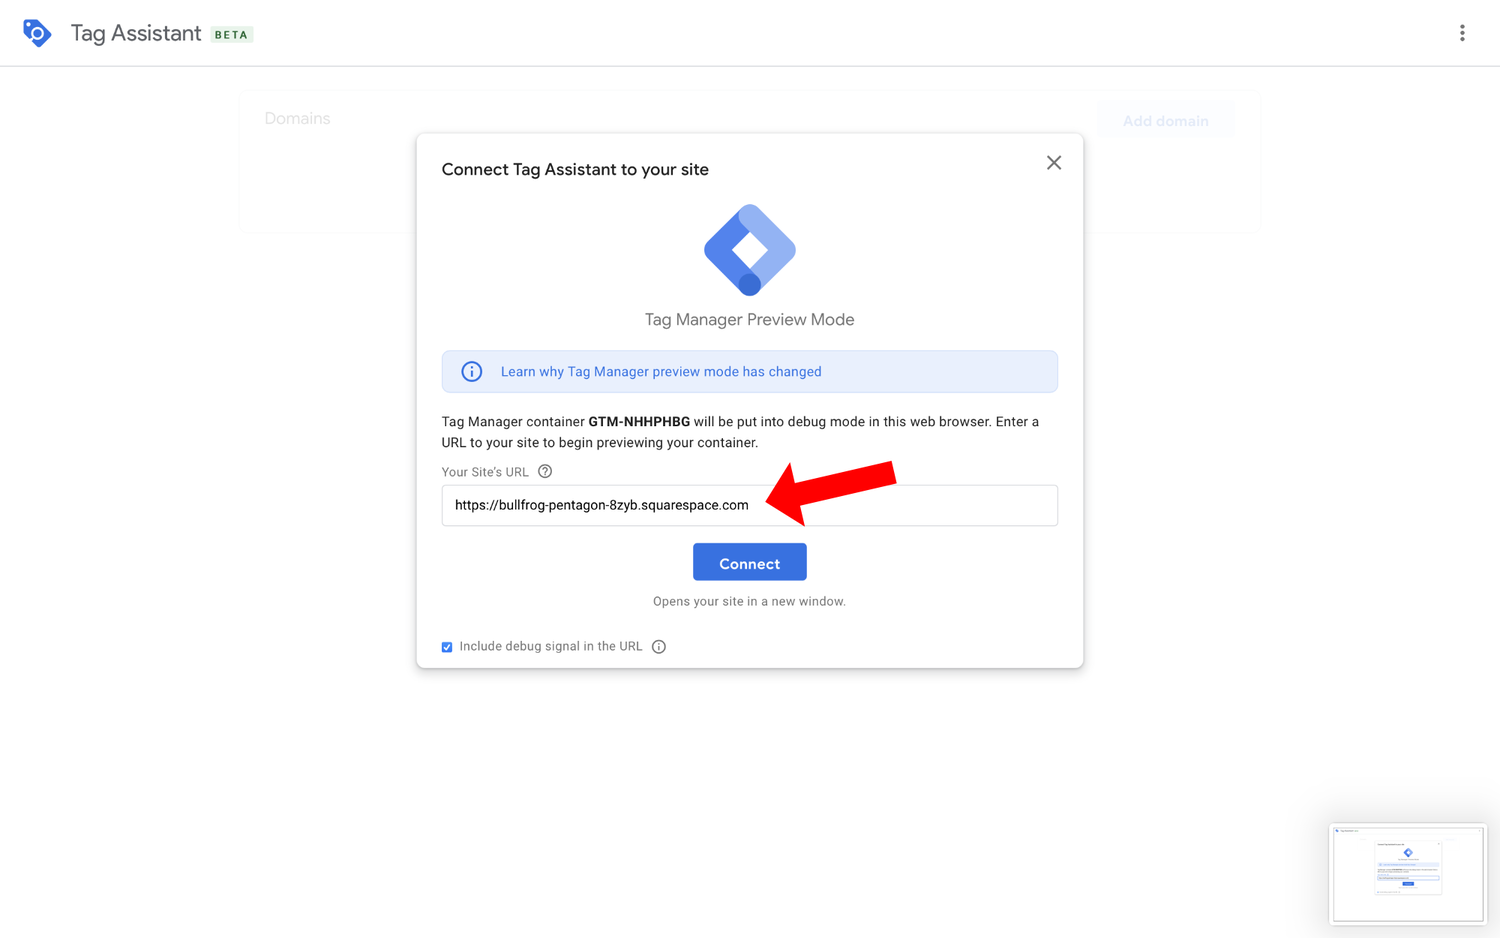
Enter the URL of your website and click ‘Connect’ to preview your website.
You will notice that the preview page has the debug console loaded. Now you can go back and select the ‘Tag Assistant’ tab in your browser.

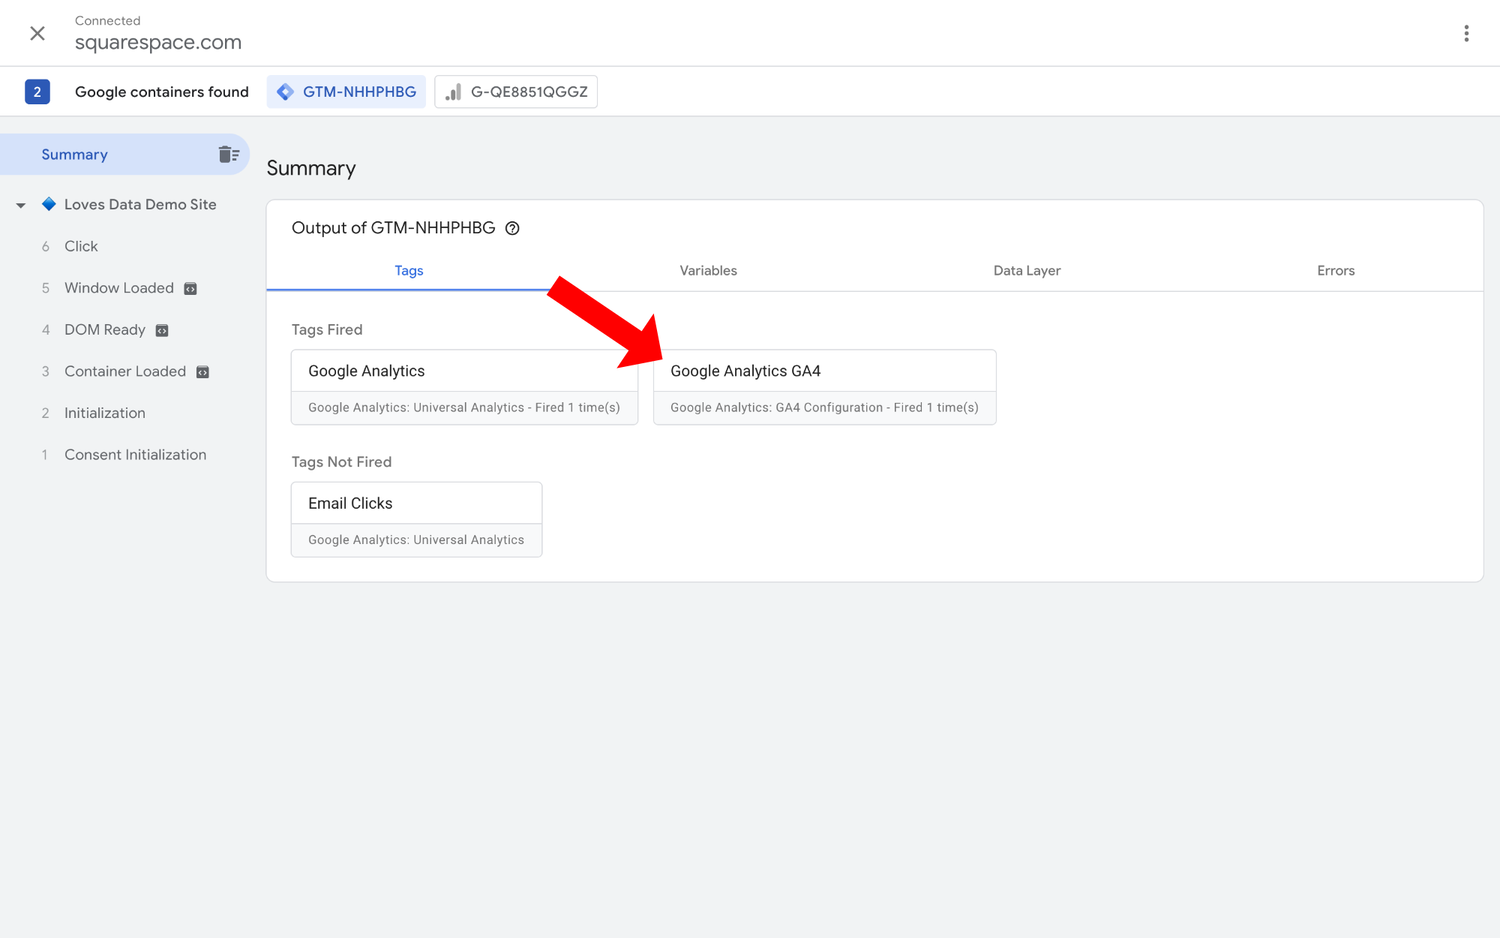
You should see that Tag Assistant has connected to the preview of your website, and you should see all of the tags that have fired.
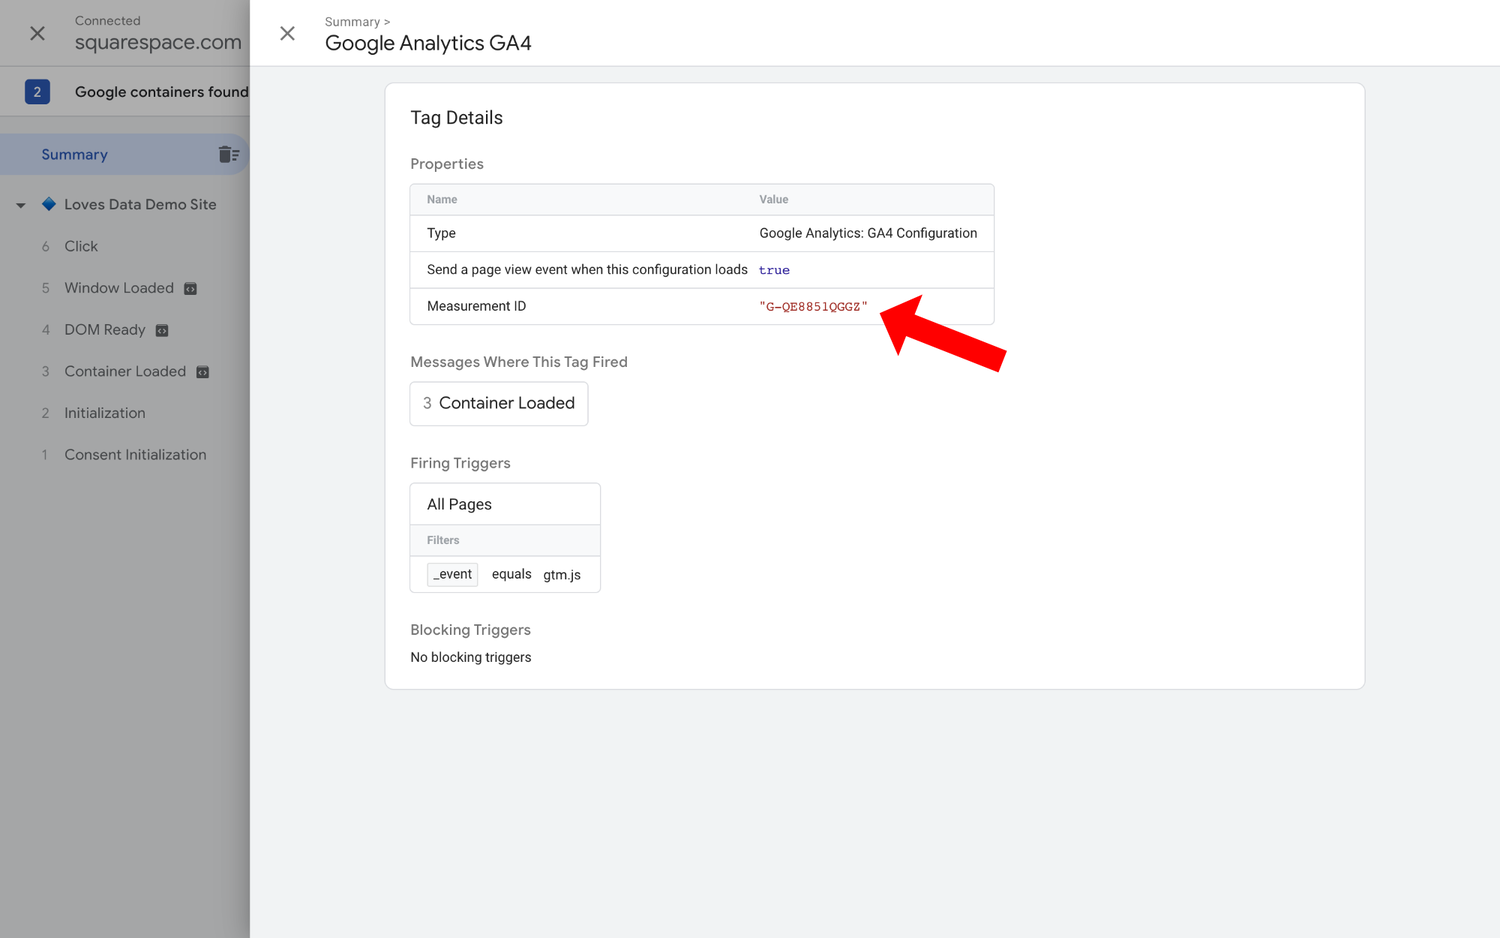
Here we can see that the new GA4 tag has fired along with the existing Universal Analytics tag:
You can click on the GA4 tag to check it. You will notice that the Measurement ID from Google Tag Manager is displayed under ‘Tag Details’. This lets you quickly confirm that the correct ID is being used for the tag.
Publishing the Tags
When you’re happy that your tags are firing correctly, you can head back to Google Tag Manager and publish the changes. To publish your changes, click ‘Submit’ on the top right corner of the window.
You can then name the version of the changes you’re about to publish. For example, you could name the changes ‘Added GA4’ or something similar. Then, click “Publish” in the top right corner.
Your new GA4 tag will now be live on your website.
Returning to Google Analytics
With the GA4 tag live on your website, you can head back to Google Analytics to check that data is flowing into your reports.
Confirm the Flow of Data
To check that the tag you previewed in Tag Assistant sends data to your GA4 property, navigate to the ‘DebugView’.
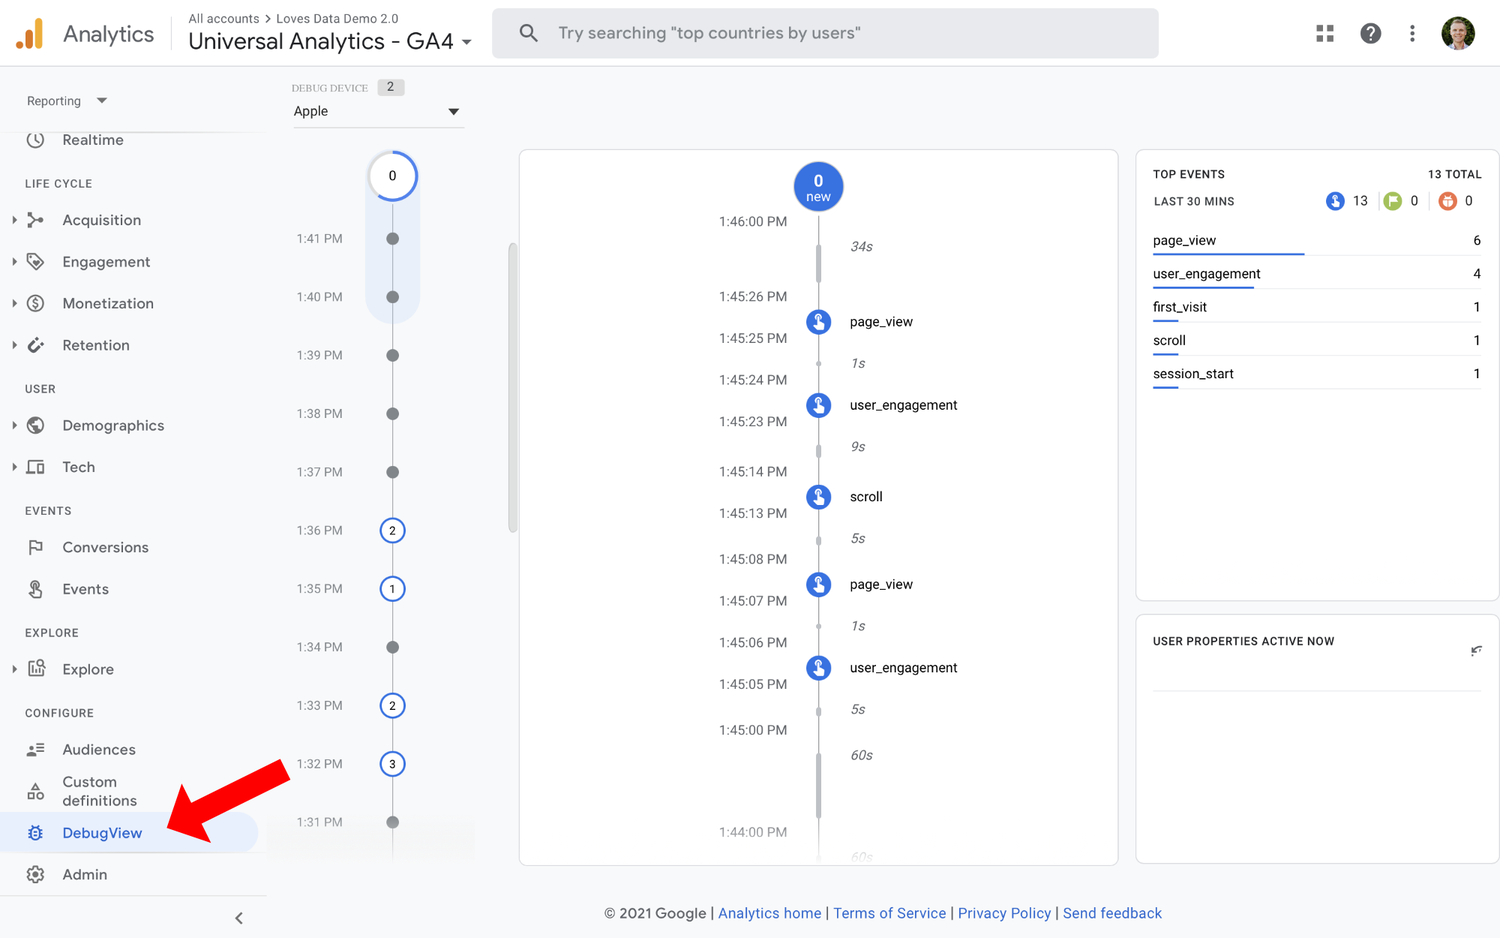
This report connects to Tag Assistant to confirm that data is being received. It also lets you view all of the events sent to Google Analytics as you preview your website. This includes pageview events, scroll events, and other events automatically send to GA4.
Final Steps in Admin
You are almost done with the basics of your Google Analytics 4 upgrade.
Go back to the Admin area and head to your Setup Assistant. You will find it as the first item listed in the Property column.
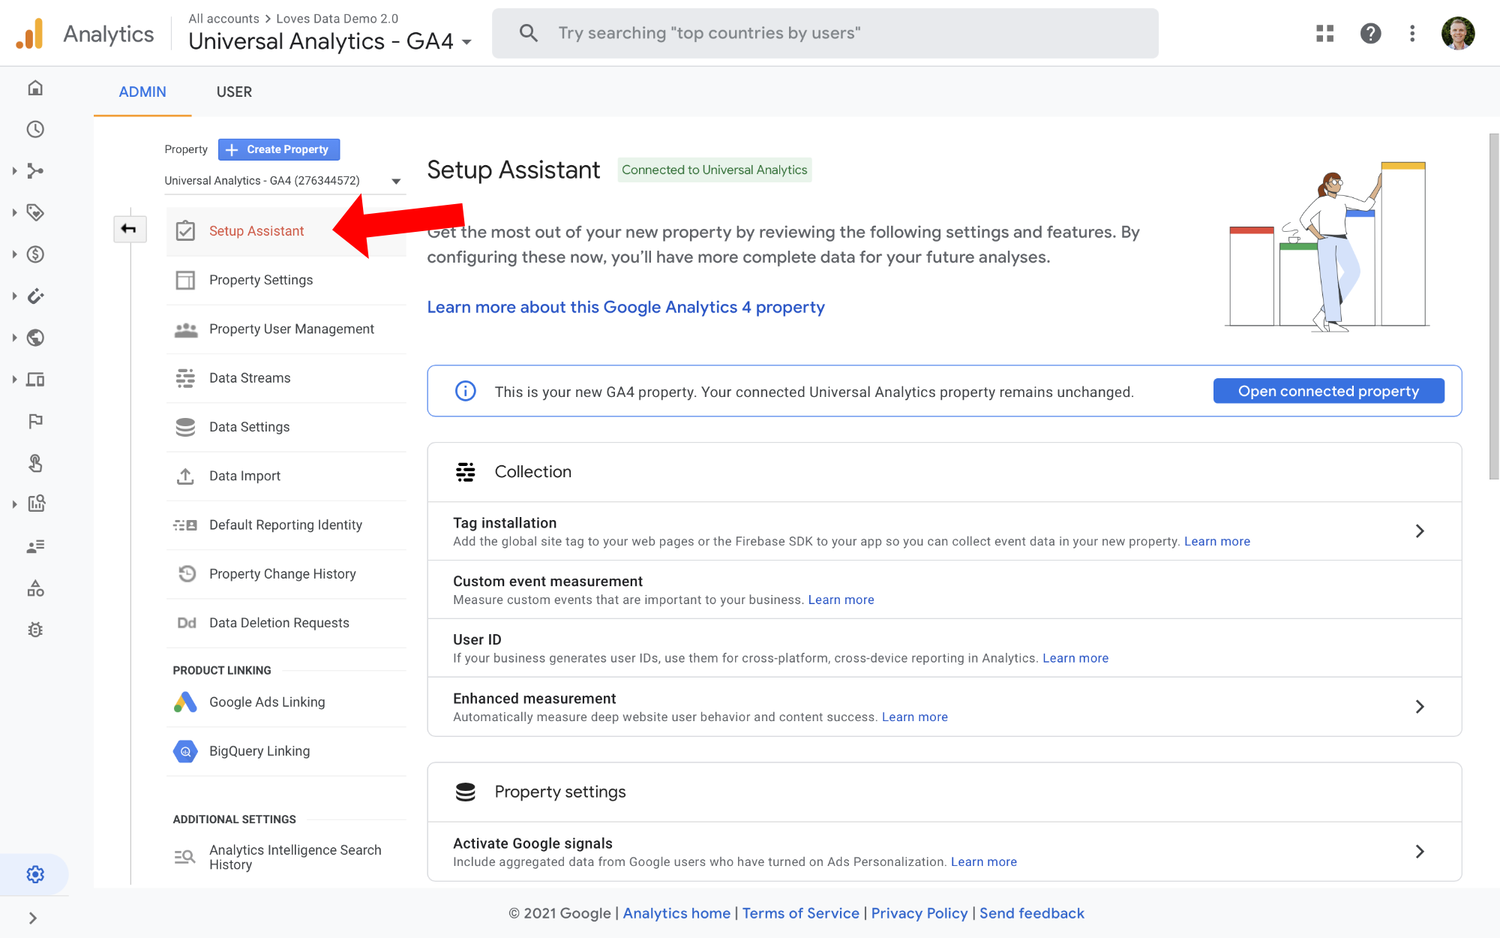
Here, you will see more options to configure your new GA4 property.
Some of the additional settings you can find include:
- Enhanced measurement settings to control automatic events
- Activating Google signals for additional insights and advertising features
- Connecting your Google Ads account
- Links to the audience and conversion reports
Remember, there is no rush to complete all of the steps to upgrade to Google Analytics 4. Your Universal Analytics properties will still be there and will continue collecting data and reporting on your website. This removes some of the stress from the update process.
Final Thoughts
Now, your Google Analytics 4 upgrade is complete. You will be able to use it in addition to your Universal Analytics property. Remember that the Universal Analytics property will show you all of your historical data, while the GA4 property will only show new data, starting whenever you upgraded. In other words, please don’t delete your Universal Analytics property.
Hopefully, this overview of upgrading to Google Analytics 4 made the process a little less intimidating. Upgrading to the latest version of Google Analytics unlocks a number of benefits, including new reports and streamlined data collection. So I suggest upgrading to take advantage of these additional features.
Here are some extra resources to help you get started with your new Google Analytics 4 property:
- Guide to event tracking in Google Analytics 4
- How to track conversions in Google Analytics 4
- My GA4 Mini-Course (paid)
And here is my Google Analytics 4 playlist on YouTube (it’s full of great tutorials):
Step-by-Step Video Walkthrough
Would you prefer to watch a walkthrough of the steps to upgrade to Google Analytics 4? Here’s my tutorial on YouTube:


Comments