How to track PayPal in Google Analytics 4 (GA4)
Loves Data
How do I connect PayPal to Google Analytics?
In most cases, the best way to track PayPal into Google Analytics 4 (GA4) is to configure your ecommerce platform to pass transaction details to Google Analytics after a purchase occurs. This allows you to capture all of the details once someone successfully completes a transaction.
If this isn’t possible, then you could consider tracking the outbound click to PayPal as a purchase, however, this will lead to inflated ecommerce metrics because not everybody will complete a transaction once they’re clicked through to PayPal.
Another option it to pass purchase details directly from PayPal to Google Analytics, which is what we’re going to explore in this article. They way we will achieve this is by sending details about the individual user (using their Client ID) to PayPal and then sending confirmed sales to Google Analytics. This allows us to see transactions, along with their acquisition channels and other behavior inside our reports.
Why can’t we just install Google Analytics on PayPal?
Wouldn’t that be great! Unfortunately, this isn’t an option. We can’t simply copy and paste the Google Analytics tracking code into our PayPal account.
So what can we do?
We need to find a way to get PayPal to talk to Google Analytics. We need PayPal to tell us when people purchase and the total value of the transaction, once we have these details we then need to tie this to the appropriate session and user inside our reports.
Today, we will use PayPal’s Instant Payment Notification (or IPN) which we can use to automatically send details about each transaction to other systems and platforms. And we’re going to use Zapier to get PayPal talking to Google Analytics.
Here’s an overview of how we’ll track PayPal into Google Analytics:
Someone comes to our website, then they decide to purchase, so they click on the PayPal button. When this happens we’ll use some custom code to grab some details from the Google Analytics cookie and send it as a hidden field to PayPal.
Important: we’re going to use the PayPal Buy Now button to integrate with Google Analytics. PayPal is focusing on their checkout solution (which includes additional fees), so while the Buy Button is now deprecated, this solution still works. You could also look to apply the techniques we cover in this article to other PayPal payment solutions.
When the person has successfully completed payment on PayPal we’ll use the PayPal IPN to send their transaction details to Zapier along with the details from the cookie.
Zapier will receive all of the information from PayPal and format this into a valid hit. We’ll be using the Google Analytics Measurement Protocol. Since this hit will include details from the person’s original session on our website it means we can view their original acquisition channel and previous behavior. This allows us to understand the performance of our website and marketing campaigns against revenue coming from PayPal.
So that’s how we track PayPal transactions into Google Analytics. Now it’s time to walk through how we configure this using PayPal, Zapier and Google Tag Manager.
Steps for tracking PayPal with Google Analytics:
- Get ready
- Create a Zap in Zapier
- Add the webhook to PayPal
- Add a custom filter to the Zap
- Configure the Zap to send data
- Configure Google Tag Manager
- Complete a test transaction
- Go live
And the great news is that if you’re already using Google Tag Manager, then the only code you’ll need to change is the PayPal button on your website.
And here’s a preview of the solution:
Let’s jump in!
Step 1: Get ready
I recommend creating a test property inside Google Analytics. This will allow you to set everything up, test it out and make sure it’s working before applying the solution to your live website and primary Google Analytics reports.
Steps to create a demo property
- Head to the admin section of Google Analytics.
- Click ‘Create’ on the top right corner and select ‘Account’.
- Follow the steps to create a new account and property. I suggesting naming the new account ‘Testing’ or something similar. You can enter ‘www.example.com’ as the URL (this won’t impact data being collected), select the other settings, and create a data stream.
Get Your measuremenT ID
Once you’ve created your testing property, you will need to get the measurement ID for the data stream you created. You can find this in the admin area by selecting ‘Data Streams’ under ‘Data Collection and Modification’.
Testing With PayPal
I suggest creating a single HTML page for testing the PayPal tracking solution. (I have my own website I use for this. I just upload the file to a hidden folder and I can play with the code until I get things working.)
I recommend using the PayPal Sandbox for testing transactions. This will allow you to complete transactions without having to make actual payments. I find PayPal’s Sandbox confusing, so these are the steps you need to follow:
- Login to PayPal Developer using your actual PayPal account (so the one you use to actually make and/or accept payments).
- Navigate to Sandbox Accounts. This is where you will find special email addresses you can use for testing. Look for the one that says it’s a ‘Business’ account and click the email address. You will now need to copy the email address and password (if you don’t remember the password, then change it and make a note of the new password you’ve created).
- Open a new browser tab navigate to the PayPal Sandbox. Now you can login using the details you’ve copied from step two above.
The PayPal Sandbox is where you can set everything up for testing without impacting your actual PayPal account.
You’ll also need a Zapier account. Plans start at $19.99 USD per month, but you can start with their free trial to test things out. I know paying for yet another subscription might not sound appealing, but Zapier is very useful.
Step 2: Create a Zap in Zapier
Start by creating a new Zap for PayPal for a successful sale.
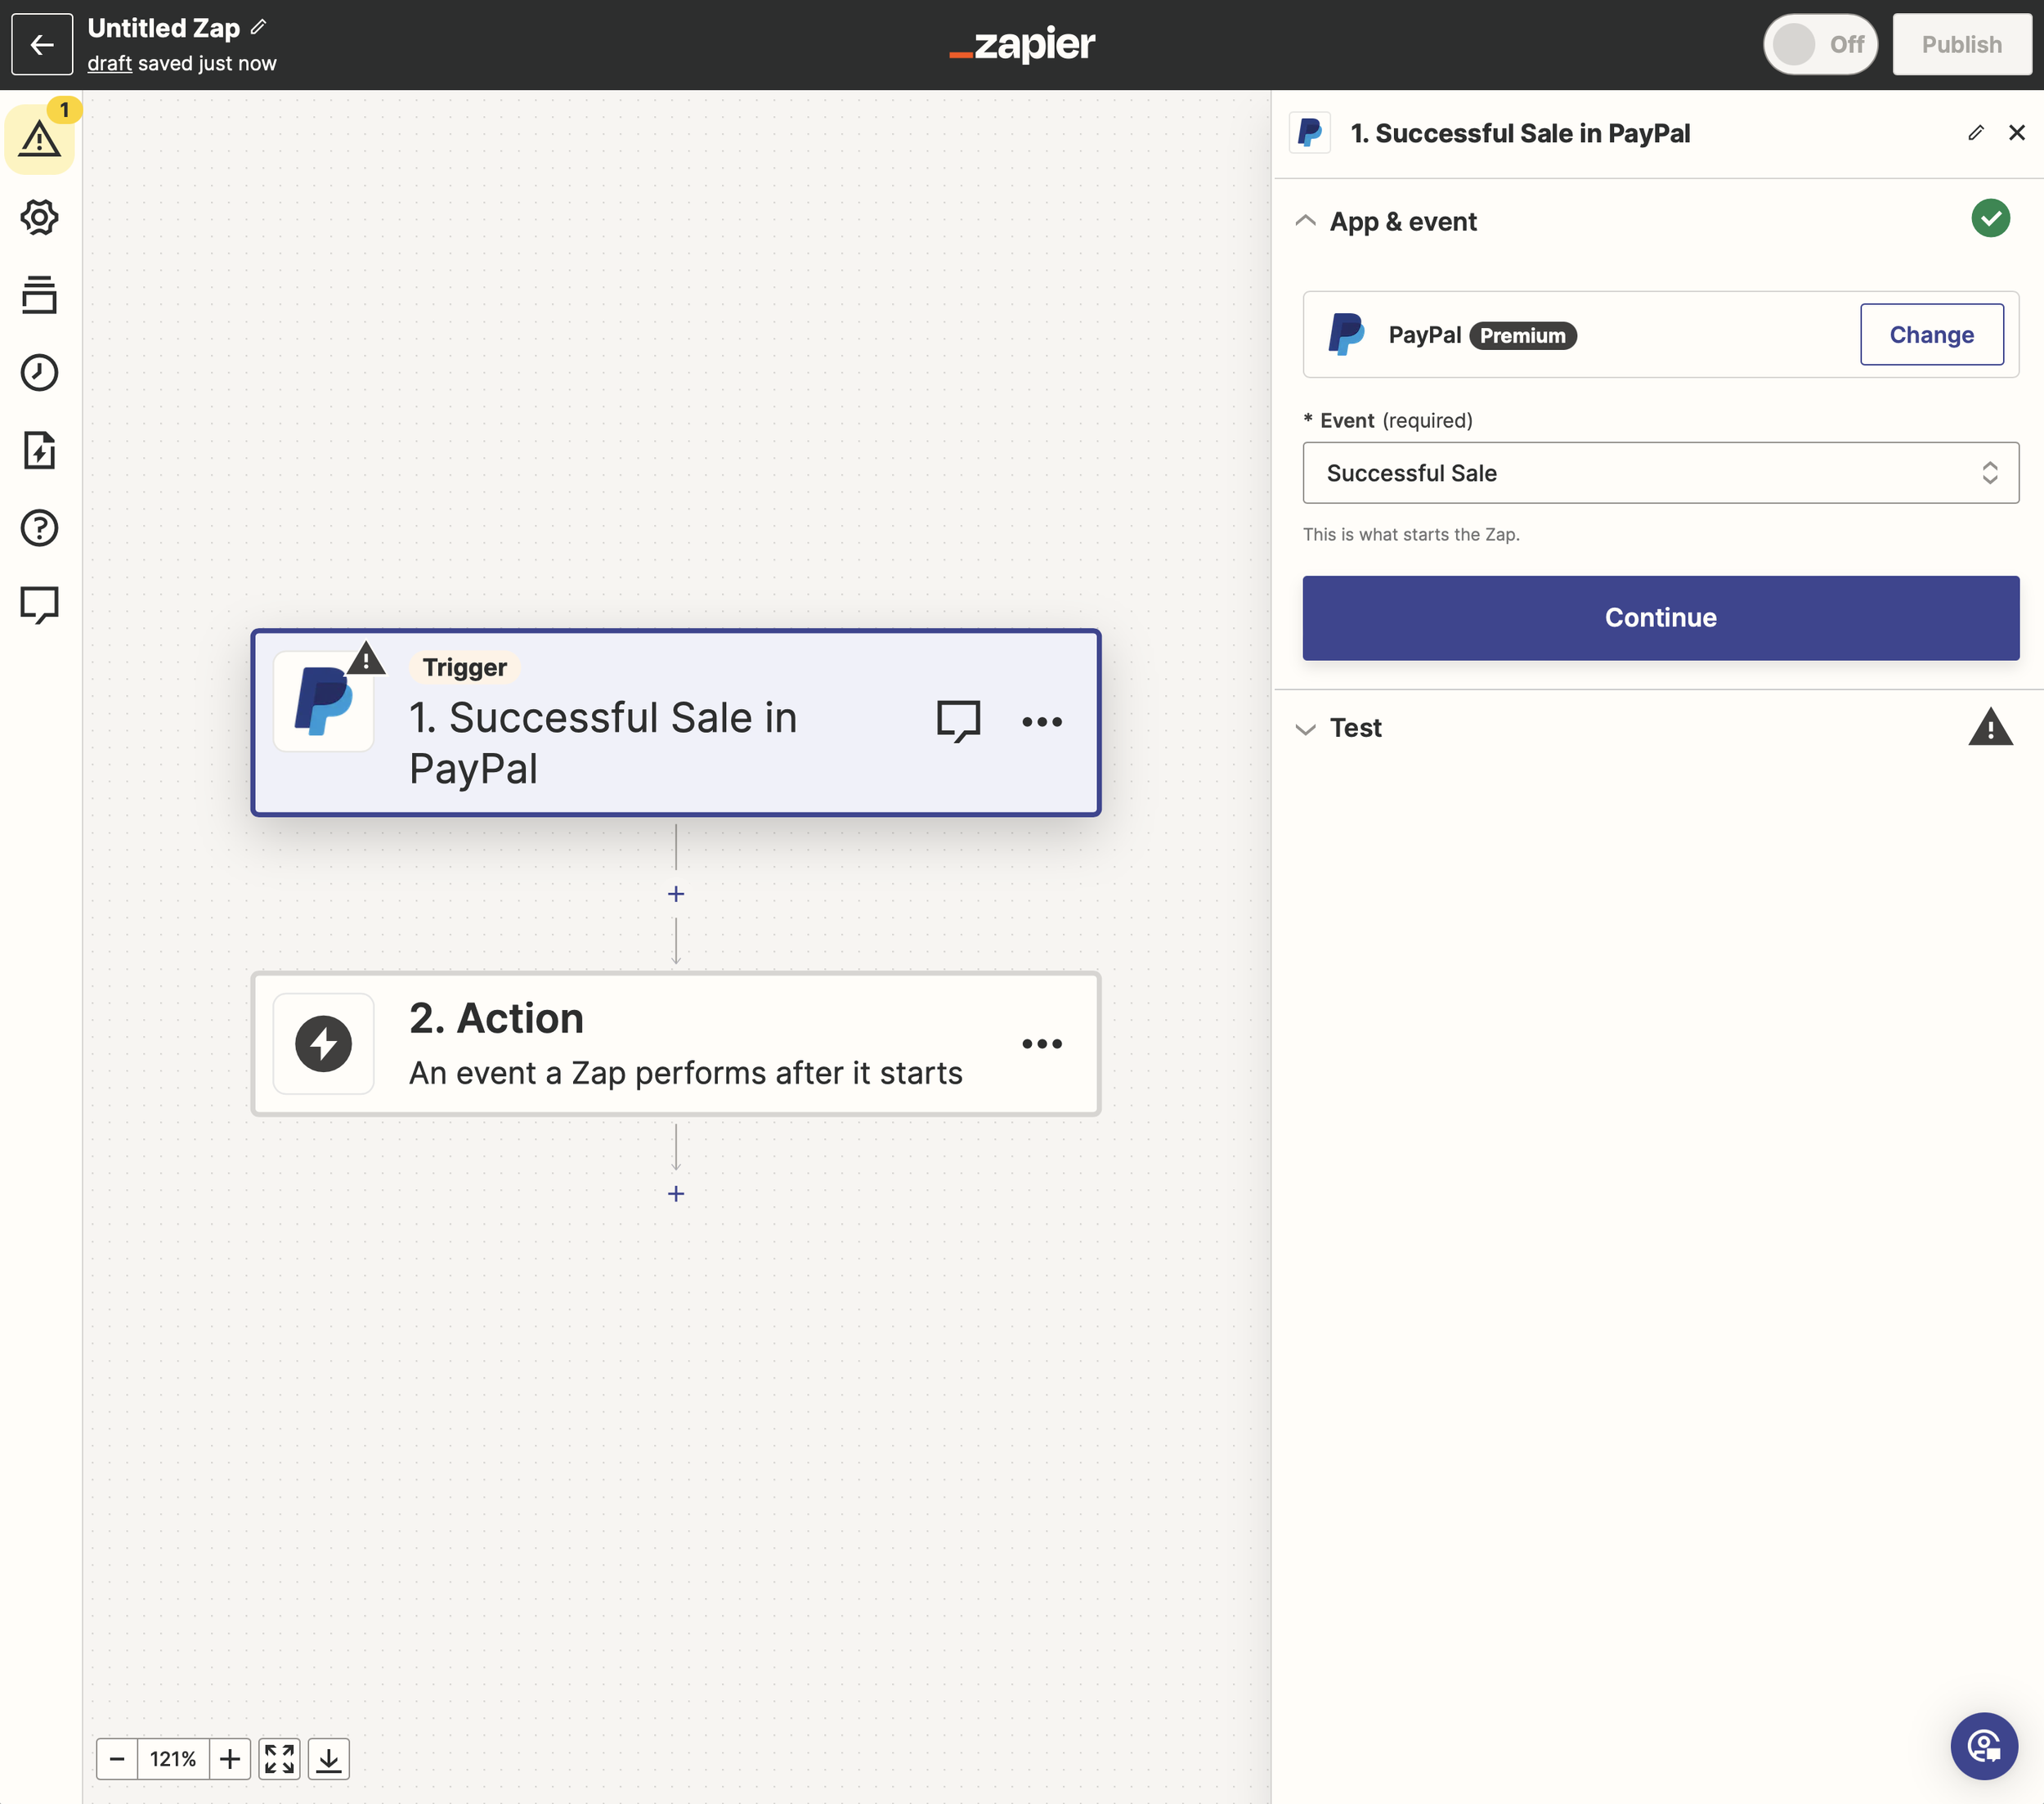
You’ll be now be given a webhook URL that we’ll need to copy and use in PayPal when we configure our IPN.
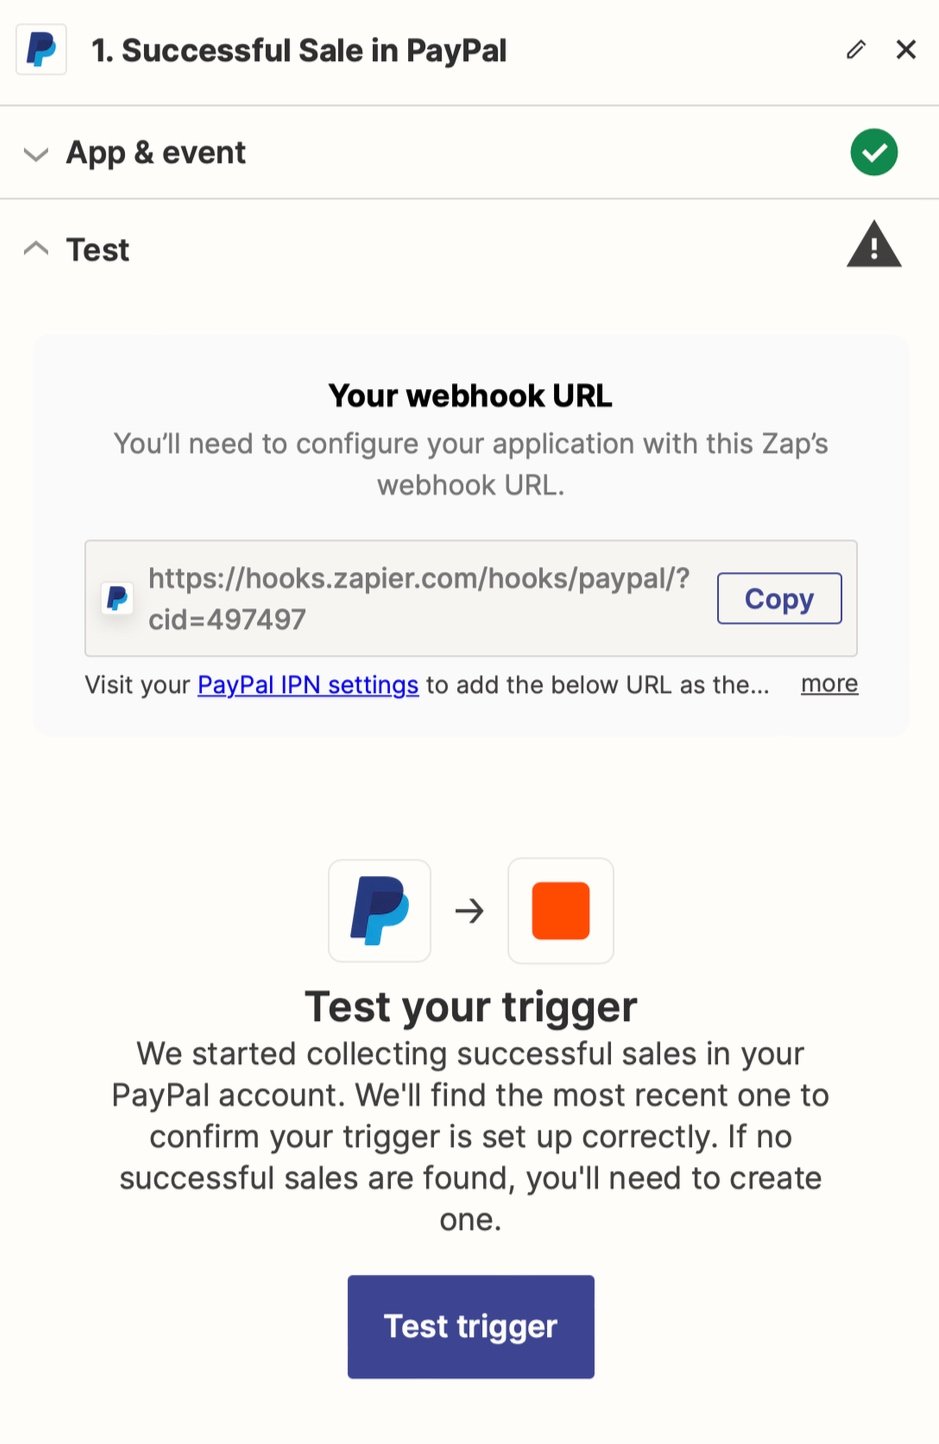
Next we need to head to the PayPal Sandbox and use the IPN Simulator. You will need to log into your account to use it. It’s also worth mentioning that PayPal is transitioning from IPN to webhooks, however, Zapier is still using the IPN at this stage.
We can now send test details through to Zapier.
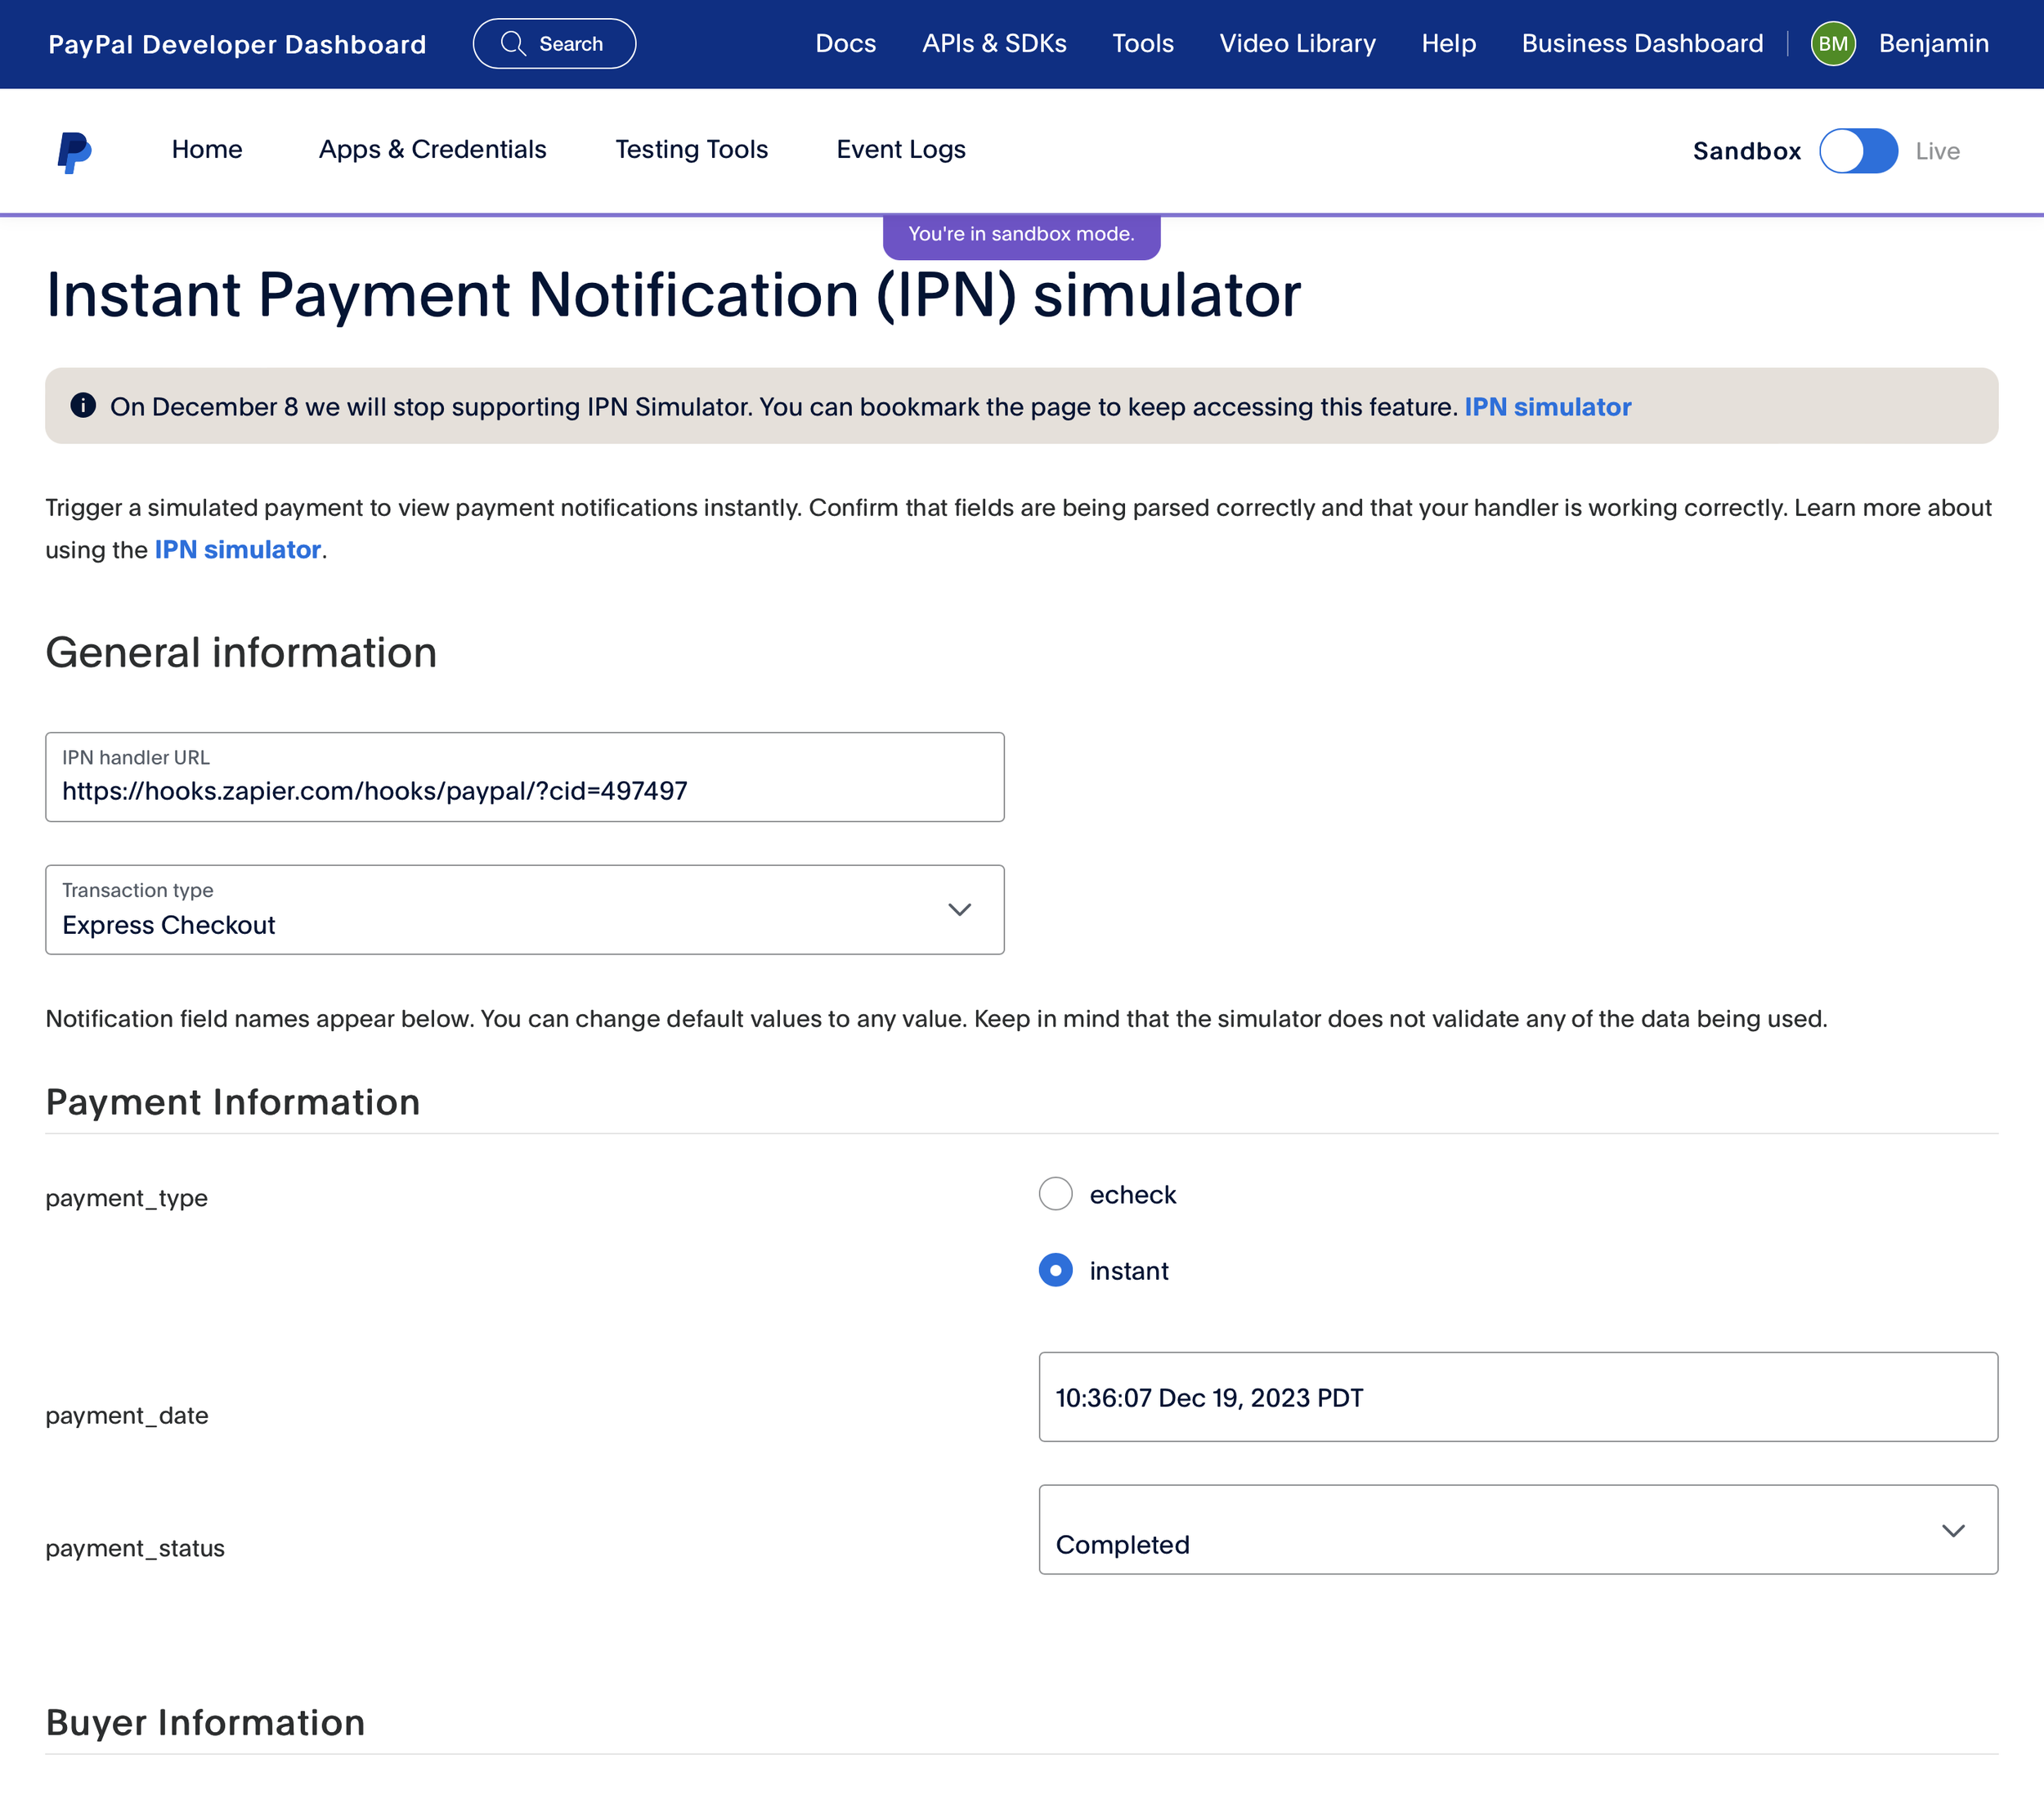
You’ll need to enter the webhook URL we just copied into the ‘IPN Handler URL’, select ‘Express Checkout’ as the ‘Transaction Type’ and then scroll to the very bottom of the page and click ‘Send IPN’.
We’ll finish setting up our Zap in a moment.
Step 3: Add the webhook to PayPal
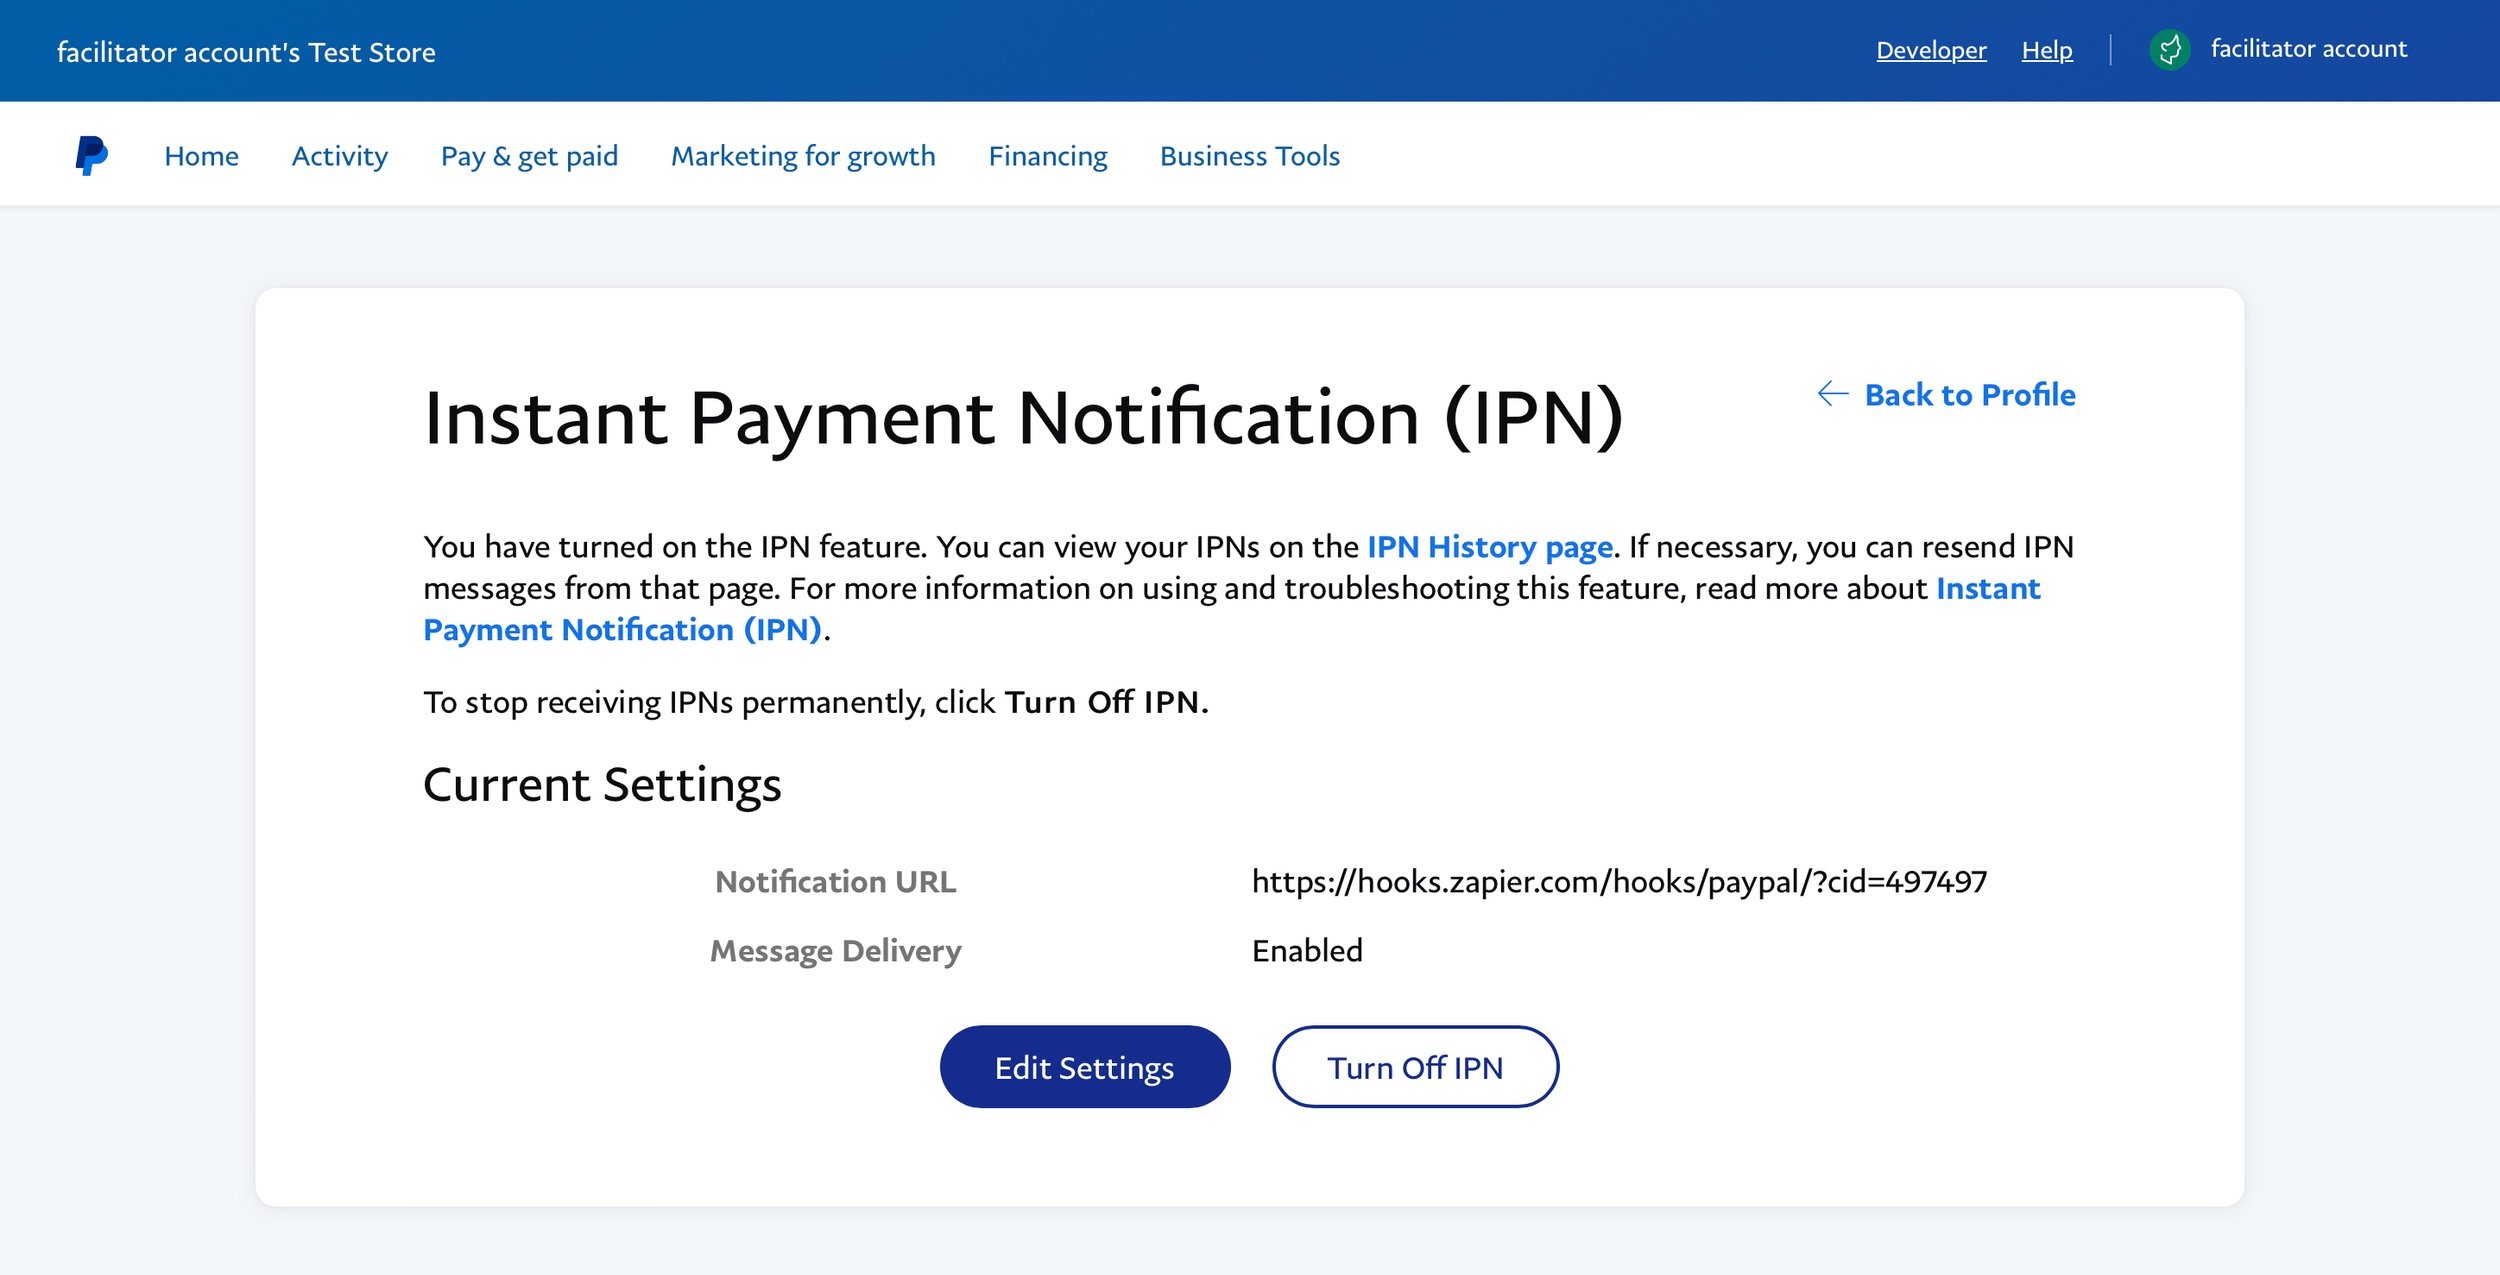
Now we need to get PayPal to send details through to the Zapier webhook. There are two ways you can do this. The first option is to add the webhook inside your PayPal account. This will mean that all of your successful transaction details are sent through to Zapier.
You’ll need a business account with PayPal to do this and then you’ll need to head to ‘Account Settings’ (which is available after selecting your profile on the top right corner) and then select ‘Notifications’ and look for ‘Instant Payment Notifications’ (if you’re already logged into the Sandbox, you can find it here). You will now be able to enter the webhook URL we copied during the second step (see above).
Another option is to simply set the webhook URL in the individual ‘Buy Now’ button. To do this you’ll need to add the ‘data-callback’. Here’s an example…
<script async="async" src="https://www.paypalobjects.com/js/external/[email protected]" data-button="buynow" data-name="My Test Product" data-amount="5.00" data-custom-editable=unknown data-callback="https://hooks.zapier.com/hooks/paypal/?cid=497497" data-env="sandbox"></script>
Important Points:
- You’ll see I have ‘data-custom-editable’ in the script. This allows us to see the value as we’re testing out our PayPal tracking. When you’re ready to use this solution on your live website, then change this to ‘data-custom’ so that it’s hidden.
- Make sure you change the email address. In my example this is ‘[email protected]’ but this should be your sandbox address when testing (and your real address when it’s live on your website).
- Make sure you change the callback URL. This should be the URL provided to you by Zapier.
- And finally, if you are interested you can find more details about the PayPal button we’re using for this solution.
Step 4: Add a custom filter to the Zap
Now we need to head back to Zapier and add a custom filter to our Zap.
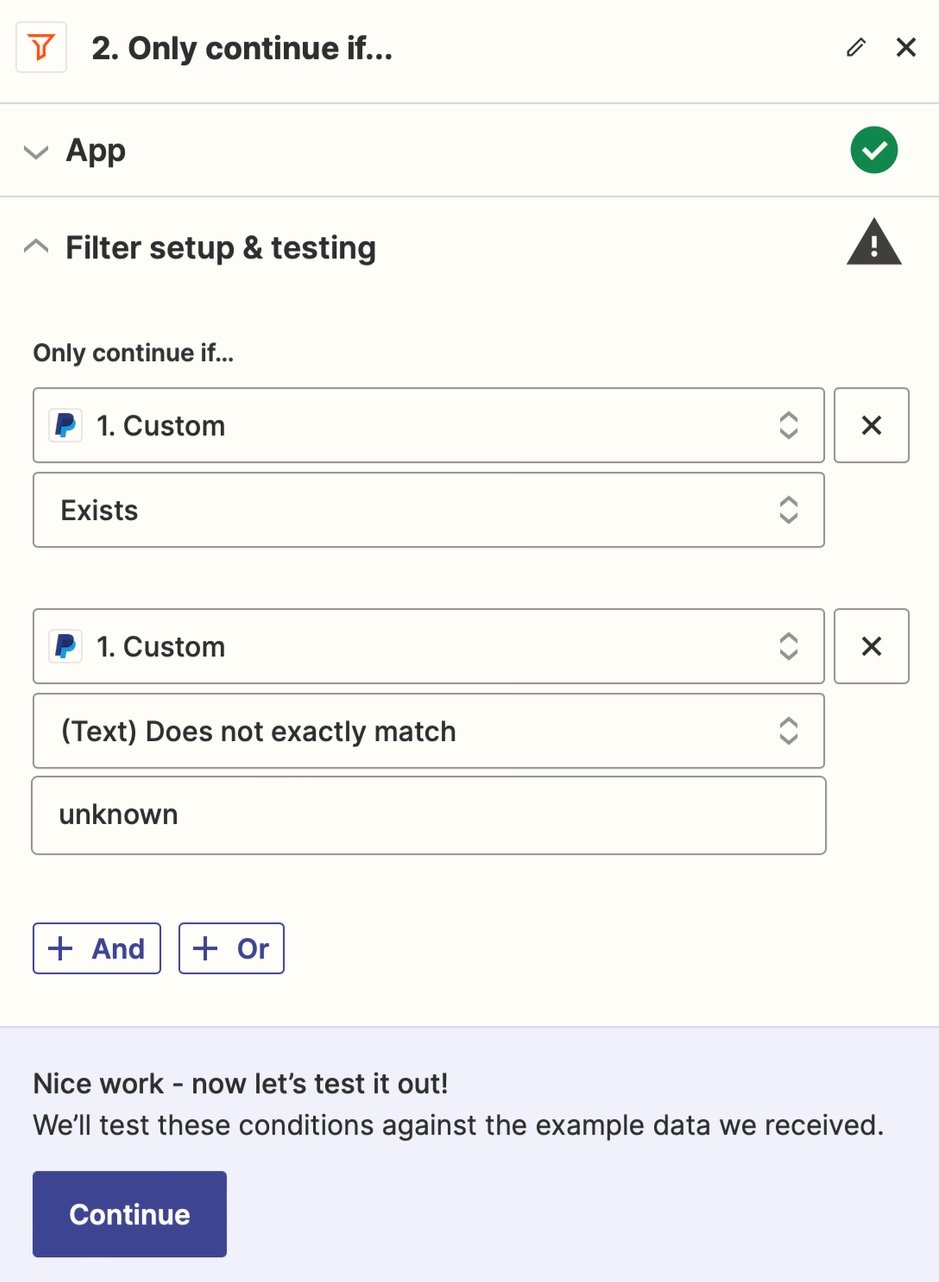
This filter checks to make sure there is a value set for ‘custom’ (and that the value is not set to ‘unknown’) before we send data to Google Analytics. Here we can see a close-up of the filter:
Important: If you didn’t send the test using PayPal’s IPN Simulator from the second step, then you won’t see ‘Custom’ as an option within your filter. You’ll need to head back to Step 2 and trigger the test notification to Zapier.
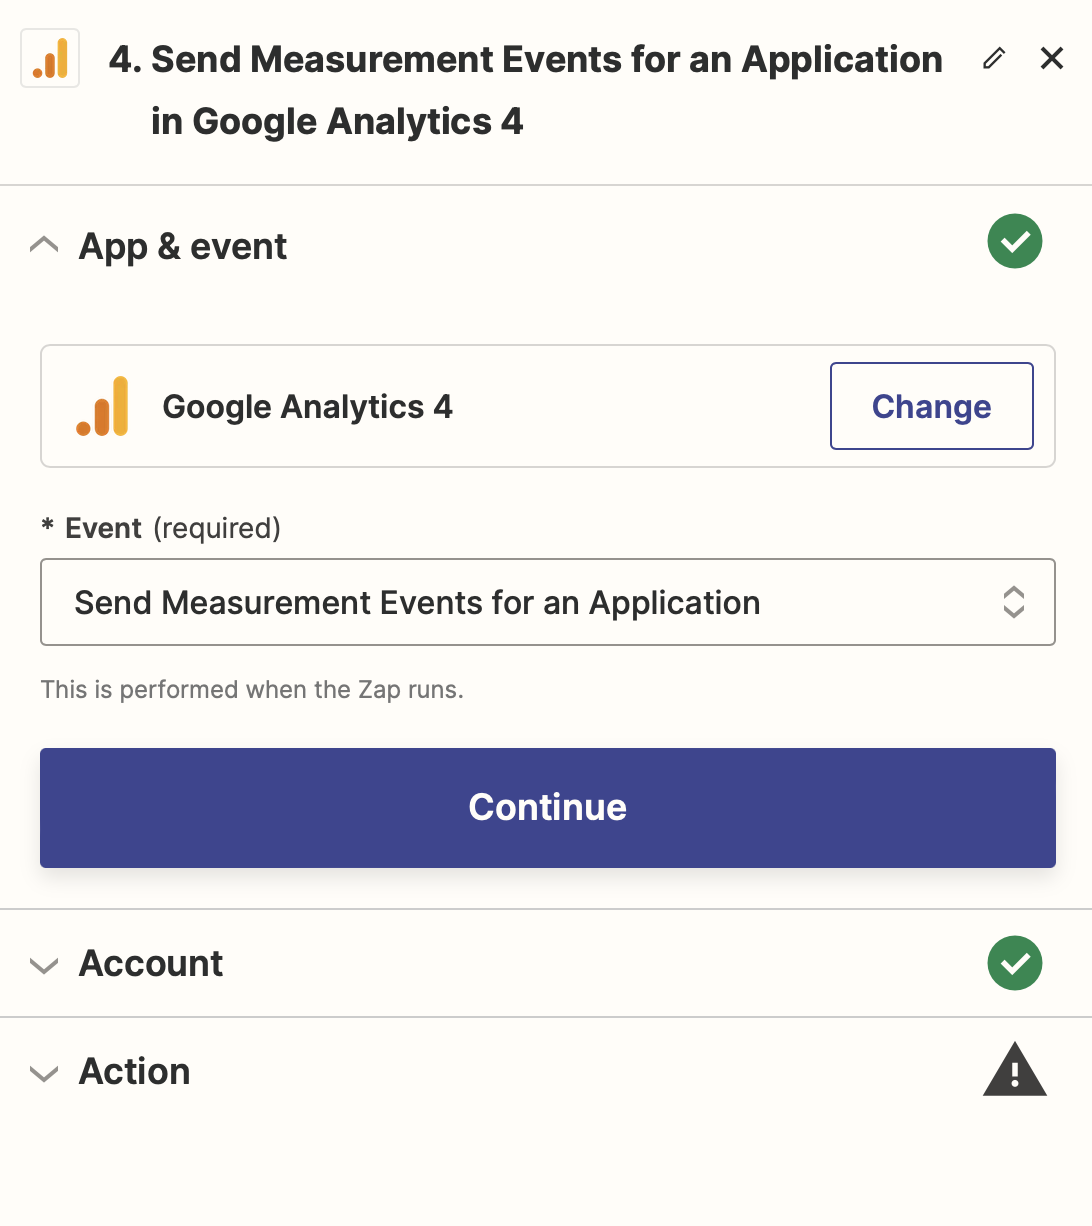
Step 5: Configure the Zap to send data
Now we need to create the hit that will send data to Google Analytics. This uses the Measurement Protocol which means we’ll be sending data directly into our reports (without the need for any tracking code).
To do this we now need to search for and select ‘Google Analytics 4’ as the action for our Zap. Then choose ‘Send Measurement Events for an Application’ as the ‘Event’.
After following the steps to connect Google Analytics to Zapier, you will need to enter the details you want sent to Google Analytics. This needs to include the custom field from PayPal as the ‘Client ID’, along with the purchase event details, and the measurement ID from your property.
For this example, I’m simply sending a purchase event without any items. You could customize this using Google’s documentation to send additional details to your reports.
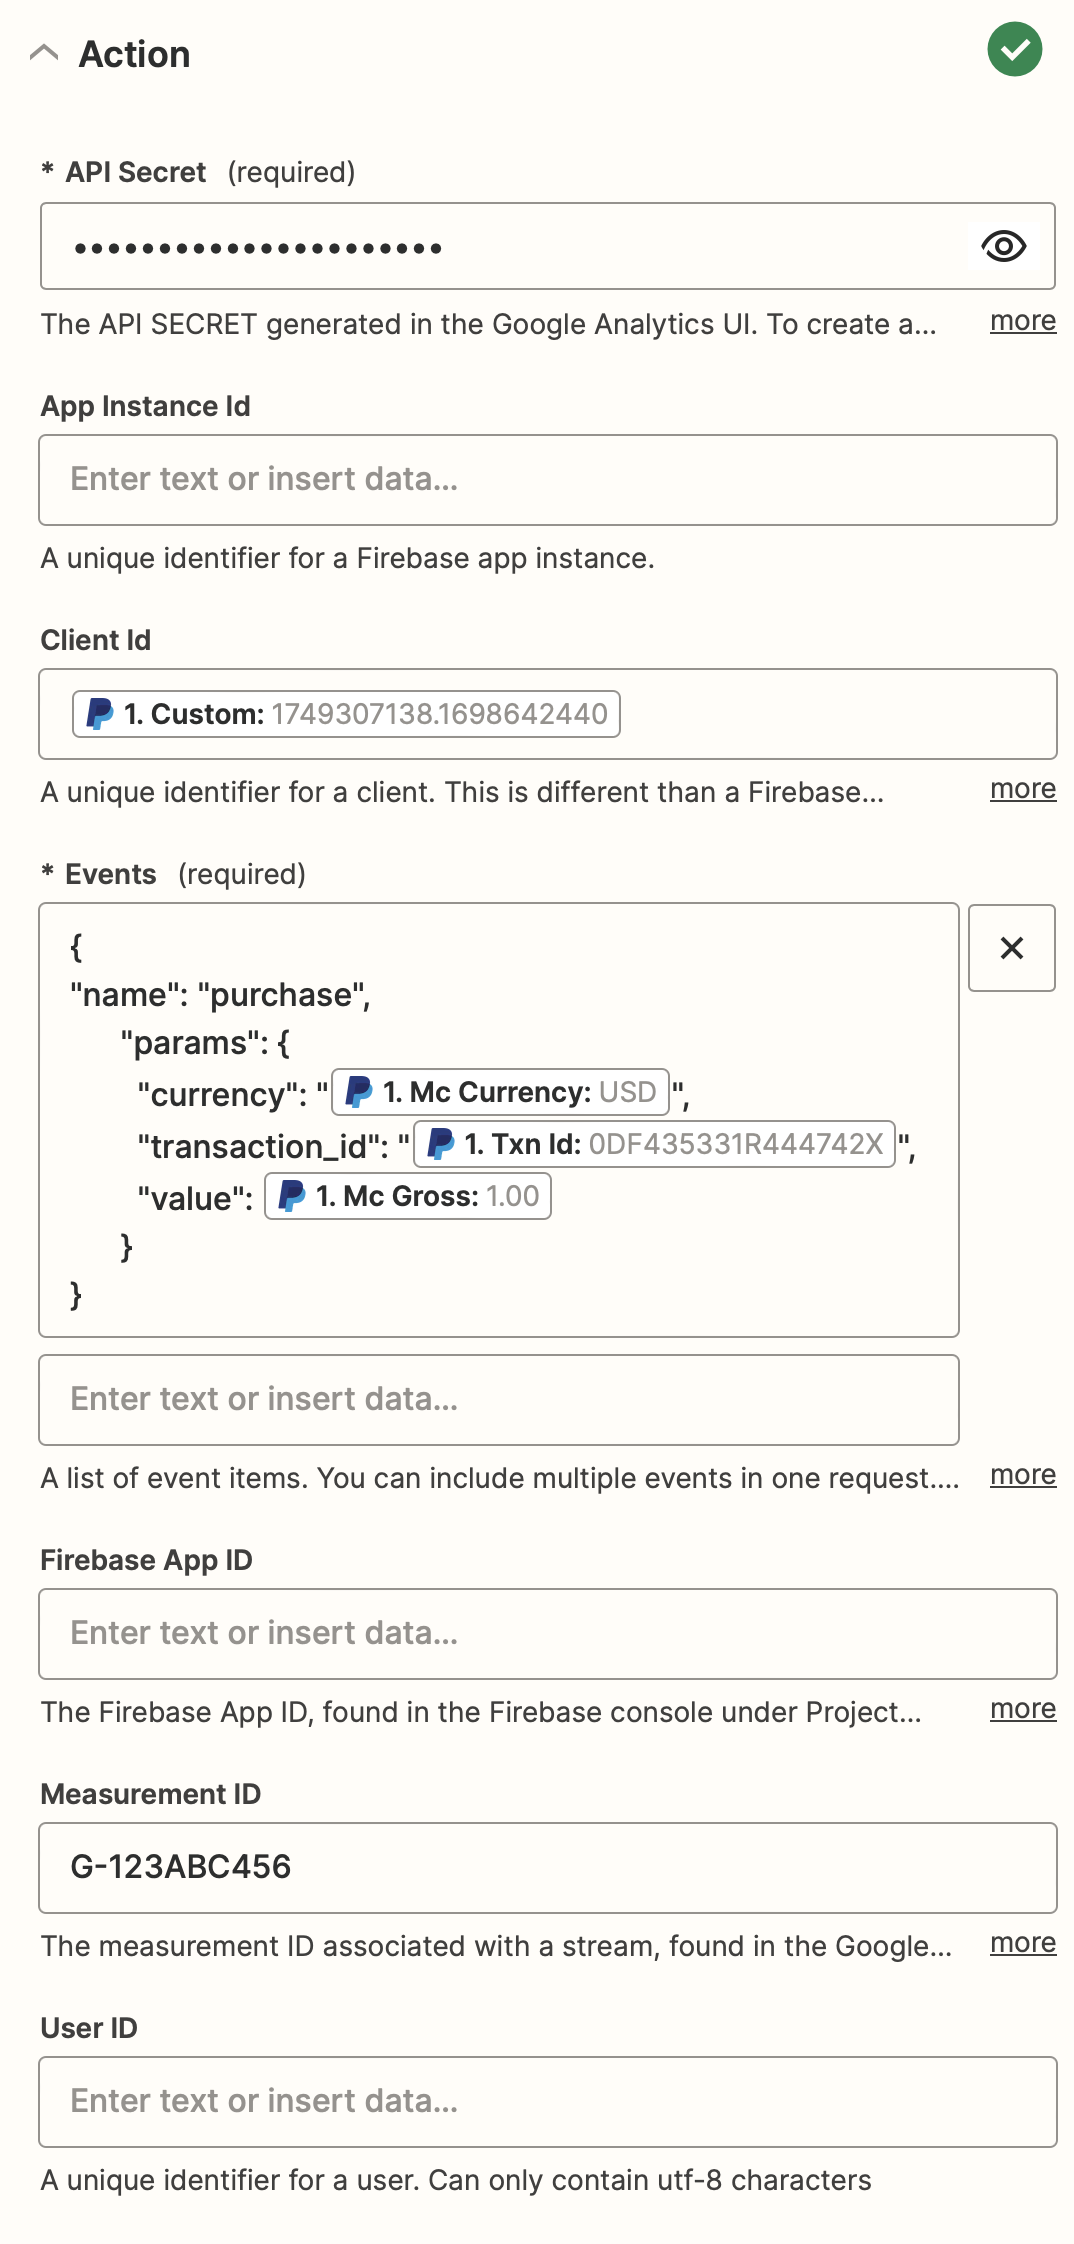
Here’s the event I’ve used in my example:
{"name": "purchase", "params": { "currency": "", "transaction_id": "", "value":}
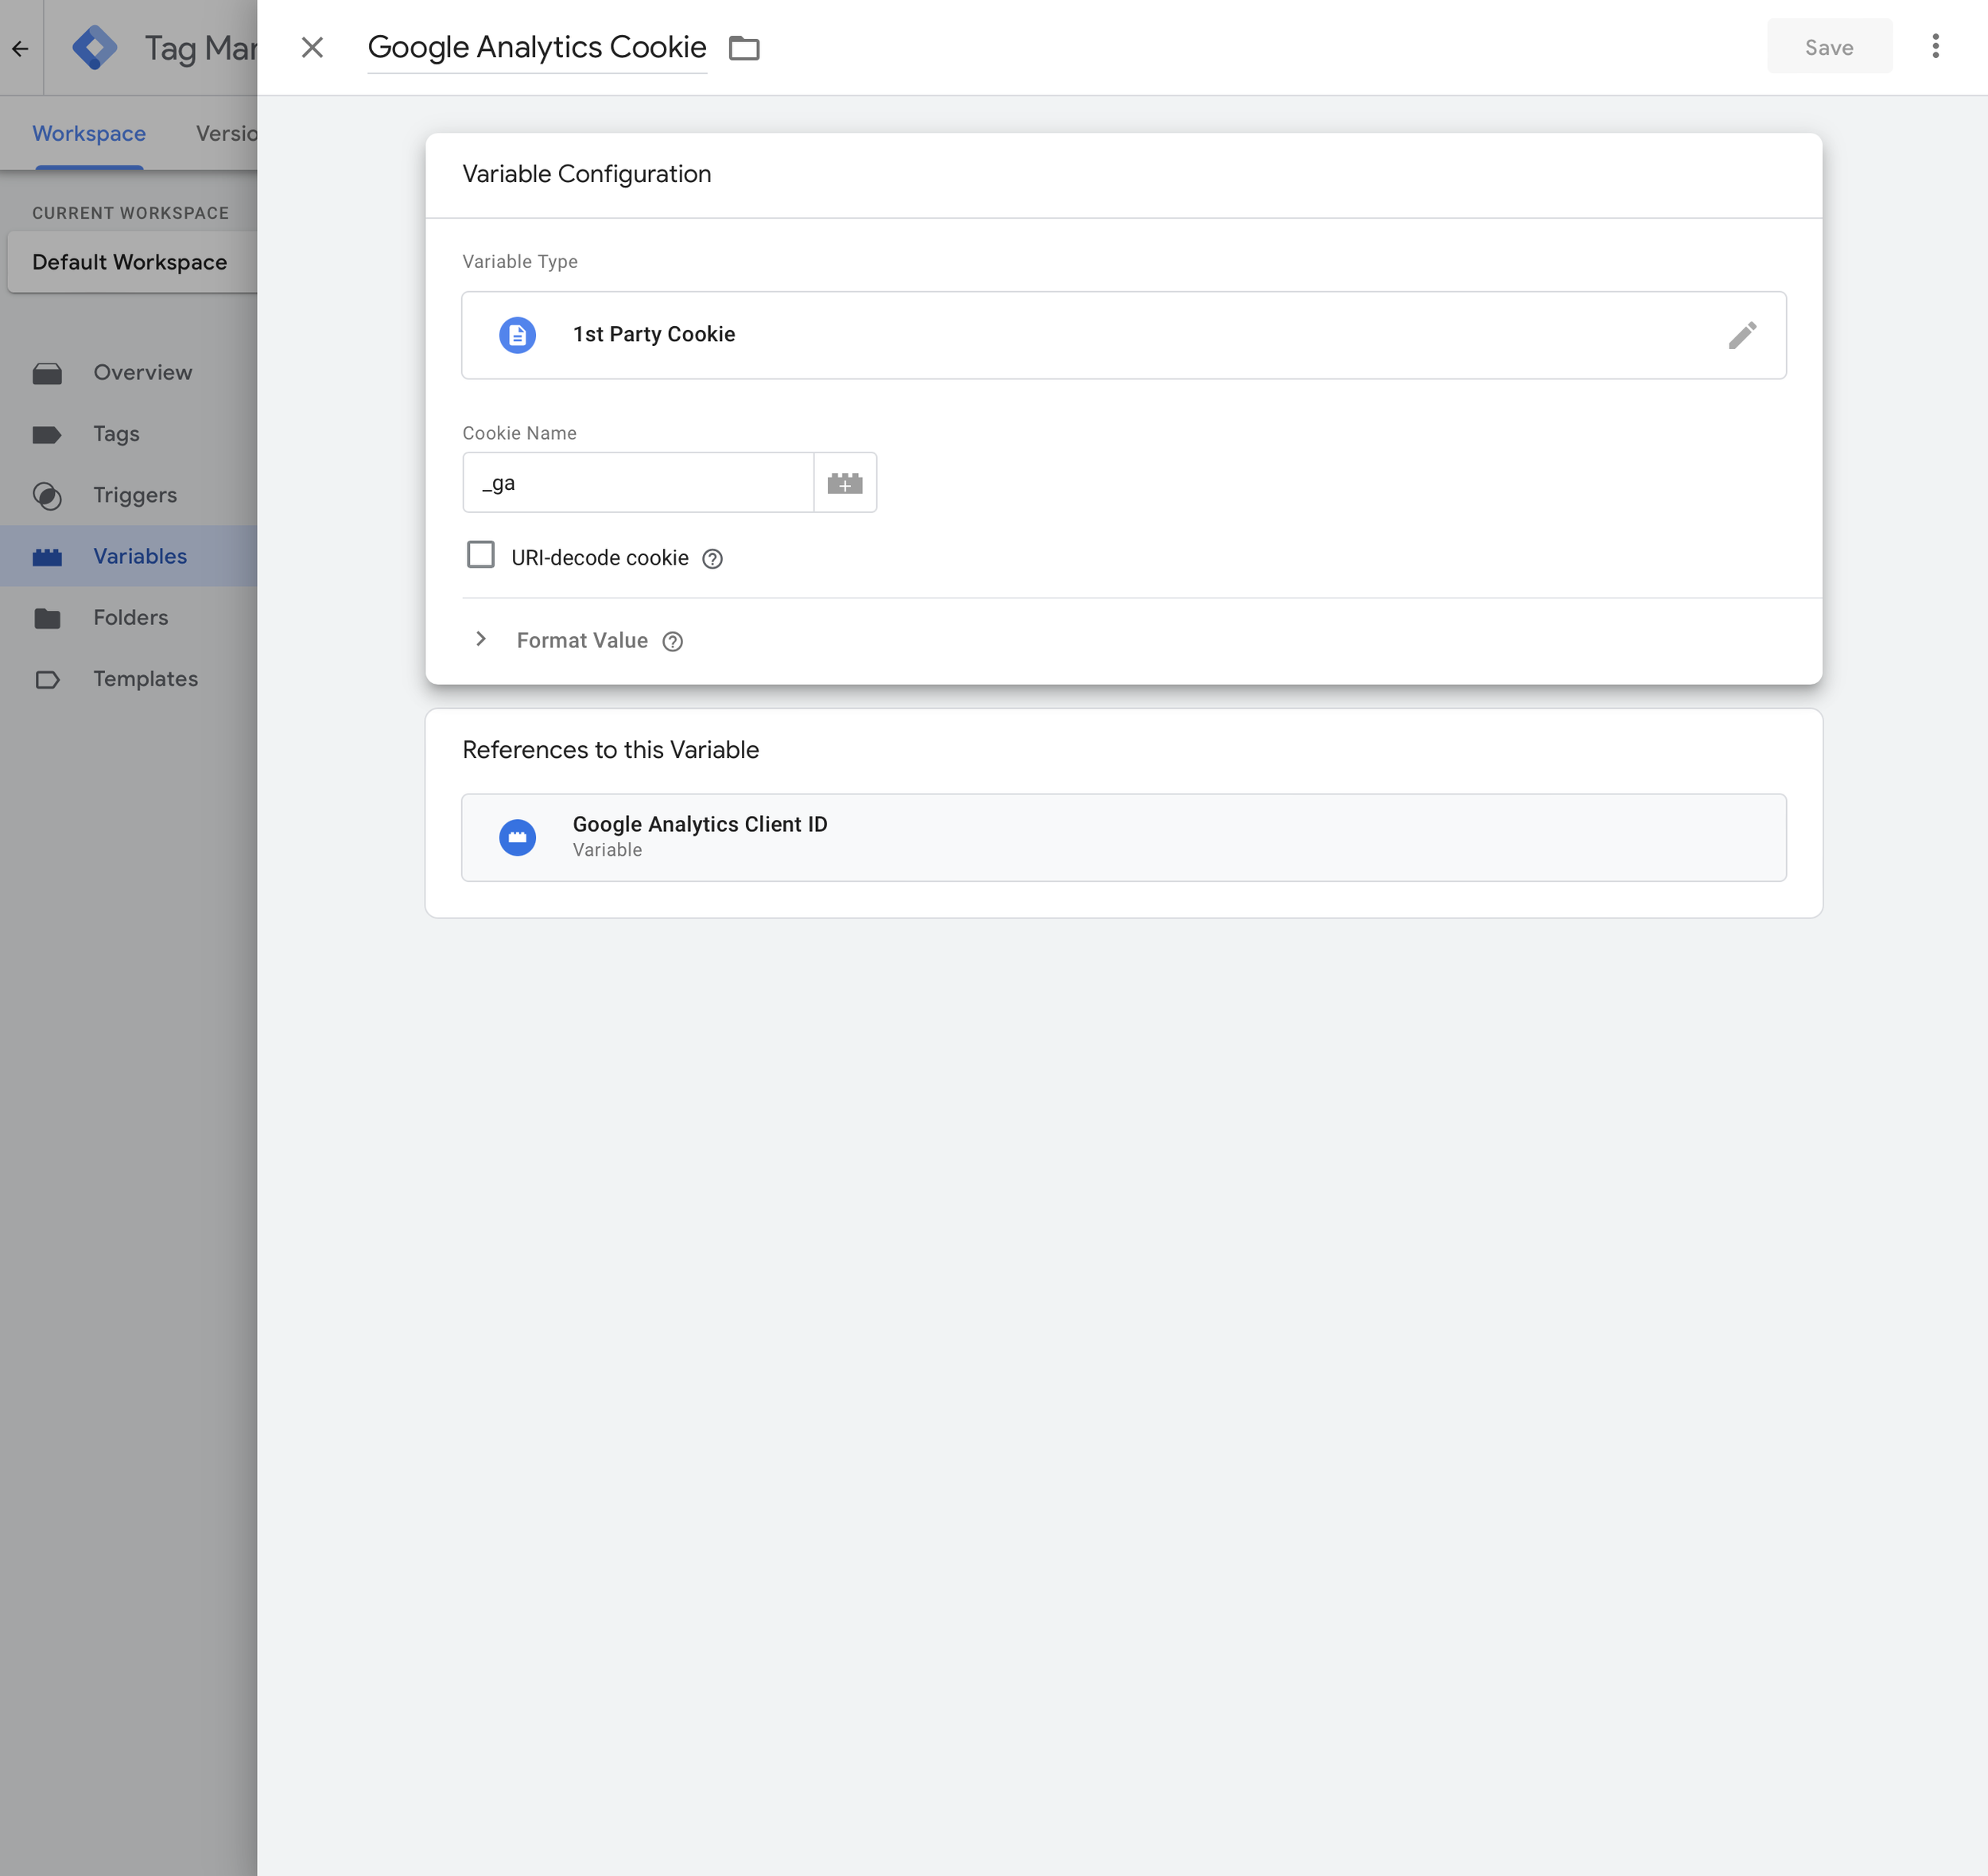
Step 6: Configure Google Tag Manager
We start by creating two user-defined variables. Navigate to ‘Variables’ and then select ‘New’. We’ll name our first variable ‘Google Analytics Cookie’ and we will use this to capture the complete Google Analytics cookie (_ga) from the user’s browser. To do this select ‘1st Party Cookie’ and enter ‘_ga’ as the ‘Cookie Name’.
Then we create another variable. This time we select ‘Custom JavaScript’ as the type and enter the following code:
function(){ return {{Google Analytics Cookie}}.match(/\d+\.\d+$/g)[0];}
![function(){ return {{Google Analytics Cookie}}.match(/\d+\.\d+$/g)[0];}](https://www.lovesdata.com/media/posts/439/Screenshot-2023-12-20-at-1.51.52-pm.png)
This grabs the Client ID from the Google Analytics cookie so we can send it through to PayPal.
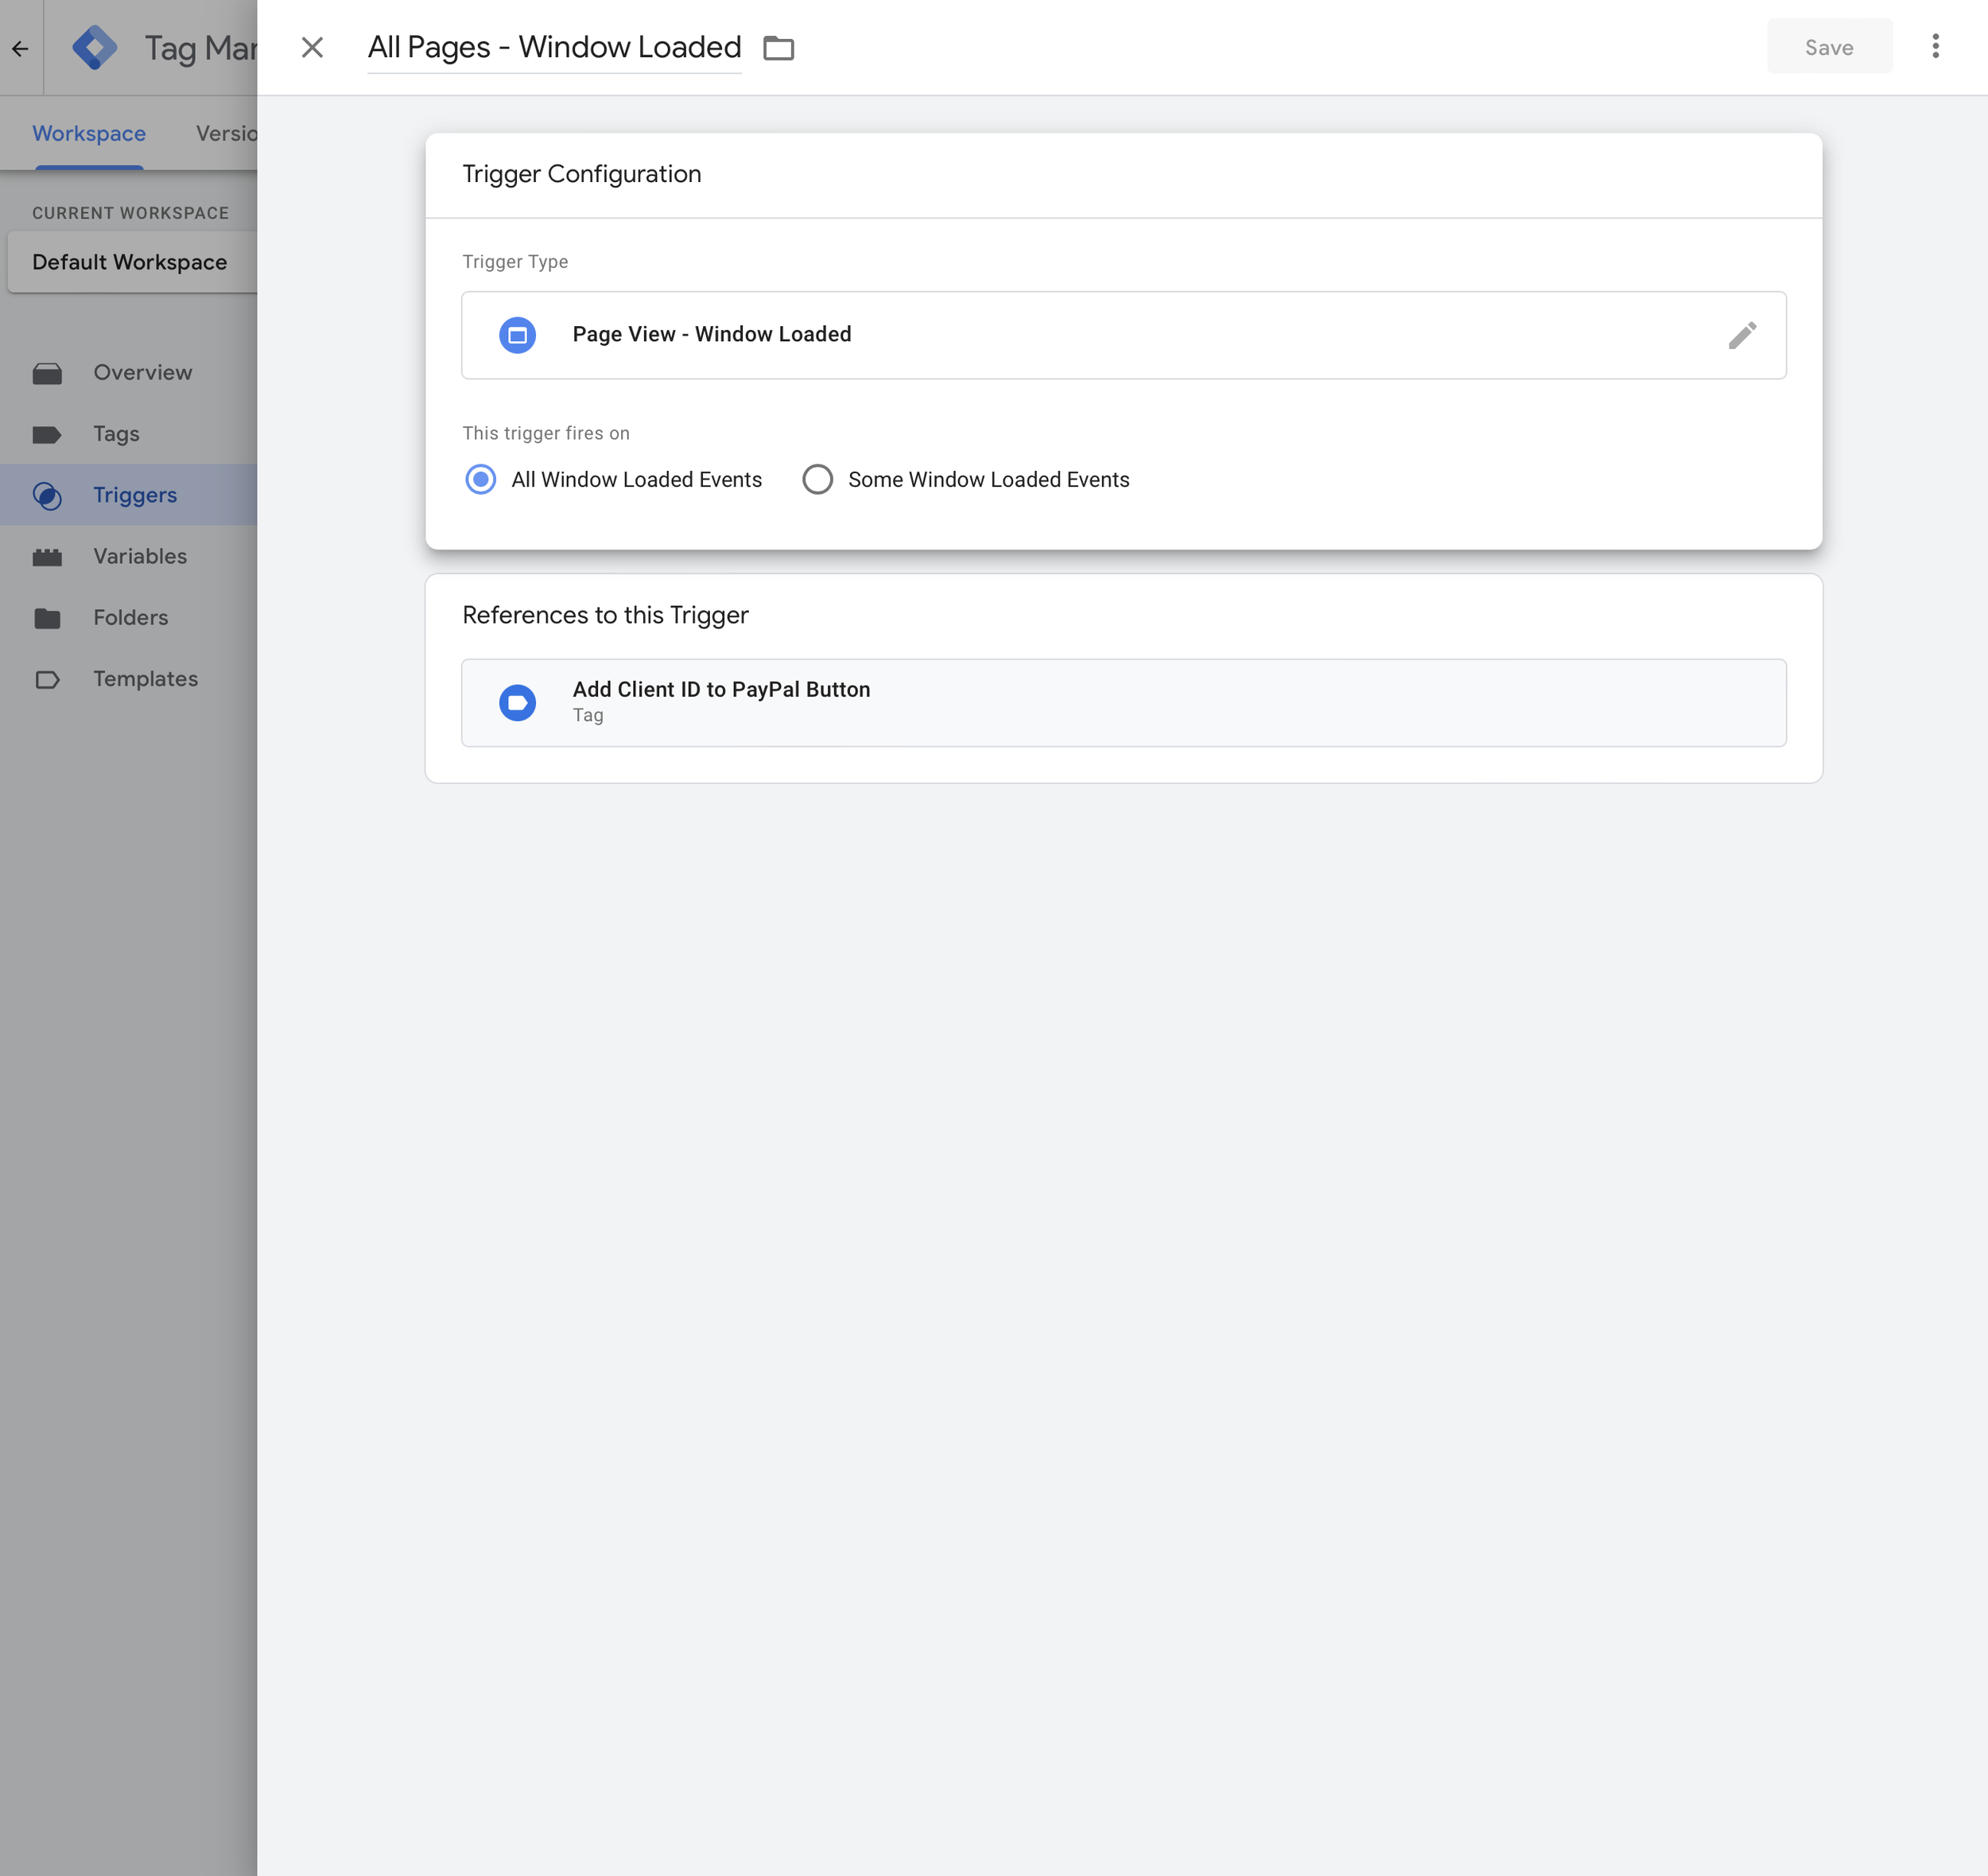
Next we navigate to ‘Triggers’ and create a new trigger using ‘Window Loaded’ as the type.
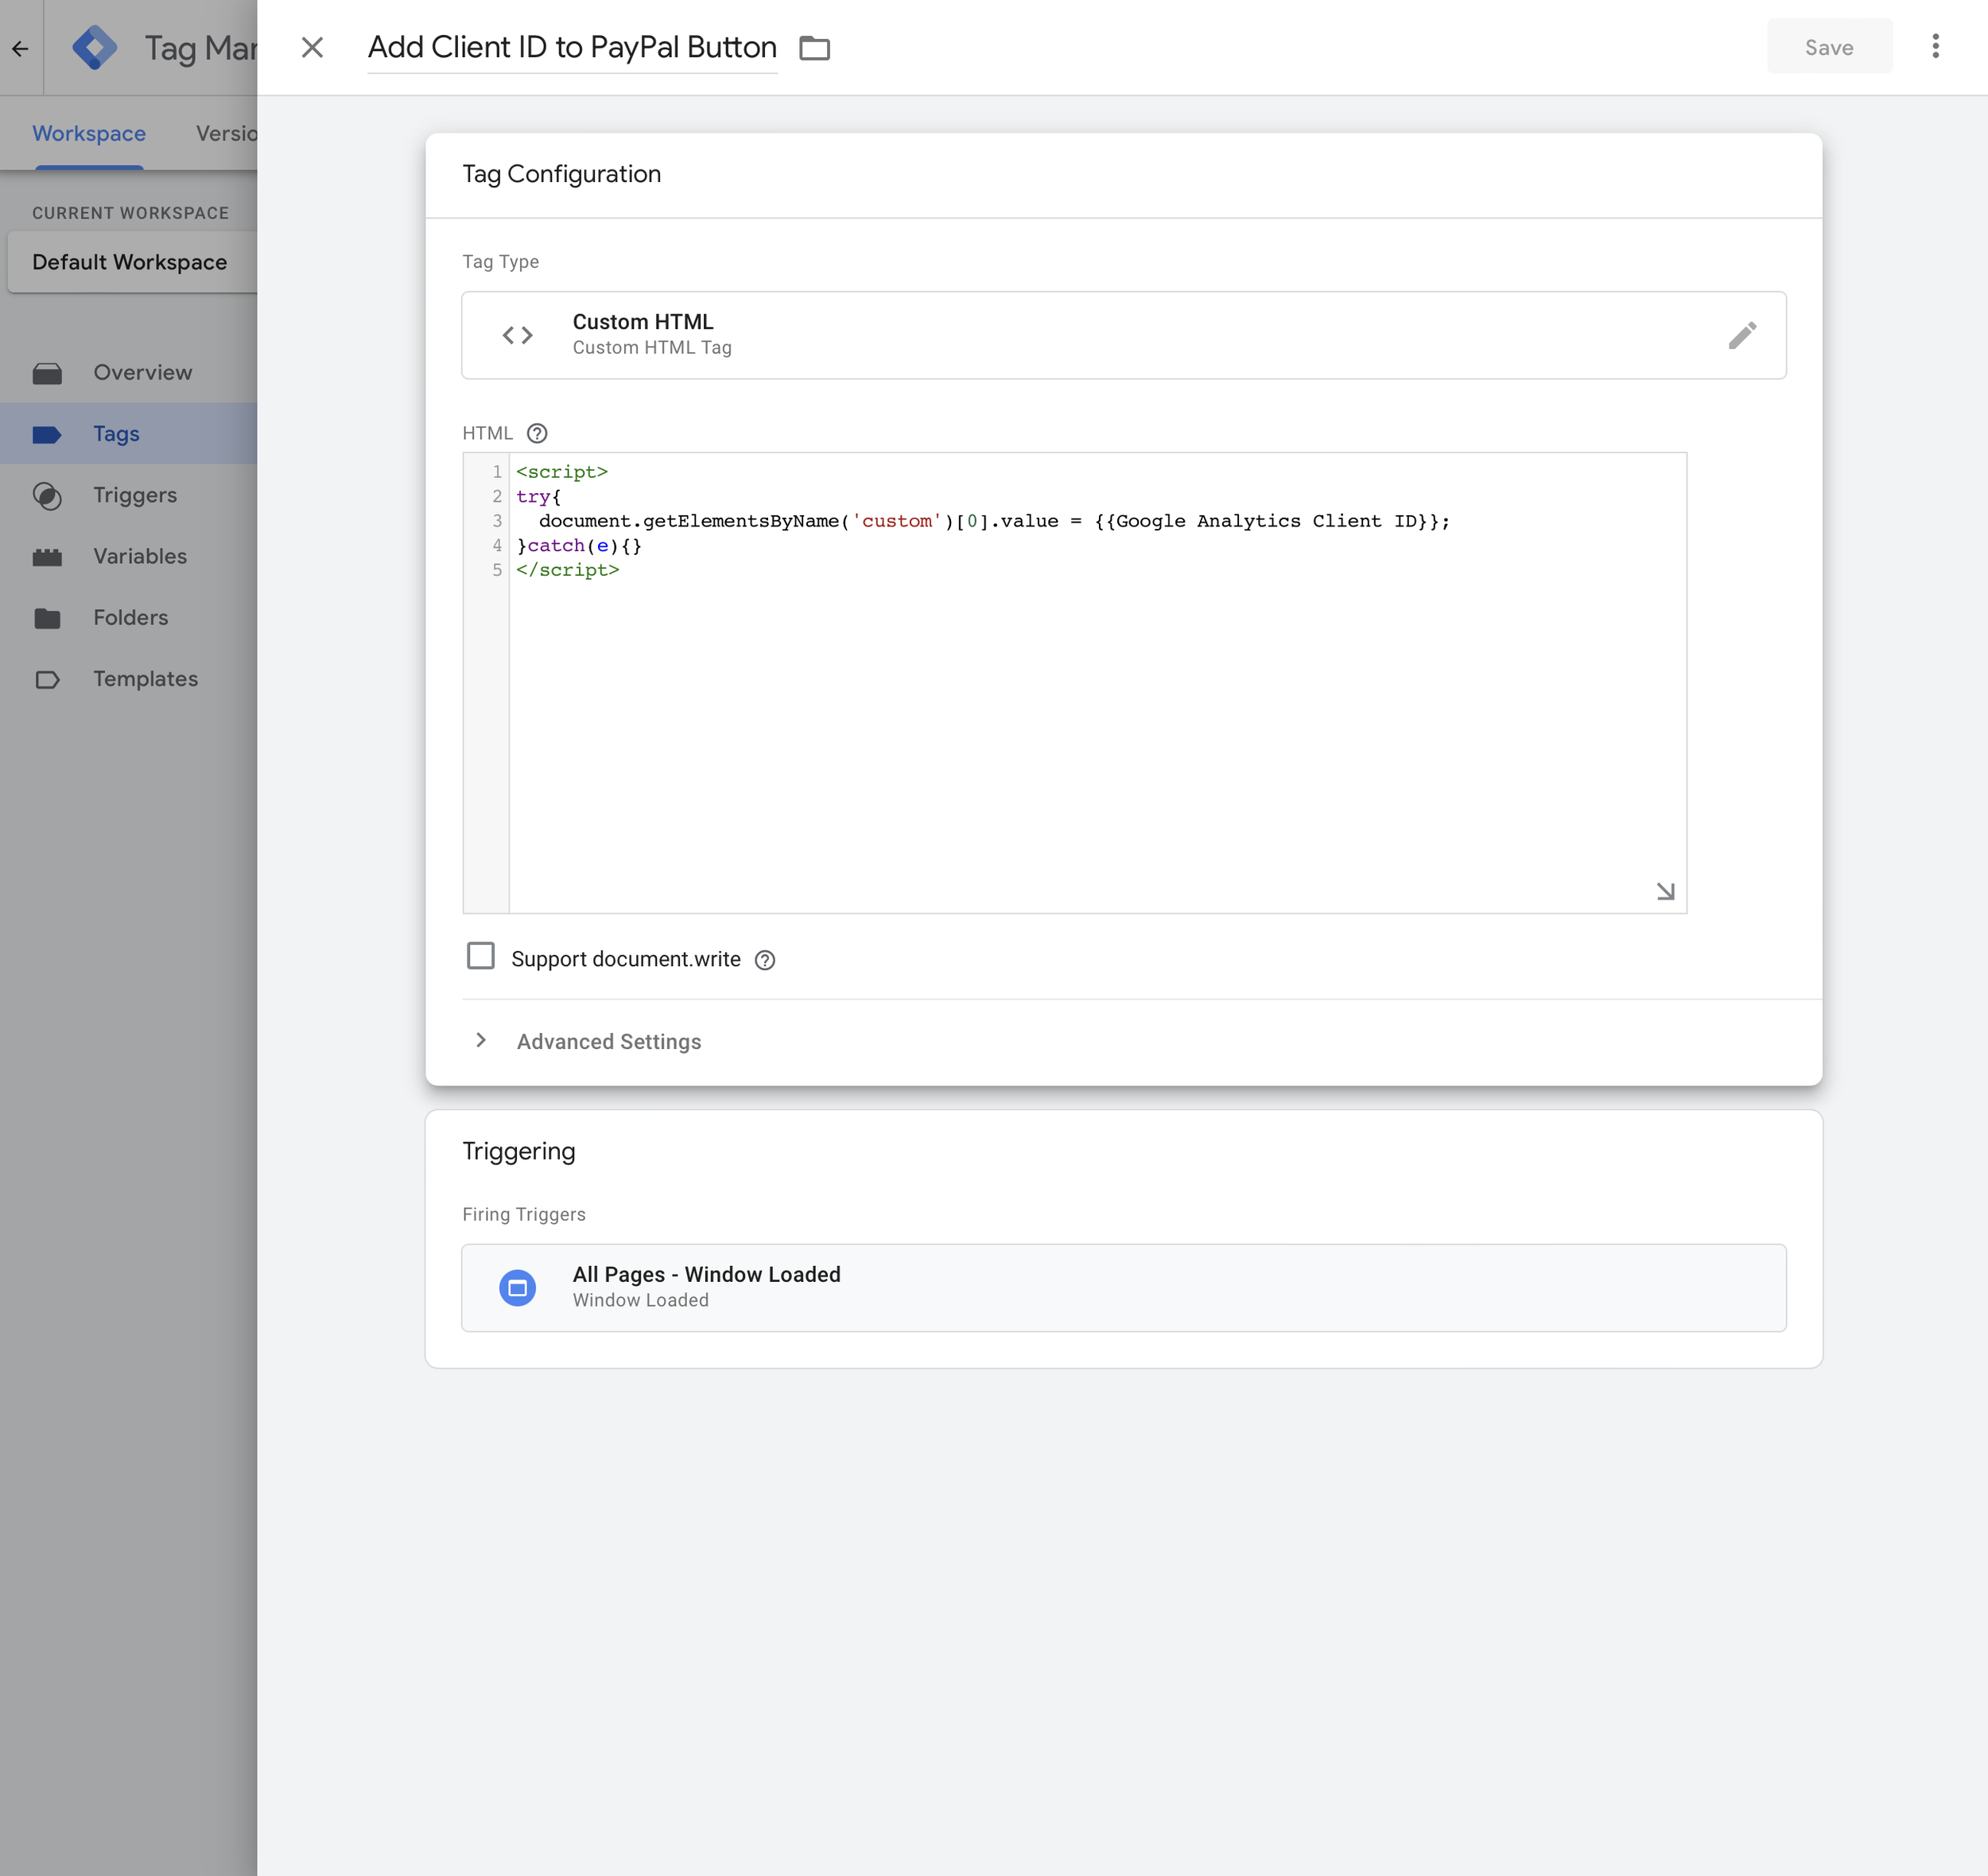
Now we head to ‘Tags’ and create a new tag called ‘Add Client ID to PayPal Button’ and select ‘Custom HTML’ as the tag type. We then enter the following code for the tag:
<script>try{ document.getElementsByName('custom')[0].value = {{Google Analytics Client ID}};}catch(e){}</script>
This passes the value of the Client ID (using the variable we just created) and adds this to the PayPal button on our website.
We then select the trigger we just created (called ‘All Pages - Window Loaded’) to fire the tag.
Finally, we need to make sure we have a Google Tag with our measurement ID added in the container.
Now we can publish our container.
Step 7: Complete a test transaction
Now it’s time to test everything out. So refresh the page with your PayPal button and complete a transaction using the PayPal Sandbox.
You can check the real time report in your testing property to ensure the purchase event is tracked. If everything is working, then the ‘User’ count should stay the same. So if it’s just you testing things out, you should see ‘1’ user reported even after Zapier sends the purchase to Google Analytics.
I recommend navigating to your test page and adding your own UTM tags (campaign tags) so that you can ensure the transaction is correctly tied to the original session on your website. For example, if my page is http://www.demo.com/paypal then I can use http://www.demo.com/paypal?utm_source=ben1&utm_medium=ben1 so I can easily see that it’s me testing.
Step 8: Go live
When you’re ready to go live with the solution on your website make sure you modify your PayPal button. Here’s what we used for our test...
<script async="async" src="https://www.paypalobjects.com/js/external/[email protected]" data-button="buynow" data-name="My Test Product" data-amount="5.00" data-custom-editable=unknown data-callback="https://hooks.zapier.com/hooks/paypal/?cid=12345" data-env="sandbox"></script>
So in this case I need to change the merchant email address, change ‘data-custom-editable’ to ‘data-custom’ and remove ‘data-env="sandbox"’.
How it all works
Now we’ve pulled everything together! We’re using Google Tag Manager to capture the Client ID from the Google Analytics cookie and since this is what’s used to tie session data together in our reports (so that we’re reporting on users) we can now tie our PayPal transactions to the appropriate Client ID (and therefore user).
This means we can make use of the acquisition reports and even the multi-channel funnel reports to understand the value we’re generating from PayPal on our website.
Although there are other options for tracking PayPal into Google Analytics, like just tracking the number of clicks on our PayPal button, using Zapier, the PayPal IPN and Google Tag Manager is going to provide accurate data in our reports.