Magically track forms using Google Analytics
Loves Data
Here’s the fast, painless, no-fuss approach to tracking form abandonment and interactions...
Lots of people have forms on their website and a lot of people ask me how they can track their forms (and form abandonment) using Google Analytics. There are a few different approaches to tracking forms, but one of the best ways is using Google Tag Manager. Google Tag Manager is great – it's flexible, it can streamline tag management but don't get me wrong – it's certainly not easy.
So what if you want to track your forms quickly and easily without having to learn the ins and outs of Google Tag Manager? What if you just want to get data and insights in minutes? Well, I’m glad you’re here because that’s exactly what I’m going to show you!
I call it Automagical Tracking
What is Automagical Tracking you ask? Well, as the name suggests it’s magic. Okay, not really, but it’s catchy right?
Okay so here is what you’ll need to automagically track the forms on your website:
- Website with forms
- Google Tag Manager
- Komito Analytics
If you’re not in IT, if you’re not a technical–web–developer–whiz, then you are absolutely going to love Komito Analytics. Komito Analytics is a free plugin (really just JavaScript) that you can copy and paste into Google Tag Manager (or place alongside your Google Analytics tracking code) and it automagically tracks a whole bunch of custom interactions that people are doing on your website right now. And yes, this includes tracking interactions with your forms.
If you’re not currently using Google Tag Manager, then you’ll need to get install the Tag Manager code and then place your Google Analytics tracking code within Tag Manager. The main trick is to make sure you don’t leave the old tracking code on your website after you’ve published the Google Analytics tag within Tag Manager (as this will result in your tracking code firing twice). If you’re not using Google Tag Manager yet, then I highly recommend you download our free Google Tag Manager Guide and jump right straight to page 3 which walks you through exactly what you need to do in order to get it up and running on your website.
Download our free Google Tag Manager Guide
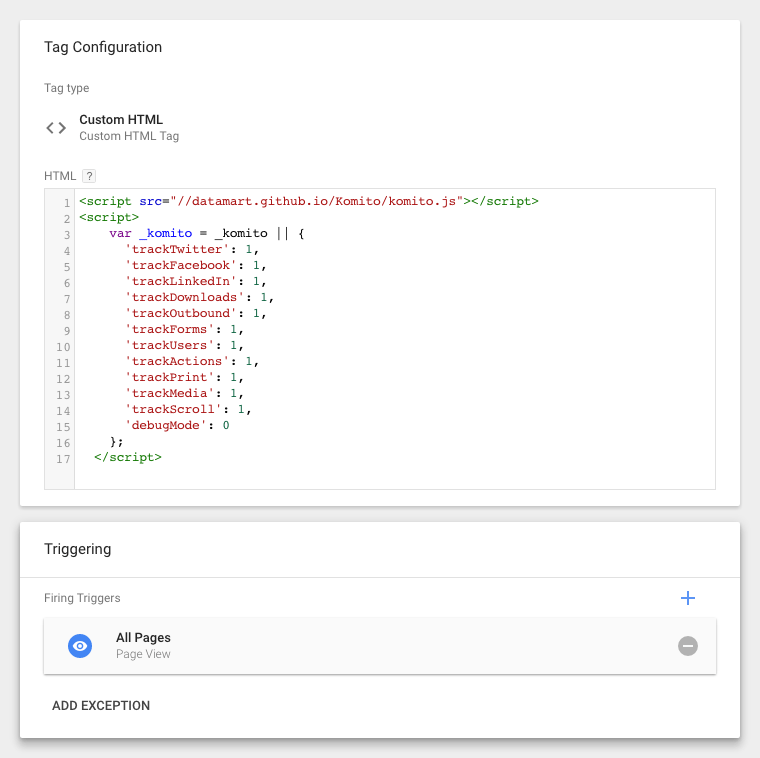
Once you have Tag Manager and you have implemented your Google Analytics tag within Tag Manager all you need to do is create a custom HTML tag inside Tag Manager and copy and paste the Komito Analytics code into your new tag.
You should end up with something like this…

Now when you paste the code into Tag Manager you will notice there are a whole lot of additional interactions you can automagically track, including scroll-depth, outbound links, file downloads and a whole bunch more. If there is something you don’t want to track automatically, then just change the ‘1’ to a ‘0’ and you’re done.
It’s just that easy!
Now you will begin to see form interactions inside Google Analytics. You’ll find your data inside the ‘Events’ report (under ‘Behavior’). When you view the ‘Top Events’ report you will see the names of the different forms and you can then click on the name of the form to see the fields that people have used within the form.
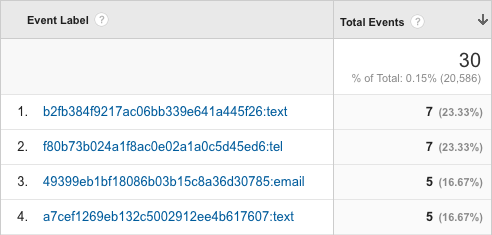
When people engage with a field Komito Analytics will track the name of the input field and the type of field. So if you’ve got really ugly field names (like on one of our forms) you might see something like this…

In which case you might want to change the name of your fields to make them pretty (or potentially use a filter in Google Analytics to change them within your reports).
Even though it’s a bit ugly we can quickly see that for this example people are happier providing their phone number than their email address.
That’s how you can magically track people interacting with your forms!


Comments