Streamline Your Analytics with Google Tag Manager
Loves Data
Streamlining your data collection can save you time and improve accuracy. Google Tag Manager (GTM) is a powerful tool that allows you to manage and deploy marketing tags without needing to touch the source code of your website or app. With GTM, you can easily add and update tags for tracking and analytics, which helps you to better understand your audience and improve your marketing strategies.
Google Tag Manager simplifies the process of managing multiple tags by offering a user-friendly interface where you can configure tags, triggers, and variables. This helps eliminate the need to manually code tags on your site manually, thereby reducing errors and streamlining your marketing operations. Whether you need to track conversions, gather detailed analytics, or manage third-party tags, GTM is your go-to solution.
In this guide, we will explore the basics of Google Tag Manager, dive into its key features, and provide a step-by-step guide to setting up tags, triggers, and variables. We’ll also cover best practices for maintaining and optimizing your GTM setup to ensure that your marketing automation runs smoothly and efficiently.
You can also watch our Google Tag Manager tutorial series to walk through all of the steps and follow along in your own account:
Understanding the Basics of Google Tag Manager
Google Tag Manager (GTM) is a free tool that allows you to manage and deploy various marketing tags on your website or mobile app without having to modify the code directly. This helps streamline the tag deployment process and reduces the dependency on development teams.
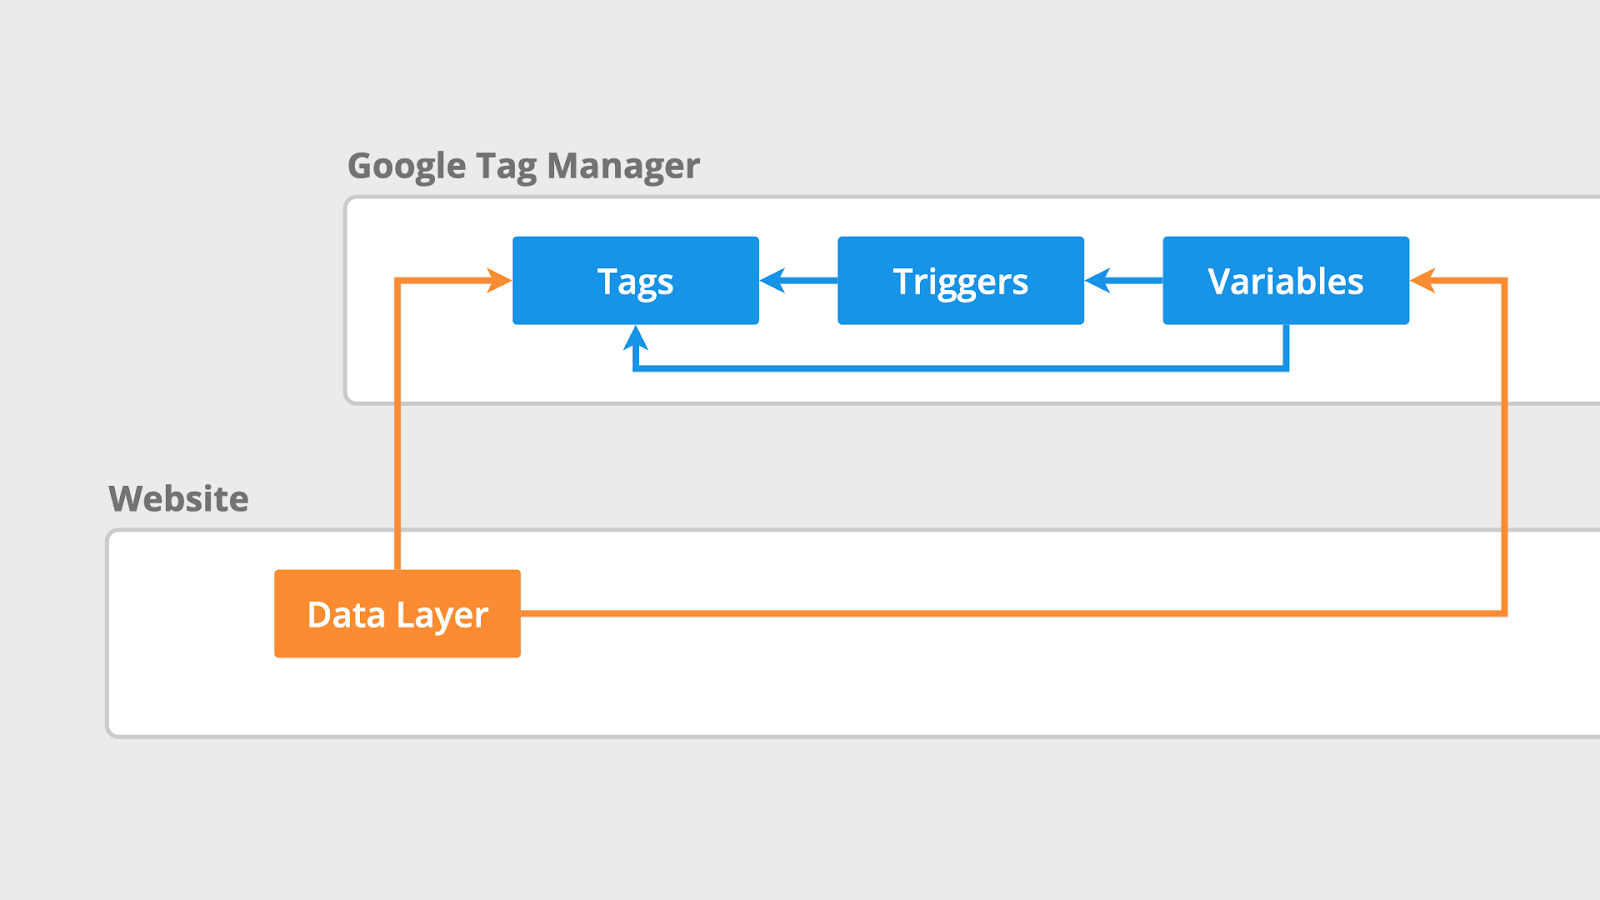
Key Components of GTM:
1. Tags: These are pieces of code or tracking pixels you add to your site to collect data. Common tags include those for Google Analytics, Google Ads conversions, and remarketing.
2. Triggers: Triggers define when and where your tags should fire. For example, you might want a tag to fire when a user clicks a button or submits a form.
3. Variables: Variables are used to store information that your tags and triggers use. They can be built-in or user-defined, such as Page URL, Click Text, or custom JavaScript variables.
4. Containers: A container holds all your tags, triggers, and variables. When you set up GTM, you’ll create a container for your website or app and then deploy it by adding the GTM code snippet to your site.
GTM simplifies the process of adding and updating these tags without requiring changes to the actual codebase. This reduces the chance of errors and improves your ability to quickly adapt to new marketing needs.
Key Features of Google Tag Manager for Marketing Automation
Google Tag Manager offers several features that make it an essential tool for automating your marketing efforts. These features help you streamline and enhance your marketing operations effectively.
1. Version Control: GTM provides a robust version control system. Each time you publish changes, GTM creates a new version of your container. This feature allows you to easily roll back to a previous version if something goes wrong, ensuring that your tracking remains accurate.
2. Preview and Debug Mode: Before deploying tags, GTM allows you to test them using the preview and debug mode. This feature lets you see which tags are firing and when, helping you identify and fix issues before they affect your live site.
3. Built-in Tags: GTM comes with a library of pre-configured tags for Google products like Google Analytics, AdWords, and DoubleClick, as well as third-party tools such as Facebook Pixel and LinkedIn Insight Tag. This makes it easier to set up and manage tracking codes.
4. Custom Templates: GTM allows you to create and use custom tag templates. These templates can be shared across different accounts, ensuring consistency and saving time when setting up new tags.
5. User Permissions: GTM supports granular user permissions, allowing you to control who can create, edit, and publish tags. This feature is particularly useful for larger teams and agencies, ensuring that only authorized users can make critical changes.
6. Triggers and Variables: The ability to define complex triggers and variables allows you to create highly specific tracking scenarios. For example, you can set up triggers based on user behavior, page elements, or custom events, making your tracking more precise and actionable.
Leveraging these features enables you to automate your marketing tasks efficiently. By reducing manual interventions, you can focus on analyzing data and optimizing your strategies, which ultimately leads to better marketing outcomes.
Step-by-Step Guide to Setting Up Tags, Triggers, and Variables
Setting up tags, triggers, and variables in Google Tag Manager is straightforward when you follow these steps:
1. Create a New Tag:
- Navigate to your GTM Dashboard and click on "Tags."
- Select "New," then choose a tag type from Google’s built-in options or configure a custom HTML tag.
- For example, to set up Google Analytics, select Google Tag, then enter your measurement ID from your Google Analytics property.
2. Set Up Triggers:
- In the tag configuration, click on "Triggering" and select "New."
- Choose the type of trigger, such as "Initialization," "Click," or "Form Submission."
- Define your trigger conditions. For example, you can set a trigger to fire on all page views or only on specific pages.
3. Configure Variables:
- Go to "Variables" in the GTM Dashboard.
- For standard variables like Page URL or Click Text, enable appropriate built-in variables.
- To create a custom variable, click "New" and choose a variable type such as Data Layer Variable, Constant, or JavaScript Variable. Input your variable details.
4. Preview and Test:
- Use the Preview and Debug mode to test your tags. Click "Preview" in the GTM interface and open your website in a new tab.
- Interact with your site to see if the tags fire correctly. GTM will show a debug console at the bottom of your site, detailing which tags fired and why.
5. Publish Changes:
- Once everything works as expected, return to the GTM Dashboard and click "Submit."
- Add a version name and description to document your changes, then publish the container.
Following these steps ensures your tags, triggers, and variables are set up correctly, allowing you to accurately track user interactions and gather valuable data.
Best Practices for Maintaining and Optimizing Your Tag Manager Setup
Maintaining and optimizing your Google Tag Manager setup is vital for ongoing success. Follow these best practices to ensure your GTM remains effective and efficient:
1. Regular Audits:
Perform regular audits of your tags, triggers, and variables. Check for outdated or redundant tags. Remove or update them as needed to keep your setup clean and efficient.
2. Use Naming Conventions:
Establish clear and consistent naming conventions for your tags, triggers, and variables. This practice makes it easier to manage and understand your setup, especially when working with a team.
3. Document Changes:
Keep detailed documentation of changes made in GTM. Use the description fields when creating new versions and maintain an external log if necessary. Documentation helps track changes and troubleshoot issues efficiently.
4. Monitor Performance:
Regularly monitor the performance of your tags. Ensure they are firing correctly and collecting accurate data. Use tools like Google Analytics to verify that the data collected aligns with your goals.
5. Test Before Publishing:
Always use the Preview and Debug mode before publishing changes to ensure everything functions as expected. Testing helps catch potential issues before they impact your live site.
6. Stay Updated:
Keep up with the latest GTM updates and features. Participate in relevant forums and communities to learn about best practices and new functionalities. Staying informed helps you leverage GTM’s full potential.
7. Leverage Built-in Templates and Features:
Use built-in tag templates and features whenever possible. These are optimized for performance and security, reducing the risk of errors and improving reliability.
Implementing these best practices helps maintain a robust and efficient GTM setup. Regular audits and disciplined management ensure that your marketing efforts remain accurate and effective.
Conclusion
Streamlining your data collection with Google Tag Manager can significantly improve your efficiency and accuracy. By understanding the basics, leveraging key features, and following a structured setup process, you can streamline your marketing operations. Regular maintenance and optimization ensure that your tag management setup remains effective, allowing you to focus on analyzing data and strategizing for better results.
Google Tag Manager simplifies the complex tasks of adding and updating tags, enabling you to respond quickly to new marketing requirements. It also reduces the risk of errors and enhances your ability to track and measure user interactions accurately.
Ready to dive deeper into mastering Google Tag Manager? Join Loves Data’s Google Tag Manager course to enhance your skills and optimize your marketing strategies using Google’s tag management platform.
Comments