Using the Google Analytics Site Search reports
Loves Data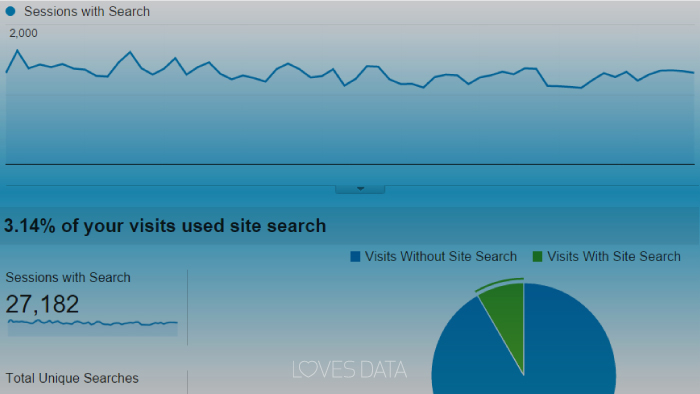
One of my top recommendations for people looking to make their Google Analytics data actionable is to use the Site Search reports. These reports allow you to quickly identify what people are looking for after they land on your website. As people search within your website using your internal search solution, you can capture details about what they are looking for and where they begin their search.
Before we look at the reports it’s important to consider just how valuable this data can be. People are actually taking the time to type in what they want – they’re actually telling you what they’re looking for!
This means you can find insights to inform the content you’re providing, including products and services, and you might even find insights that help inform the way you design and structure your navigation.
Here we can see what people have actually searched for within the Search Term report:
If your website currently doesn't have a site search function and has more than a handful of pages, I'd recommend adding a search to allow people to look for information they're not finding straight away. You might find that some people like using the search function and you’ll have the benefit of being able to see what they’re trying to find.
Tip: If you have a small website and don’t see the need for a search function, then consider adding one to your error page. This can help get people to the content they were originally looking for.
Most CMS systems, like WordPress, Joomla and Squarespace all offer inbuilt search functions, but you can also set up a Google Custom Search Engine if your CMS doesn’t have an inbuilt option or if you want something more custom.
How to configure your Site Search reports
You need to configure Google Analytics to capture data into the Site Search reports. In most cases, this means finding the query parameter that modifies the results you present to people searching.
For example, if you perform a search for ‘Google Analytics fundamentals’ on our website you’re presented with results from the following page:
http://www.lovesdata.com/search?q=google%20analytics%20fundamentals
Here you can see what we searched for is highlighted in green - this is the search query. The query parameter that is driving the search results page is highlighted in red - for the Loves Data website it’s ‘q’. Now that we’ve identified the query parameter we can head into Google Analytics and configure the reports. To do this we head to ‘Admin’ and then ‘View Settings’. Then find the ‘Site Search Settings’ where we’ll enter ‘q’ as the query parameter for our search function.
For a more in-depth walk-through of setting up the Site Search reports, you should read our post on the options for configuring Site Search. We also have a visual walk-through of a basic setup of Site Search.
Search Terms Report
This is a great report to use if you’re just getting started. It will give you fast insights into what your audience is looking for and help you improve your site. The report shows you the actual terms that people have searched for and you can see the number of unique searches for each term (this means people searching for the same term multiple times will only be counted once within a session).
Some people love clicking things and this can include your search function (especially if you have search button), so if you see the keyword ‘(not set)’ or ‘search’ these will be for people who have searched without taking the time to enter a term. You can simply ignore these or create a filter to remove them from your reports.
“People are looking for this information, so consider how you can improve their experience.”
Take some time to review the terms people are using, you might just have a handful of terms, or you might have thousands of terms. Try to identify terms that could be used to create new content or that are unexpected. For example, if people are searching for something that you do not currently have on your website, this is identifying a content gap that you can fill. You might also identify terms that could help you inform the product or services you offer.
If you click on a particular term in the report you will see the ‘Destination Page’ for the term. My view is that this report is broken because what I expect to see within the report are the pages that people have navigated to after searching. However, instead of seeing where people go, you are given a list of pages where the search was performed and this is the search results page - which isn’t useful at all.
Understanding Post-Search Navigation
So although I feel the inbuilt ‘Destination Page’ report is broken, there is still a way to understand how people are navigating from a particular search result page. Just:
- Navigate to the ‘All Pages’ report under ‘Site Content’ within the ‘Behaviour’ section
- Click on the ‘Navigation Summary’ tab (just to the right of the ‘Explorer’ tab).
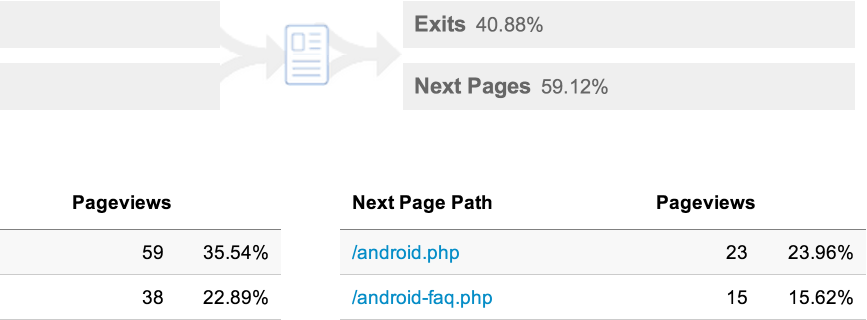
The Navigation Summary allows you to see simple navigation paths as people travel between pages on your website. Next to ‘Current Selection’ you will see one of your pages displayed in blue.
You can click on the page next to ‘Current Selection’ and perform a search for your search results page. You will need two things to do this, firstly you will need to know the query parameter for your search solution as we discussed earlier in the post.
Secondly, you will need to be using a reporting view where you have not selected to strip out the query parameter from your reports. This is an optional setting that some people select when configuring the Site Search reports. If you have stripped out the query parameter, then switch to an unfiltered view. If you don’t have an unfiltered view or a view where the query parameter hasn’t been removed, then you’ll want to create a new view. Unfortunately, this means you’ll have to wait until there is enough data to perform your analysis.
After searching for the query parameter that is driving your search function you can then select one of the search results pages. For example, if you might see /search?q=contact for people who have searched for ‘contact’.
Now we click the particular page (and search query) we want to view. The report will now update and you will see two columns below the page icon. The column on the left shows you the pages people viewed before searching. The icon in the middle represents the search results page you are analysing and the column on the right shows the pages that people navigated to from the search results page.
This technique allows you to understand post-search navigation paths and compare the pages people navigate to against your search results. If people are regularly navigating to a page that is lower down on your results page, then this page could potentially be featured within your search results to improve navigation.
Now you can repeat the analysis for other search terms by clicking the ‘Current Selection’ and choosing a different search results page.
Identifying Post-Search Issues
To find potential issues after someone has performed a search you can use the Search Terms report. Start by looking at the engagement metrics for particular terms, including the ‘Percentage of Search Exits’. This metric shows you the percentage of sessions that end on your search results page. Ideally, all of your search result pages would have a 0% Search Exit because this indicates that people are finding the information they are looking for and clicking through to that content from the search results. If people don’t see what they were looking for they are more likely to exit. This can also indicate that the search results for a particular term are not what people expected to see and they are choosing to leave your website, rather than selecting a result.
Another important metric to pay attention to is the ‘Percentage of Search Refinements’ as it shows you how often people change the term that they are using to search. For example, if someone searched for ‘location’ and then searched for ‘store location’ this would be seen as a search refinement. In some cases, this might be expected, but in other cases, it can indicate that people aren’t getting the best results.
You can get additional details on the search refinements being performed by your users. Simply click on the particular term within the report. Then click ‘Refined Keyword’ above the table. This will now show you new keywords people used to search within your website.
There are additional engagement metrics available within the report, including ‘Time After Search’ and ‘Average Search Depth’ which you can use to identify terms that are potentially related to search results that aren’t delivering to the expectations of people searching. If you do identify terms that have lower levels of engagement, then the best thing to do is to head to your website and try searching for the term yourself. Consider the results you see and ask yourself if they are the best possible results for the term. This can help you fine-tune your search function and potentially even provide better results to your users.
Site Search Pages Report
The Pages report shows you the different pages on your website that people are viewing before they perform a search. In some cases, you will probably see pages that you expect people to search from (like error pages), but in other cases, you will probably want to review what people are searching for based on the particular page. You can do this by clicking an individual page within the report to see the terms people are entering. This can be used to help identify potential issues with your navigation. For example, if lots of people are searching for a particular term on your homepage, then you might want to review your navigation and ensure that the content people are looking for is clearly highlighted.
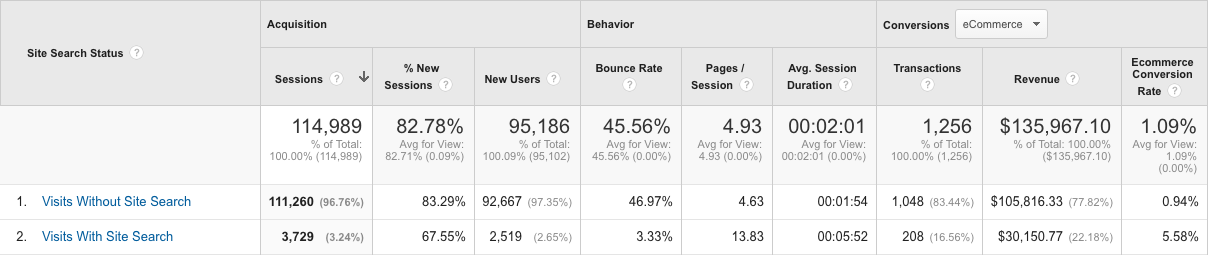
Site Search Usage Report
The Usage report shows you the percentage of sessions that included a search (or not) within your website. This can be extremely important for ecommerce sites where your search function is a critical way for people to find your products. For websites with lots of products, you will need to ensure that your search function is helping to drive revenue. Ideally, you will even see a higher conversion rate from people that have searched.
This report is also useful if you have invested time and effort in setting up or customising your search function. If you have, then you will want to see that you’re improving engagement (and minimising the amount of frustration) and ideally even having a positive impact on the conversions and value being generated.
If you do have a focus on conversions, then you can select the particular conversion actions you’d like to evaluate by selecting the appropriate goal on the drop-down (or selecting ‘eCommerce’ if you’re selling products). If people are less likely to convert after searching, then you should check that your search function is providing relevant results and that it’s easy to use.
Extra Tips for Site Search Reports
You’ll find lots of valuable insights within the Site Search reports, so if they’re not set up within Google Analytics, then you’ll definitely want to take the time to get the reports up and running. After you’ve used the reports it’s a great idea to open up your website and test out your search function to review the quality of the results it’s providing to your users. This is important because by default Google Analytics doesn’t show you which pages or results are displayed with all the different terms people are using.
You can also use the Search Terms report to identify areas you might want to target with your paid search campaigns and even your organic optimisation efforts. And don’t forget – it’s a great place to identify potential gaps in content and possible issues people are having with your navigation.
Comments