Google Tag Manager: Sequential Tags Cheat Sheet
Loves Data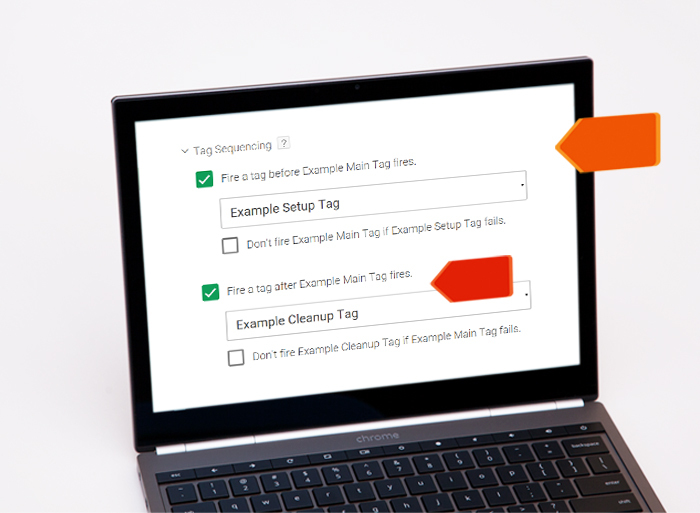

It’s only recently that Google Tag Manager has supported firing a chain of tags in a defined sequence, with the ability to guarantee that a tag has completed firing before the following tag in the sequence is fired. This allows you to have tags that are dependent on other tags and have some control over firing order without having to resort to complicated homebrew hacks with event pushes. For example if you want to use an external API to derive a custom dimension for a Google Analytics tag, tag sequencing gives you a controlled and well-defined way to achieve this. If you need to take a step back and cover the fundamentals of Google Tag Manager first, check out our other blog resources:
For this Google Tag Manager cheat sheet, we refer to the sequence of tags as:
- Setup tag
- Main tag
- Cleanup tag
Basic instructions
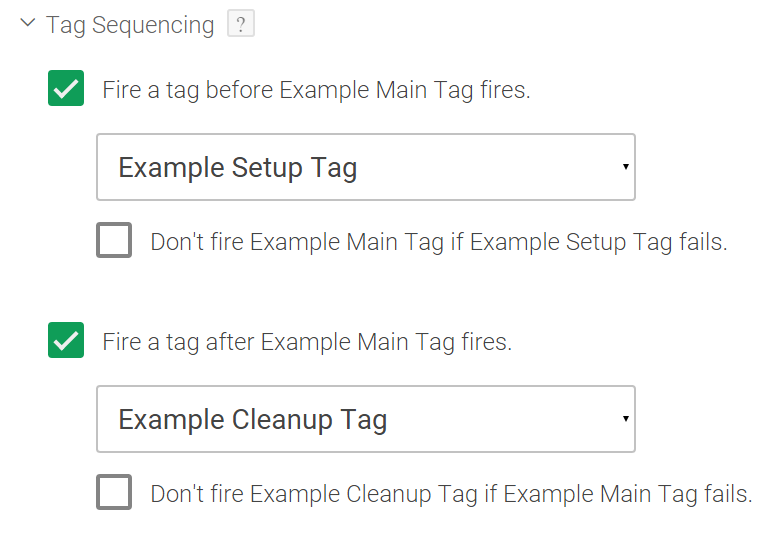
A tag may have either or both of a ‘setup’ and ‘cleanup’ tag associated with it. Whenever the main tag is to be fired, Google Tag Manager will fire tags as follows:
- First, any specified setup tag will be fired
- Next, when the setup tag has completed, the main tag will be fired
- Finally, when the main tag has completed, any specified cleanup tag will be fired
Setup and/or cleanup tags may be attached in the Tag Sequencing settings under a tag’s Advanced Settings.
You should ensure that your main tag has one (or more) triggers associated to fire it off in the usual way. There is no need to attach any triggers to the setup and cleanup tags: these will be fired in sequence by Google Tag Manager automatically.
Optional settings: Don’t fire if previous tag failed
If you specify a setup tag, you may choose the accompanying option ‘Don’t fire [main tag] if [setup tag] fails’. There is a similar option not to fire the cleanup tag if the main tag fails. This can be used to ensure that Google Tag Manager does not fire your tag if the previous tag in the chain failed, for instance, because it could not load a resource over the network or due to a JavaScript error. Say you have a ‘setup’ tag that loads a JavaScript library and a main tag that uses that library – attempting to fire the main tag when the setup tag couldn’t load the library just wouldn’t work so firing that main tag would be futile at best.
For built-in tags, such as Google Analytics tags, there is no special action required on your part for Google Tag Manager to know whether the tag failed or succeeded; however, you should be aware that this just means that the tag itself completed its work and not necessarily that any downstream action was successful (for example, with a Google Analytics tag, the tag may have fired and completed but no hit data was delivered to your Google Analytics property).
For custom HTML tags, it is necessary for you to use a little JavaScript to advise Google Tag Manager of success or failure by taking the following steps:
- Enable the built-in variable called ‘HTML ID’ (Variables → Enabled Built-In Variables → Utilities → HTML ID).
- Enable the built-in variable called ‘Container ID’ (Variables → Enabled Built-In Variables → Utilities → Container ID).
- In your custom tag’s JavaScript, access the object that represents your Google Tag Manager container, available at window.google_tag_manager[{{Container ID}}]
- Call (as appropriate) one of the two methods exposed by that object, called onHtmlSuccess and onHtmlFailure, passing as an argument the built-in variable HTML ID.
In pseudo-code: <script> try { // payload work: throws error in event of failure ... ... window.google_tag_manager[{{Container ID}}].onHtmlSuccess({{HTML ID}}); } catch { window.google_tag_manager[{{Container ID}}].onHtmlFailure({{HTML ID}}); } </script>
Conclusion
That’s all you need to get started with sequential tags. If you have an existing Google Tag Manager container where you have tried using a series of event pushes to make your own sequencing solution, you might like to get started with the feature by simplifying your setup to use the built-in sequencing functionality instead.