Google Tag Manager Ecommerce Tracking Guide
Loves Data
Tracking ecommerce activities on your website is essential for gaining valuable insights into user behavior and sales performance. Google Tag Manager (GTM) offers a powerful way to track these activities by capturing various events such as product views, cart additions, and purchases. Setting up ecommerce tracking with GTM can help you make data-driven decisions to optimize your online store.
GTM simplifies managing tags, scripts, and other tracking codes on your website. It enables you to deploy and update tags without modifying your site’s code, making it easier to implement and manage. The core components of ecommerce tracking in GTM include the data layer, variables, triggers, and tags. Each element is vital in capturing and sending ecommerce data to tools like Google Analytics.
One of the key elements to successful ecommerce tracking is the data layer. This JavaScript object holds and transfers information about the products and user interactions on your site. Implementing an effective data layer ensures that all necessary ecommerce data is captured accurately. You can implement this data layer using different methods, such as plugins or custom-coded solutions.
In this article, we will explore the components of ecommerce tracking with GTM, the different ways to implement the data layer, and provide step-by-step instructions to set up ecommerce tracking using GTM. This guide will equip you with the knowledge to harness GTM for effective ecommerce tracking.
Components of Ecommerce Tracking with Google Tag Manager
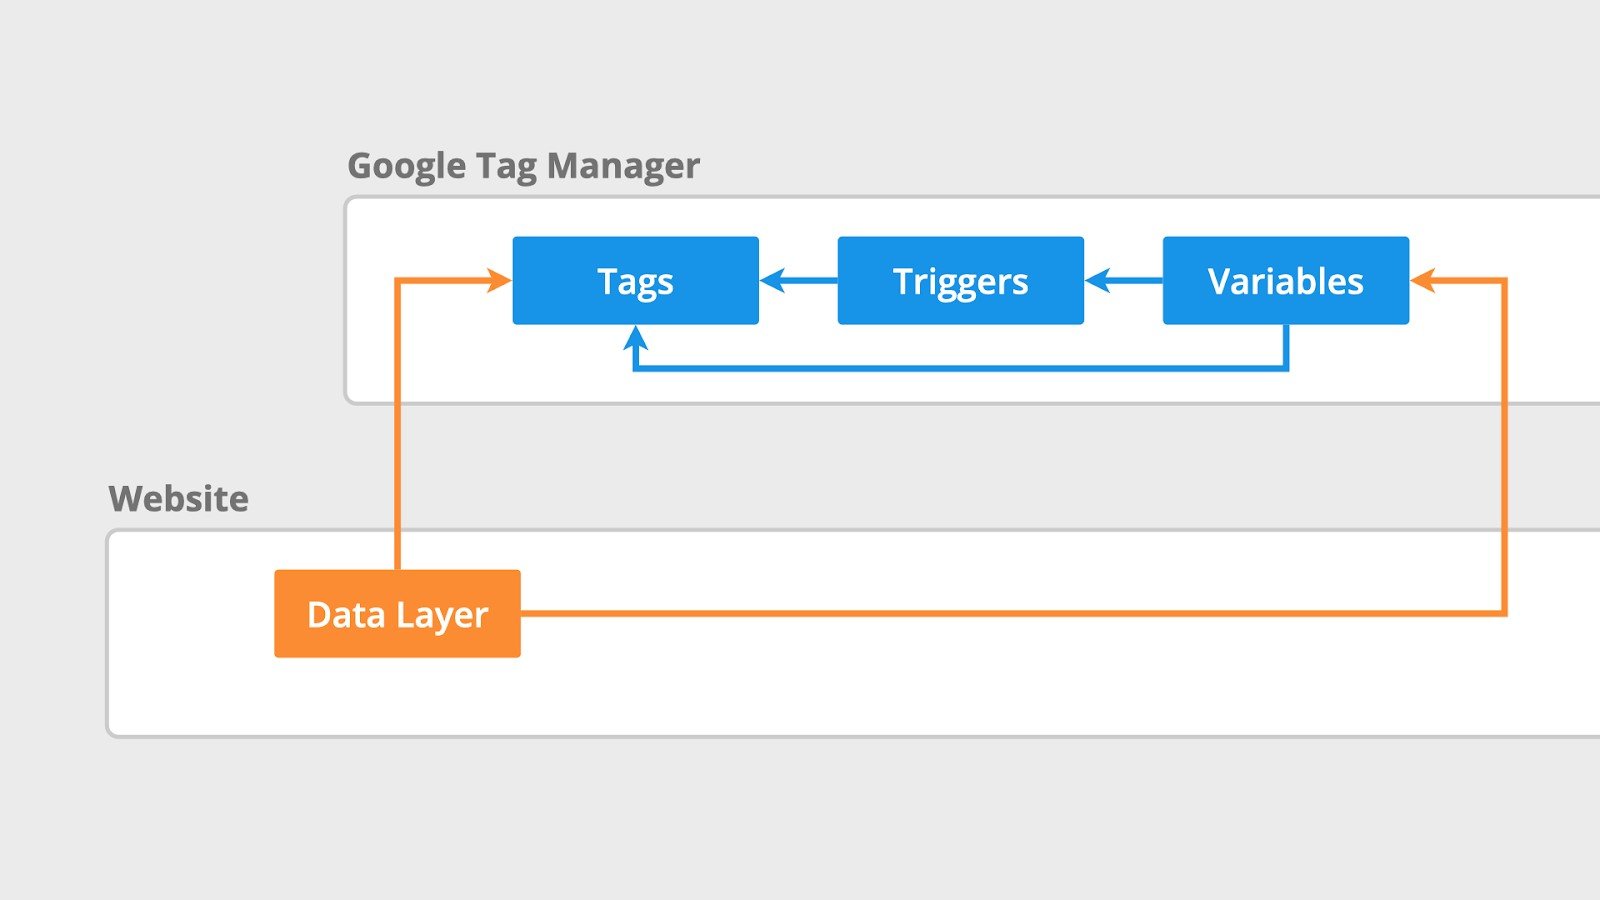
Ecommerce tracking with Google Tag Manager (GTM) involves several key components that work together to capture and report data. These components include the data layer, variables, triggers, and tags. Understanding each part is essential for implementing a reliable tracking system.
Data Layer:
The data layer is the backbone of GTM ecommerce tracking. It is a JavaScript object that holds structured information about the user’s actions and the products on your website. This information is pushed to the data layer when a user interacts with your site, such as by viewing a product or completing a purchase. The data layer ensures that the necessary details are readily available for GTM.
Variables:
Variables in GTM store the values from the data layer and other sources. These values can include product names, prices, and quantities. Variables make using the information captured by the data layer in different tags easier. For example, you might have a variable to store the total value of a shopping cart, which can then be used in a tag that tracks purchase events.
Triggers:
Triggers determine when tags should fire based on specific actions or conditions. For ecommerce tracking, triggers might be set to fire a tag when a user adds an item to their cart or completes a purchase. Triggers enable precise tracking by ensuring that tags only activate when the criteria are met.
Tags:
Tags are snippets of code that send data to various marketing and analytics platforms, such as Google Analytics. Tags can track page views, clicks, and other interactions. In ecommerce tracking, tags capture key actions like product views, cart additions, and transactions.
By understanding and configuring these four components – data layer, variables, triggers, and tags – you can successfully set up ecommerce tracking in GTM to monitor your online store’s performance.
Ways to Implement the Data Layer
The data layer is crucial for capturing and organizing ecommerce data on your website. There are different ways to implement the data layer based on your website’s structure and your technical skills. Let’s explore these methods.
Using Plugins:
Plugins offer an easy way to implement the data layer without much coding. Many ecommerce platforms like Shopify, WooCommerce, and Magento have plugins available that automatically set up your data layer. These plugins are user-friendly and require minimal configuration, making them ideal for those less comfortable with coding. Installing a plugin lets you quickly set up a data layer that captures essential ecommerce information.
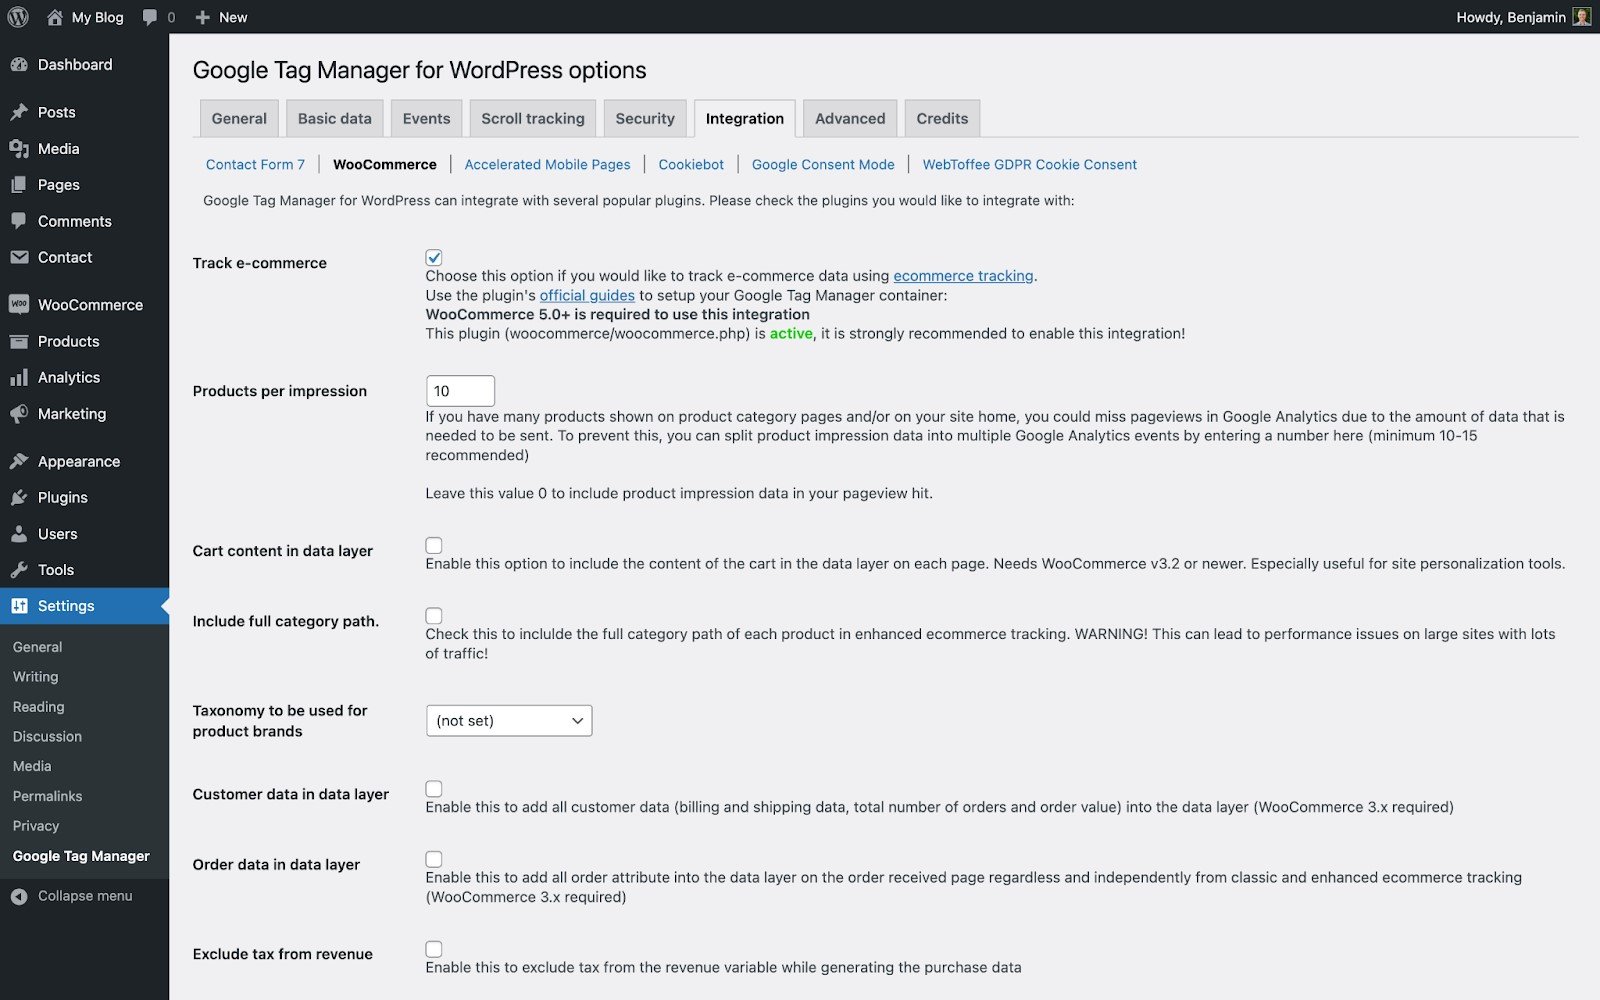
Here we can see the GTM4WP plugin has the ‘Track Ecommerce’ option enabled for WooCommerce. This will automatically add the ecommerce data layer to the website.
Custom Coding:
You can implement the data layer using custom coding for websites with unique requirements or those seeking more control. This method involves manually adding JavaScript code to your site to define the data layer and push relevant information. The code you use will need to include appropriate details dynamically.
For example, when someone purchases two red caps for $25.00 each, your code will need to include those exact details. This includes the items, the unit price, quantity, currency, transaction ID, and more. Then, when someone else purchases a t-shirt and a blue cap, the code will need to include the details for this purchase.
Custom coding provides flexibility, allowing you to tailor the data layer to capture specific details that pre-built plugins might not cover. However, it also requires more technical knowledge and resources.
Hybrid Approach:
A combination of plugins and custom coding can also be used. For example, you might use a plugin to handle general data layer implementation and add custom code snippets to capture specialized information. This hybrid approach leverages the simplicity of plugins while offering the flexibility of custom coding.
Ways to Implement Data Layer:
1. Plugins for Standard Implementation:
- Shopify Data Layer Plugin
- WooCommerce Data Layer Plugin
- Magento Data Layer Extension
2. Custom Coding for Tailored Needs:
- Define a JavaScript object in your website’s code.
- Push data to the data layer using JavaScript functions.
3. Hybrid Approach:
- Use plugins to cover basic data needs.
- Add custom codes for specific tracking requirements.
Choosing the right method for implementing the data layer depends on your website’s complexity and your technical skills. Plugins offer a quick setup, custom coding provides flexibility, and a hybrid approach combines the best of both worlds.
Examples of Data Layer Implementation
Implementing the data layer can vary based on the platform you’re using and your specific tracking needs. Let’s look at examples of how you can set up a data layer using plugins and custom coding.
Using Plugins:
1. Shopify:
- Shopify offers third-party apps that automatically set up a Google Tag Manager data layer. These apps typically require simple configurations and can start capturing ecommerce data such as product views, add-to-cart actions, and purchases without extensive coding.
- Apart from using apps, you can also configure Shopify Custom Pixels for Google Tag Manager. This lets you securely pass information about items and purchases to Google Analytics.
2. WooCommerce:
- For WooCommerce, plugins like "GTM4WP" can set up the data layer for you. Once installed, the plugin pushes ecommerce data to the data layer as users interact with your store.
3. Magento:
- Magento users can use extensions such as "DataLayer for Google Tag Manager" by MagePal. This plugin can automate the data layer setup, capturing relevant ecommerce actions like transactions and cart updates.
Custom Coding:
1. Basic Data Layer Example:
- You can implement a simple data layer using JavaScript. Add the following script to your site’s code:
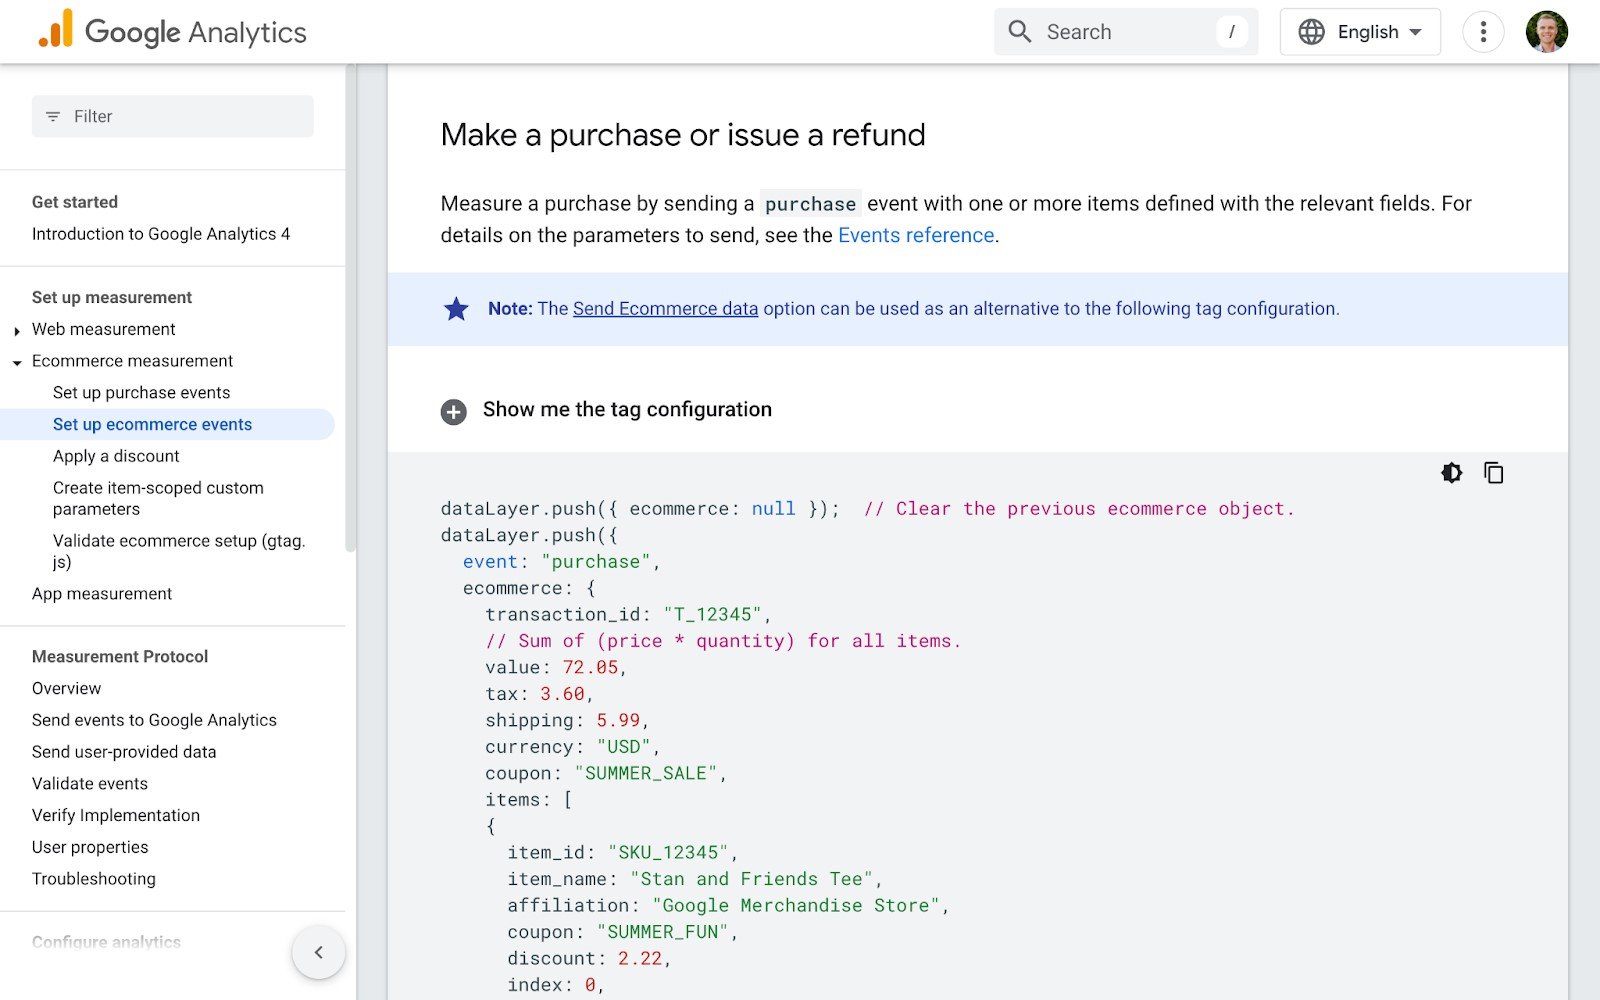
- This example code pushes a purchase event to the data layer for a particular transaction. 2. Advanced Data Layer Example: - For more detailed tracking, you might define additional parameters: - This example code also pushes a purchase event to the data layer, but it includes additional parameters to capture more details about the item and coupon code. By understanding these examples, you can choose the right approach to implement the data layer that best suits your ecommerce tracking needs. Setting up ecommerce tracking with Google Tag Manager involves a few steps. Follow these instructions to capture key ecommerce actions on your website. 1. Setting Up the Data Layer: Add Data Layer Code: - Implement the data layer using plugins or custom coding as described in the previous section. This ensures that relevant data is captured when users interact with your site. Test Your Data Layer: - Use GTM’s preview mode to launch Google Tag Assistant or Developer Tools to verify that the data layer captures the necessary information. 2. Creating Variables: Define Variables in GTM: - The Google Analytics tag in GTM can automatically capture all the ecommerce information from your data layer. However, if you’re using additional tags, like the Google Ads Conversion Tracking tag or other custom third-party tags, you must create variables to use with these tags. - Go to the GTM dashboard and create variables that match the data layer parameters. For example, create a variable to capture the transaction ID, amount, currency, and item details. 3. Setting Up Triggers: Create Triggers Based on Events: - Define triggers for specific actions, such as product views or purchases. For instance, set a trigger to fire when the 'add_to_cart' event is pushed to the data layer. - In most cases, you will want to create a single trigger that will fire your analytics tag for all the recommended ecommerce events. You can do this using the regular expression matching option. 4. Creating Tags: Create Tags for Analytics: - Set up a GA4 event tag to send the captured data to Google Analytics. You can configure the tag to use the name of the event automatically pushed to the data layer, and by enabling the ‘Sent Ecommerce Data’ option along with using the ‘Data Layer’ as the source, you will automatically send all of the ecommerce details to Google Analytics. - For platforms other than Google Analytics, you must configure the tag to use the variables we created earlier. This will then pass each piece of information from the data layer to the tag. 5. Test and Publish: Test Tags: - Use GTM’s preview mode to launch Google Tag Assistant. You can then test your tags and make sure they fire correctly. Verify that data flows to your analytics tool as expected. Publish the Container: - Once everything is tested and working correctly, publish your GTM container. This makes the tracking active on your live site. By following these steps, you can effectively implement ecommerce tracking with GTM, capturing valuable insights into user behavior and sales performance. Ready to dive deeper into mastering Google Tag Manager? Watch our Google Tag Manager tutorial series on YouTube:Steps to Set Up Ecommerce Tracking with GTM
And to dive even deeper into Google Tag Manager, consider joining our Google Tag Manager course.
Conclusion
Setting up ecommerce tracking using Google Tag Manager is crucial for understanding user behavior and sales performance on your website. By utilizing the data layer, defining variables, setting appropriate triggers, and deploying tags, you can capture detailed ecommerce data. Plugins offer a straightforward implementation, while custom coding provides flexibility for more specific tracking needs.
Effective ecommerce tracking enables you to make informed decisions that enhance your business strategy. Accurate tracking allows you to see how users interact with your products and measure the success of your marketing efforts. Whether you choose a plugin, custom coding, or a combination of both, the key is ensuring that your data layer captures all the necessary information.