How to Track Conversions with Google Tag Manager
Loves Data
Tracking conversions is one of the most important steps in measuring and optimizing your digital marketing efforts. Whether it’s a purchase, a form submission, or a newsletter sign-up, these actions show that your visitors are taking meaningful steps toward becoming customers – and Google Tag Manager (GTM) makes tracking them easier and more efficient.
In this guide, you’ll learn how to track conversions using Google Tag Manager, from setting up your container to sending events to Google Analytics 4 and Google Ads. We’ll also cover advanced tracking techniques and provide tips to help ensure your data is accurate and actionable.
Why Use Google Tag Manager for Conversion Tracking?
Google Tag Manager lets you manage and deploy tracking codes – known as tags – on your website without editing code directly. This means you can track user actions and conversions without needing ongoing help from a developer. GTM simplifies the process of adding, testing, and maintaining tags, while also giving you the flexibility to track everything from basic page views to complex interactions.
- Faster implementation of tags
- Less reliance on developers
- Better consistency and accuracy
- The ability to scale your tracking setup
Step 1: Set Up Google Tag Manager
Before tracking any conversions, you need to set up your GTM account and install the container on your website.
- Create a GTM Account: Go to tagmanager.google.com and create a new account.
- Set Up a Container: Enter your website’s domain and choose 'Web' as the platform.
- Install the Container Code: GTM will give you two code snippets. Add the first to the
<head>of every page and the second just after the opening<body>tag. - Preview and Verify: Use GTM’s Preview mode to make sure the container is installed correctly.
Step 2: Set Up Conversion Tracking
Tracking Google Ads Conversions
- Create a Conversion in Google Ads:
- Navigate to 'Goals' and select 'Summary' under 'Conversions'.
- Click the button to create a new conversion and select the option to create a website conversion.
- Once you've created the conversion, make a note of the Conversion ID and Conversion Label.
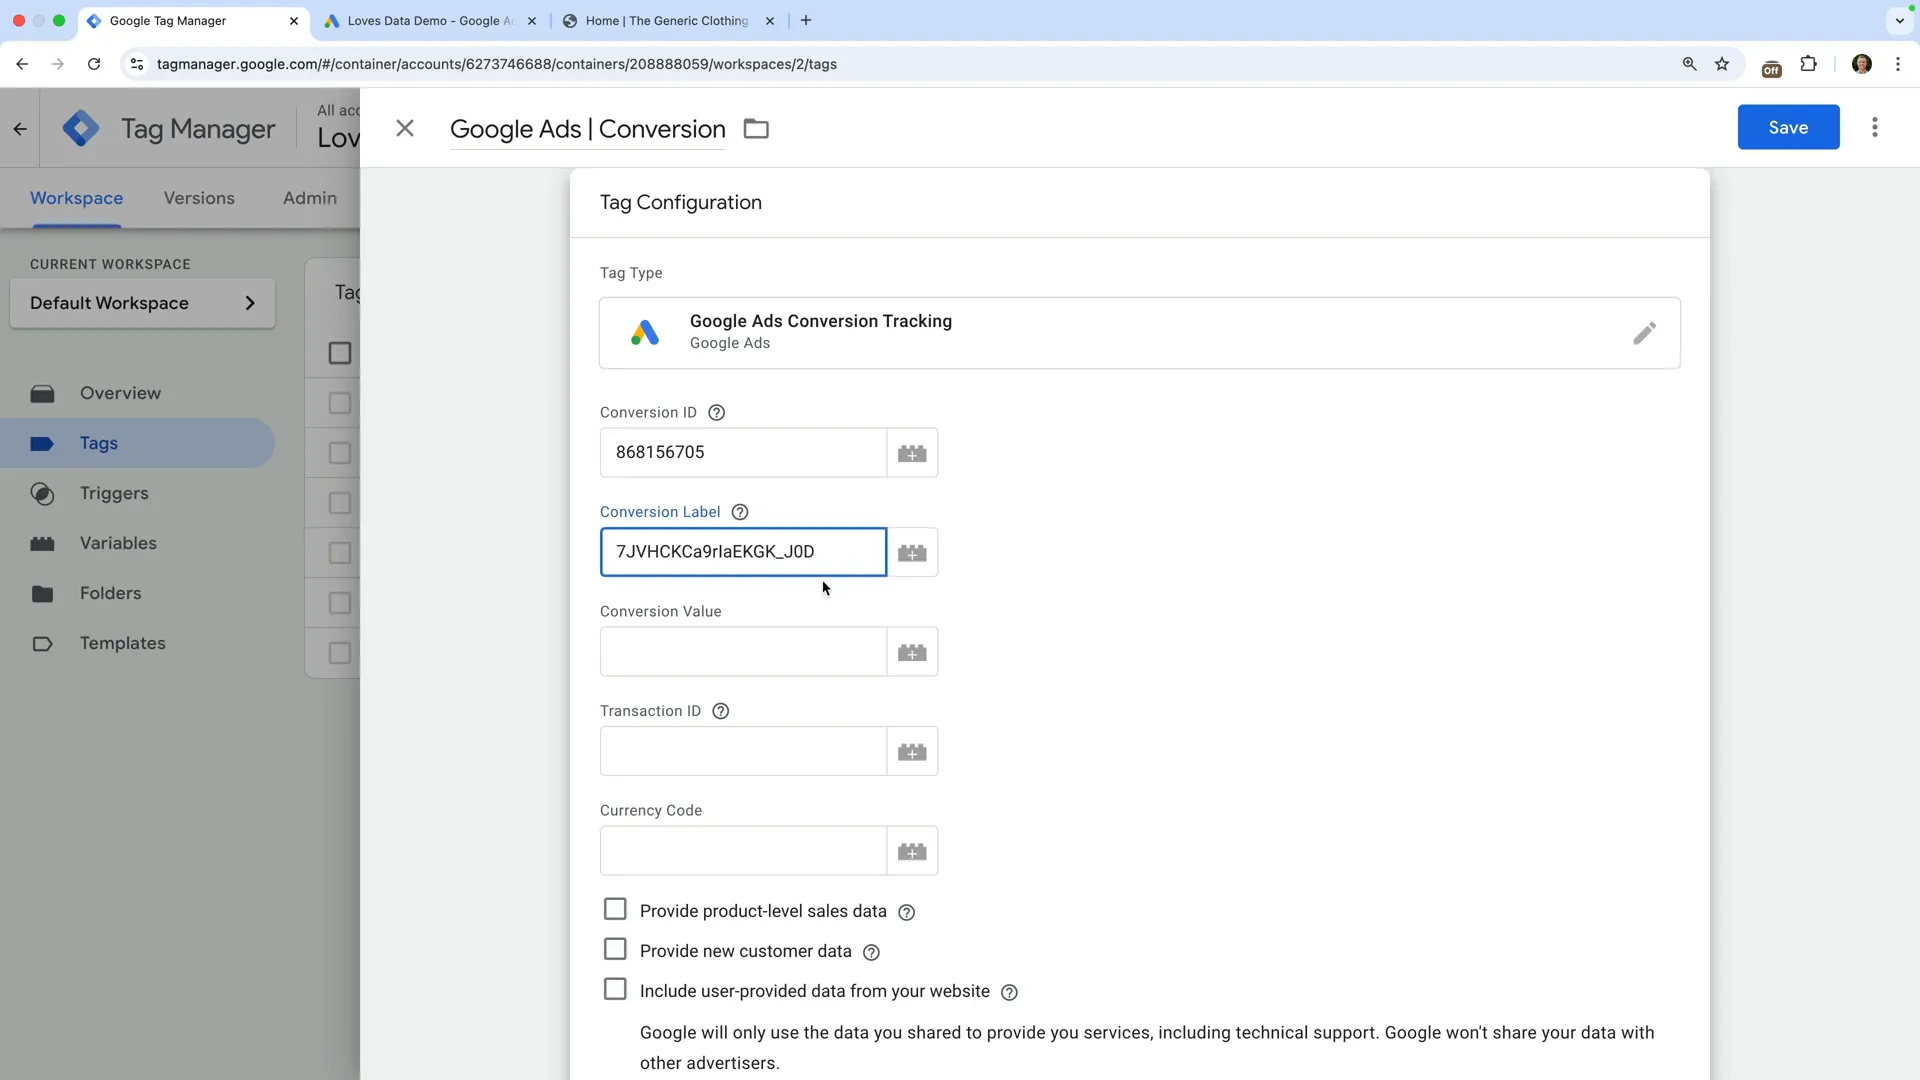
- Add the Google Ads Tag in GTM:
- Create a new tag using the 'Google Ads Conversion Tracking tag type
- Enter your Conversion ID and Conversoin Label.
- Set a trigger for when the conversion should be tracked (for example, a thank you page).
- Publish Your Changes: Save and publish your container.
Tracking GA4 Conversions
- Create a GA4 Event Tag:
- Use 'Google Analytics: GA4 Event' as the tag type.
- Enter your GA4 Measurement ID.
- Define the event name (for example,
sign_up,purchase, or a custom name). - Include event parameters as needed (for example, value, currency).
- Set a Trigger: Use the same trigger as your Google Ads tag (for example, a thank you page).
- Publish the Tag: Save and publish your container.
Step 3: Use Custom Triggers for More Precision
Triggers in GTM tell your tags when to fire. While page views are common, custom triggers give you more control:
- Click Triggers: Track when a user clicks a specific button or link.
- Form Submission Triggers: Monitor form completions.
- Custom Event Triggers: Fire tags based on JavaScript events in your data layer.
Custom triggers allow you to tailor your tracking to your specific goals and user journeys.
Step 4: Test Your Conversion Tracking
Before going live, preview and test your tags:
- Use GTM’s built-in Preview mode
- Complete the conversion action (for example, form submission)
- Check that the correct tags fire in the debug panel
- Confirm events appear in GA4’s DebugView or Google Ads
Step 5: Track Custom Interactions
You can also track non-conversion interactions that provide valuable behavioral insights:
- Clicks on a video play button
- File downloads
- Adding an item to a shopping cart
Use custom GA4 Event tags, name your events (for example, video_play), and set triggers based on element ID or class. Publish and verify these tags like any other conversion tag.
Step 6: Analyze and Optimize
Once your conversions are tracked and flowing into Google Analytics and Google Ads, analyze the data to improve your strategy:
- In Google Analytics, navigate to 'Reports', then 'Engagement' and 'Key Events' to view conversions.
- In Google Ads, use conversion data to optimize campaigns and targeting
- Monitor and refine your tags regularly to maintain accuracy
Bonus: GTM Tutorial
Walk through the steps to track conversions using GTM in our tutorial:
FAQs About Conversion Tracking in GTM
What types of conversions can I track with GTM?
You can track purchases, sign-ups, form submissions, button clicks, video views, and more.
Can I track conversions across domains?
Yes. GTM supports cross-domain tracking with GA4 using the same Measurement ID and a correctly configured property.
How do I check if my tags are working?
Use GTM’s Preview mode, GA4 DebugView, and browser tools like Tag Assistant.
Why aren’t my conversions showing?
Check that triggers are firing, event names are correct, and the tag is publishing correctly. Also verify that GA4 is configured to mark your event as a conversion.
Final Thoughts
Mastering conversion tracking in Google Tag Manager unlocks powerful insights into how your audience interacts with your website. Whether you’re tracking sales or micro-conversions like clicks, GTM gives you the flexibility and control you need to make smarter marketing decisions.
Ready to go further? Explore our Google Tag Manager course to level up your tracking skills and unlock the full potential of your digital analytics strategy.
Comments