Tracking Button Clicks with Google Tag Manager
Loves Data
Tracking button clicks on your website is crucial for understanding user behavior and improving conversions. Google Tag Manager (GTM) makes this task easy by allowing you to set up tags to track these interactions. This guide will help you get started with button click tracking using GTM, giving you the insights you need to make better decisions for your business.
Google Tag Manager simplifies the process of setting up tracking tags and triggers, making it easier for marketers and website managers to implement tracking without relying on developers. With the right configuration, you can track every click on your website's buttons, whether they're tied to your main call-to-action, form submissions, or other actions.
Once you have set up button click tracking, you can analyze the data to gain valuable insights into user behavior. This information can help you optimize your website, improve your marketing strategies, and ultimately drive more conversions. So, let’s guide you through setting up Google Tag Manager, creating button click tags, identifying important events to track, and analyzing your data for actionable insights.
Setting Up Google Tag Manager
Before you can start tracking button clicks, you need to set up Google Tag Manager (GTM) on your website. Follow these steps to get started:
1. Create a GTM Account: First, go to the Google Tag Manager website and sign in using your Google account. If you don’t have an account yet, create one. After logging in, click on the ‘Create Account’ button. Enter your account name and fill in your website details.
2. Install GTM Code on Your Website: After setting up your account, you will receive a container code. Copy this code and paste it into the header section of your website. This code allows GTM to manage your tags and triggers.
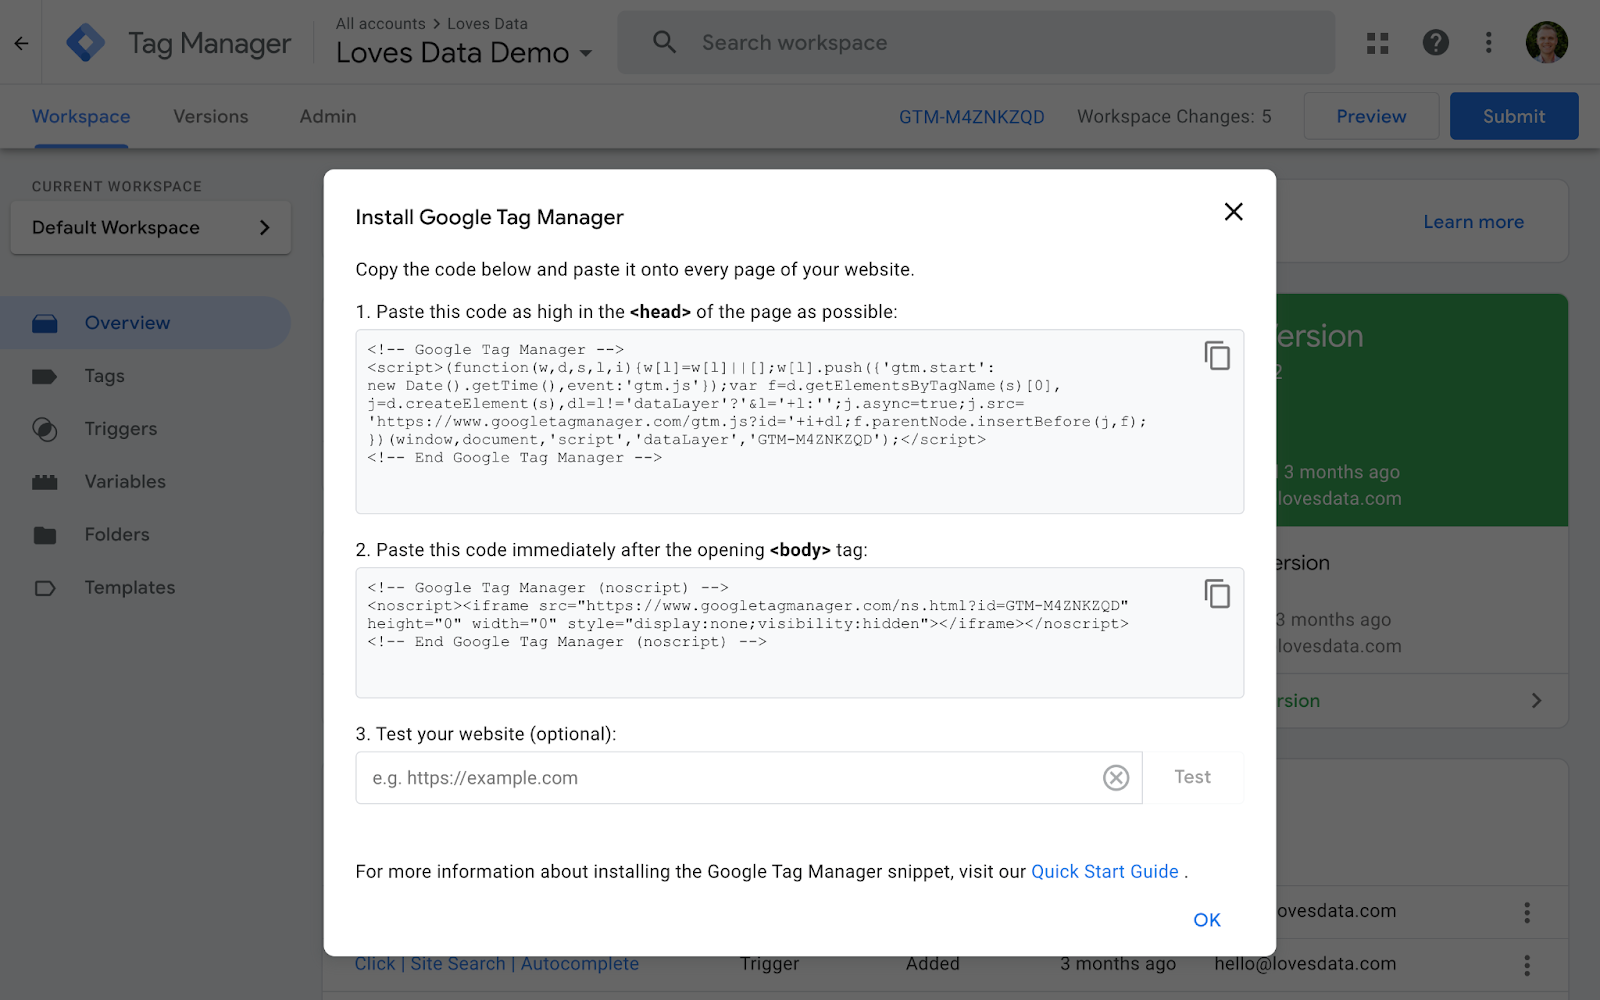
3. Verify Installation: To ensure GTM is working correctly, click ‘Preview’ to test your tags. This loads Google Tag Assistant which let’s you verify that the GTM container is properly installed on your site, and that your tags are firing when you expect.
Once you’ve completed these steps, you’re ready to create tags and triggers to track button clicks. Setting up GTM is straightforward, and it allows you to manage your tracking needs without relying on developers.
You can also follow our Google Tag Manager tutorial to get up and running with GTM:
Creating Button Click Tags: Step-by-Step Instructions
After setting up GTM, the next step is creating tags to track button clicks. Follow these steps to set up button click tags:
1. Create a New Tag: In your GTM workspace, click on ‘Tags’ in the left sidebar. Then, click the ‘New’ button to create a new tag. Give your tag a descriptive name, such as ‘Google Analytics | GA4 Event | Button Click’.
2. Configure Tag Settings: Click on the ‘Tag Configuration’ box to select a tag type. Choose ‘Google Analytics: GA4 Event’ if you are using GA4. Enter the event parameters, such as event name and value.
3. Set Up Trigger for Button Clicks: Click on the ‘Triggering’ box to set up the conditions that will fire the tag. Click the ‘+’ button to create a new trigger. Choose ‘Click - All Elements’ as the trigger type. Name your trigger, such as ‘Button Click Trigger’.
4. Define Trigger Conditions: Click on ‘Some Clicks’ and set the conditions specific to your button. For example, you can trigger the tag based on the button’s ID or CSS class. Use the ‘Preview’ mode to test and make sure it works correctly.
5. Save and Publish: Once you’ve configured your tag and trigger, click ‘Save’. Then, click ‘Submit’ in the main workspace to publish your changes.
By following these steps, you can easily set up button click tracking tags in Google Tag Manager. This setup helps you capture valuable data about user interactions and improves your insights for better decision-making.
Watch our Google Tag Manager button tracking tutorial for a detailed walkthrough of the steps to start tracking buttons:
Important Button Click Events to Track
Understanding which button clicks to track can help you gather meaningful data. Here are some key button click events to focus on:
1. Call-to-Action (CTA) Buttons: Track clicks on your main call-to-action buttons, such as ‘Buy Now’, ‘Sign Up’, or ‘Get Started’. These CTAs are crucial for conversions, and tracking them helps you understand user engagement and the effectiveness of your marketing efforts.
2. Form Submission Buttons: Tracking form submission buttons, like ‘Submit’ or ‘Register’, helps you gauge user interest in your services or content. This data can provide insights into how many people are converting through forms on your site.
3. Navigation Menu Buttons: Track clicks on navigation menu buttons to see which sections of your website attract the most interest. This helps you optimize site structure and improve user experience.
4. Download Buttons: If you offer downloadable content like ebooks or whitepapers, track these button clicks to measure the popularity of your resources and understand what content resonates with your audience.
5. Social Share Buttons: Tracking social share buttons can provide insights into how your content is being shared across social media platforms. This helps you understand which pieces of content are most engaging and have the potential to go viral.
By focusing on these key button click events, you can gather valuable data that informs your strategies and improves your website’s performance.
Analyzing Button Click Data for Better Insights
Once you’ve set up button click tracking, the next step is to analyze the collected data. Here’s how you can do it effectively:
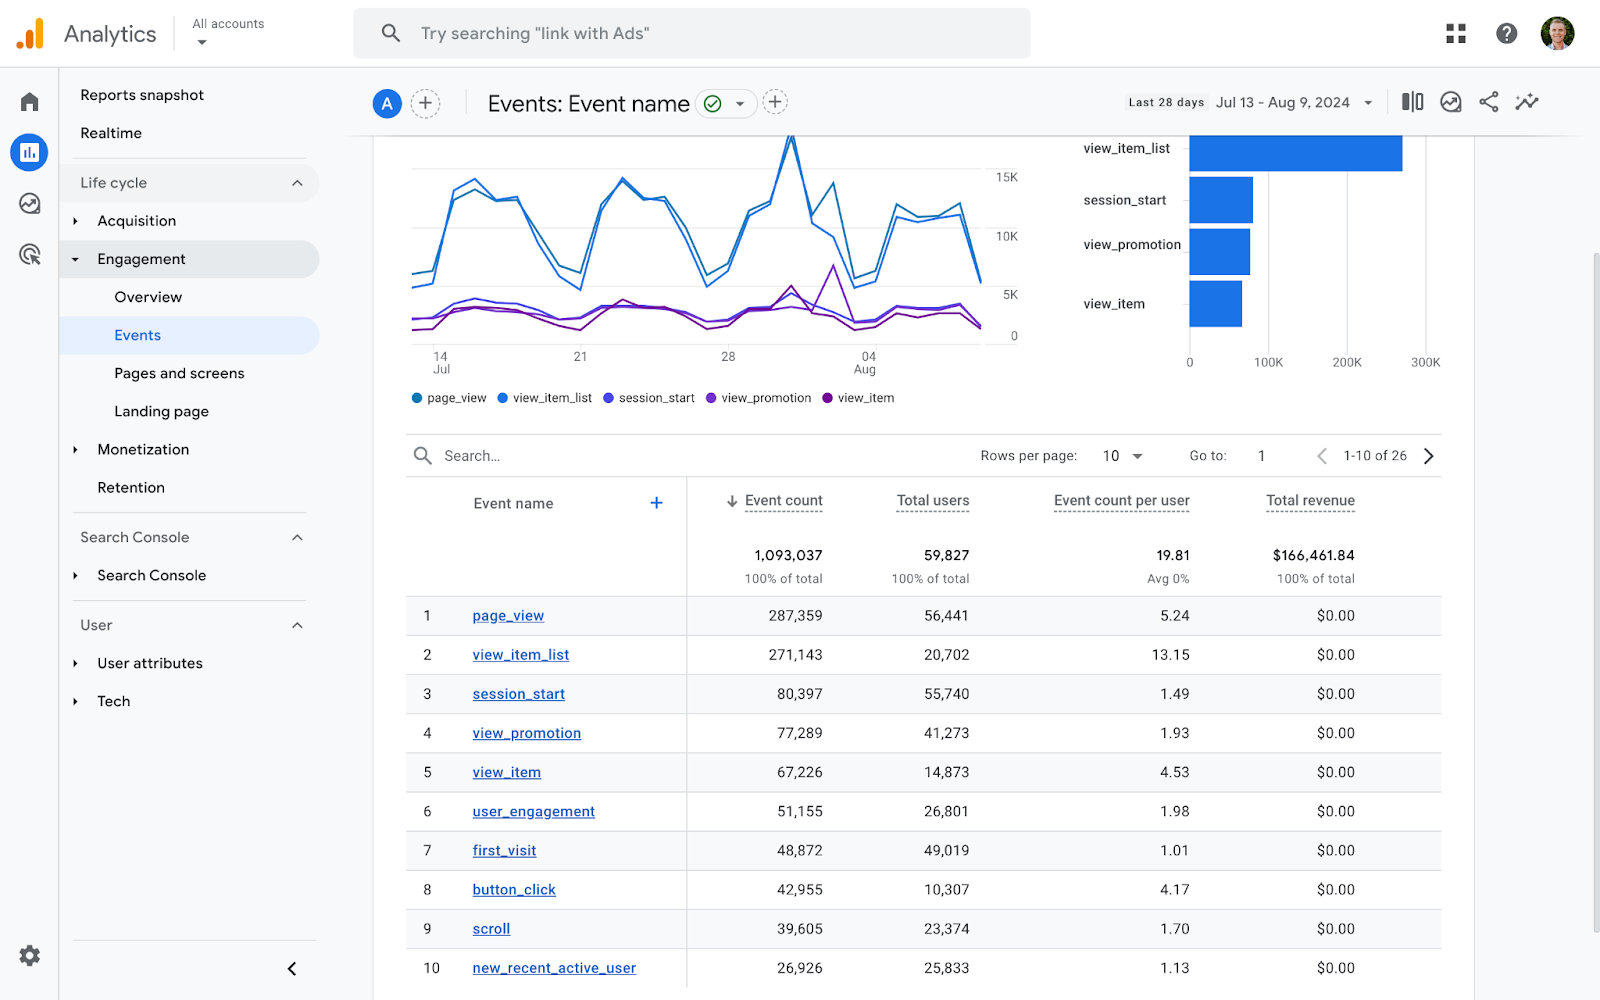
1. Use Google Analytics Reports: Go to Google Analytics and navigate to the ‘Events’ report. Here, you can see a list of all tracked events and their occurrences. This gives you an overview of how users are interacting with your buttons.
2. Create Comparisons and Segments: Use comparisons in the standard reports and segments in exploration reports to filter your data. For example, segment users who clicked on a specific button to see their behavior throughout the site. This helps you understand how different user groups interact with your content.
3. Set Up Key Events: In Google Analytics, set up key events to track conversions based on button clicks. This helps you measure the effectiveness of your CTAs and other crucial buttons in driving conversions.
4. Compare Data Over Time: Review button click data over different time periods to spot trends and patterns. This could reveal seasonal behaviors or the impact of any changes you made to your site.
Analyzing this data provides actionable insights, allowing you to make informed decisions to enhance user experience and improve conversion rates.
Boost Your Conversions: Optimize Buttons with GTM
Google Tag Manager makes it simple to track button clicks, providing essential insights into user behavior on your website. By setting up GTM and creating tags to monitor key button clicks, you gain valuable data that can drive better business decisions. From tracking call-to-action buttons to analyzing download and social share buttons, the collected data tells the story of how users engage with your site.
Analyzing this data in Google Analytics, using custom segments and conversion goals, further enhances your understanding. Comparing data over time and utilizing heatmaps can reveal user patterns and inform strategies to optimize your site. The combination of GTM and thorough data analysis equips you with the tools to improve user experience and boost conversions significantly.
For more expert tips and comprehensive training on using Google’s marketing platforms, visit Loves Data. Our courses will help you master tools like Google Tag Manager with our course, ensuring you can make data-driven decisions to grow your business. Unlock your website’s potential with Loves Data today!
Comments