Google Search Console reports you need to be using
Loves Data
If you’re trying to understand how your website is performing in Google search results, then you need to be using Google Search Console. Search Console allows you to see how your website is ranking in Google’s search results and even more importantly if people are actually choosing to click through to your website.
In this post, I’ll walk you through how to use the Search Analytics report (available inside Search Console) and why you absolutely need to link Search Console with Google Analytics.
Feel free to jump to the topic you’re most interested in…
- Setting up Google Search Console
- Glossary of terms you’ll find in Search Console
- Using the Google Search Console reports
- Linking Search Console and Google Analytics
- Glossary of Search Console terms you’ll find in Google Analytics
- Why you might see differences in your data
- Using the Search Console reports in Google Analytics
Here we go…
Getting started with Google Search Console
To begin using Search Console you’ll need to verify that you own the website you’re trying to add. This is because you’ll be able to access data about the performance of your website and modify the way your website appears within the Google Search results. (And we don’t want anybody to be able to do that!)
Once you’ve entered your website’s URL there are various options you can choose from to verify your website:
- Uploading a file: allows you to verify ownership by uploading a HTML file to your website’s server. I tend to avoid this option as it can take some time for the verification to be confirmed.
- Adding a tag to your website: this means you’ll need to be able to access your website’s code and add a tag to your homepage. My tip here is to add it to your website’s template to verify your site. It will mean it’s on all of your pages, but that doesn’t matter.
- Verifying with your domain name provider: depending on where you’ve purchased your domain name, this can be super easy (for example if you’re with Bluehost or GoDaddy) or you’ll need to add a TXT record to your DNS configuration. I suggest only using this option if you’re comfortable managing your website’s domain name, otherwise go with one of the other options.
- Using your Google Analytics account: this requires that you have the Google Analytics tracking code installed on your website and that you have edit-level permission to the Google Analytics property.
- Using your Google Tag Manager account: to use this option you’ll need Google Tag Manager installed on your website (and manage permission). This is my preferred option if it’s available.
Once you've verified your website you’ll be able to access Google Search Console, including the reports we’re about to cover.
If you’re just verified your website for the first time, then you’ll need to wait for the data to become available. So hang tight!
Glossary of important Google Search Console terms
Here’s a rundown of the terminology you’ll find inside Search Console:
- Queries are the different keywords people are searching for on Google when they see and click through to your website.
- Pages (or Landing Pages) tell you the pages on your website that people are clicking through to from the search results. (This what is being found by people searching on Google.)
- Countries show you the geographic location of people searching.
- Devices show you how you’re performing on desktop, tablet and mobile devices.
- Search Type allows you to see performance based on people using Google’s standard web search, image search and video search options.
- Search Appearance includes details about how you appeared in search results. For example, if a rich card was included with your website or if it was an AMP result on mobile.
- Clicks show you the total number of times that people have clicked through to your website from the search results. Clicks are not the same as sessions (which are found in Google Analytics), although they will be closely aligned, some people choose to block cookies and JavaScript, so there can be differences between clicks and sessions.
- Impressions are the total number of times your website has been included in the search results. This number includes people who did and did not click through to your website.
- CTR stands for click-through rate and it shows you how engaging your website is when it’s displayed in the search results. It’s calculated by dividing the number of clicks by the number of impressions. For example, if you received 100 clicks and 1,000 impressions for a keyword you would have a 10% click-through rate. A higher click-through rate can indicate that your website is relevant to what someone was searching for on Google.
- Position (or Average Position) is where your website was displayed within the search results. For example, an average position of 1.5 would indicate that your website is displayed towards the top of the organic results, while an average position of 18.1 would indicate you’re not even on the first page of results.
Using the Search Analytics report inside Search Console
Let’s start by looking at how you can begin using the Search Analytics report to identify opportunities to improve and optimize your content.
Here’s what we need to do...
Step 1: After you’ve selected your website in Search Console navigate to ‘Search Traffic’ and select ‘Search Analytics’.
Step 2: At the top of the report make sure that ‘Clicks’, ‘Impressions’, ‘CTR’ and ‘Position’ are all selected. This gives you all of the available data within the report.
Step 3: You will now see the search queries with the most clicks at the top of the report. Spend time identifying search queries that are relevant to your business that have a lower than expected CTR. I’d recommend starting with ones that have a CTR that is less than 6%. This will give you a list of search queries that you can then use to optimize your content. Also keep an eye out for search queries that have a strong CTR, but aren’t showing an average position in the top 10 organic results. There might be opportunities to optimize for these search queries too.
Step 4: If you already know the page (or pages) on your website that are shown for the search queries you’ve identified, then you can skip this step. However, if you’re not exactly sure which pages are shown for the search queries, then I recommend using SEMrush to quickly pinpoint the pages on your website that could be optimized. To do this, head to SEMrush, select ‘Domain Analytics’ (1) and then ‘Organic Research’ (2). Then enter your website’s domain and click ‘Search’ (3).
You’ll now have a list of all the keywords that you’re ranking for in Google. Now all you need to do is enter the particular keyword you want to check in the ‘Filter by keyword’ input box (4).
Now you can see the page (or pages) associated with the search query you identified in Search Console.
Step 5: Now it’s time to repeat this process for your landing pages. To do this click on ‘Pages’ at the top of the Search Analytics report inside Search Console. Look for pages that have a lower CTR (I’d recommend below 4%). If you notice a page that has a high CTR, but a low average position, these are worth taking a note of too.
You will now have a list of pages that you can optimize in order to increase their CTR. Next you’ll need to review the page titles and descriptions.
The aim here is to make them as relevant as you can to the search queries people are using on Google. The more relevant they are, the higher the CTR and the more likely your website will be higher in the organic rankings.
Edit your page titles and descriptions to make them more relevant and compelling for your audience. I recommend documenting the changes you make so that you can check back to see what you’ve changed and if the changes are achieving results.
Linking Search Console and Google Analytics
It’s pretty easy to link the two tools. Here’s what you need to do…
- Navigate to the ‘Admin’ section inside Google Analytics.
- Select ‘All Products’ in the Property column (under ‘Product Linking’).
- Scroll to the bottom of the options and click ‘Link Search Console’. (If your accounts are already linked, then you’ll find Search Console towards the top.)
- Click on ‘Edit’.
- Then select the appropriate site within Search Console and click ‘Save’.
That’s it! You’ve linked Search Console to Google Analytics. You can now head to your reports and you’ll find the Search Console reports under ‘Acquisition’.
Glossary of terms you'll find in Google Analytics
The Search Console terminology we’ve covered also applies to what you’ll find inside Google Analytics, plus there are the following terms...
- Sessions show you how many interactions people have had with your website. Each session can contain one or more pageviews and a new session is started if someone leaves your website for 30 minutes or more. You’re likely to see some difference between your click and session numbers. This is because some people will click through to your website, but have cookies or JavaScript disabled which mean they won’t be tracked by Google Analytics.
- (not set) can mean different things depending on where it appears inside Google Analytics. If you see (not set) in the Landing Pages report it’s likely that your Google Analytics tracking code is installed on websites that are not verified by Search Console (apply ‘Hostname’ using ‘Secondary Dimension’ to check). In the Countries report (not set) tells you that the geographic location for those sessions couldn’t be identified. Finally, in the Queries report you will find search queries that have been filtered out of Search Console grouped together as (not set).
Differences in data
I’ve found three key reasons that you might see differences in the data you find inside Google Search Console compared to the Search Console reports inside Google Analytics.
The first reason is to do with time zones. The reports inside Google Analytics are based on the time zone you selected for the reporting view (likely the location of your office), while Google Search Console uses US Pacific Daylight Time. This means the data will be different based on the two different time zones (unless of course Google Analytics is set to Pacific Daylight Time too).
The second reason is the difference between clicks and sessions we’ve already covered. They’re similar, but not the same. Sessions are 100% reliant on the Google Analytics tracking code, so you might see slightly more clicks than sessions within your reports.
Finally, if you’re delivering different versions of your website, then you might find Search Console is under-reporting clicks (while Google Analytics is reporting sessions without any clicks). This can happen if you’re presenting secure and non-secure versions of your website simultaneously (HTTP and HTTPS) or if you’re presenting your website with and without the www. for your domain.
You can solve this in Search Console by adding an extra property for the version of your website that isn’t already included (for example, if you have HTTP configured in Search Console, you can create a second property for HTTPS). I’d also recommend creating a ‘Set’ inside Search Console (look for it on the top right of the Search Console homepage).
Unfortunately, there isn’t a way to fix this in Google Analytics, since you can only link one property from Search Console to your Google Analytics property. This means you’ll want to link the property from Search Console with the most data (or highest importance) for your website.
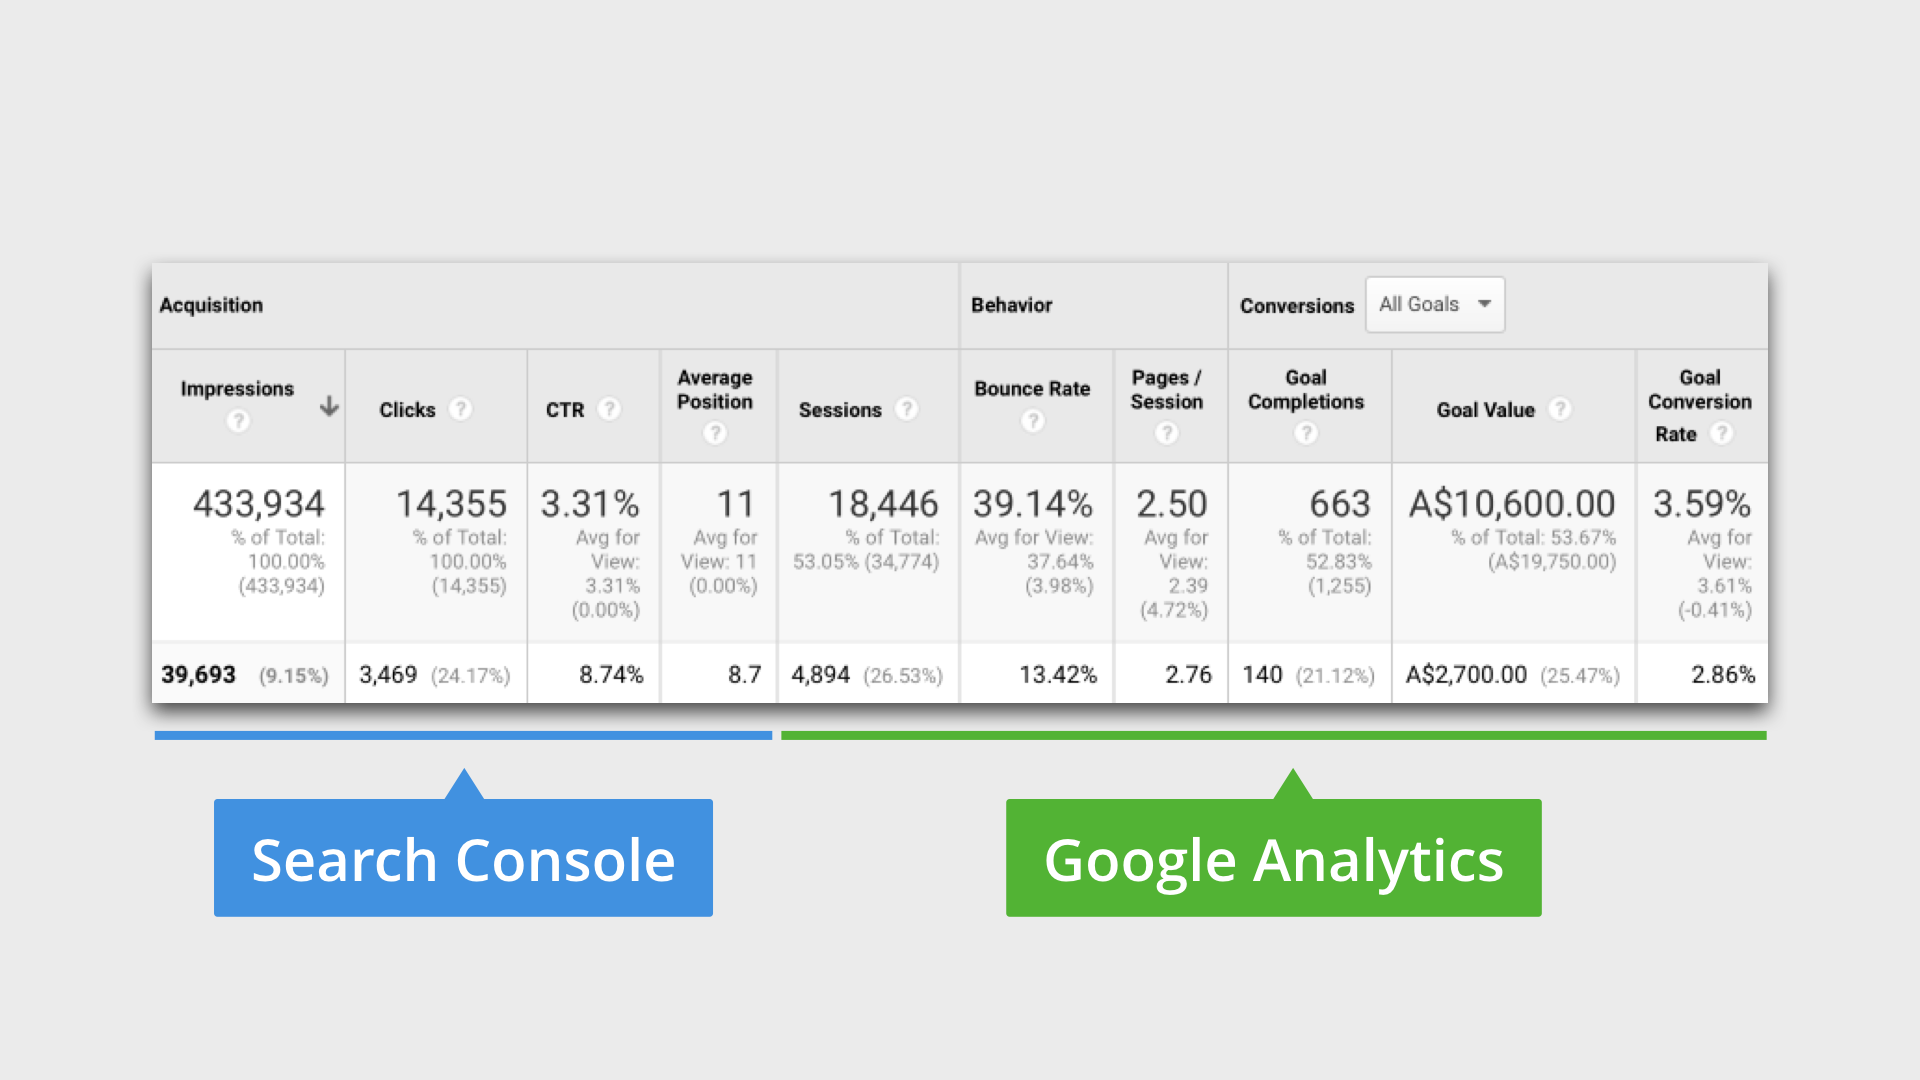
Using the Search Console reports inside Google Analytics
So what’s the difference? Why would I want to use the Search Console reports inside Google Analytics anyway?
The answer is sessions! Okay, it’s more than just sessions, it’s about being able to see people’s engagement after they’ve clicked through to your website. Google Analytics allows you to see the following in the Landing Pages report for Search Console…
- Sessions (which we’ve already covered)
- Bounce Rate which tells you if people are navigating beyond the landing page. For example, a 50% bounce rate for a search query tells you that half of people head back to the Google search results page (or close their browser) and the other half of people go on to view at least one more page on your website.
- Pages Per Session tells you the average number of pages people view after clicking through to your website.
- Conversion metrics, including goal conversions, goal value, goal conversion rate, transactions, revenue and ecommerce conversion rate.
- And you also continue to see clicks, impressions, CTR and average position.
I recommend you start by looking for landing pages that have a higher than expected bounce rate. These pages can then be improved to increase engagement. For example, if you notice that your primary call-to-action is below the fold when the page is first loaded, you could adjust the layout of the page to bring the message above the fold.
In some cases, you’ll be able to make immediate improvements to pages and in other cases, you’ll want to run a conversion test to determine if you can improve engagement (you can use Google Optimize or another tool to do this).
Conclusion
Google Search Console and the Search Console reports inside Google Analytics provide insights that aren’t available using Google Analytics alone. Once you’ve linked the products you will have the best of both worlds.
Start by using the reports to identify areas that you can improve. Once you’re optimizing your content you can use them to check your progress. Look for search queries and landing pages where you’ve increased the CTR improved your average position and increased clicks coming through to your website. Once you know what’s working, you can continue optimizing your pages.
How are you using Google Search Console?


Comments