Demystifying the Facebook Pixel
Loves DataConsider the following scenario: you’ve set up some Facebook ads, they’ve gone live but you don’t know how to measure your campaign’s performance. Sound familiar? Fortunately, there are many ways to address this issue: you can campaign tag your destination URLs and then set up some goals in Google Analytics or you can install the Facebook Pixel on your website and use standard events to measure key user interactions.
In this blog post, we’ll show you how you can set up the Facebook Pixel very quickly with Google Tag Manager.
What is the Facebook Pixel?
Like with most tracking codes, the Facebook Pixel is a piece of Javascript code that measures user interactions, website conversions and builds audience segments for your ad campaigns.
Where can I find the Facebook Pixel?
You’ll need to be logged into Business Manager in order to access the Facebook Pixel. Once logged in:
1. Open the hamburger menu
2. Select ‘Pixels’ from the menu
Once on the Pixels page, open the “Actions” dropdown menu and select “View Pixel Code”:
Once on the Pixels page, open the “Actions” dropdown menu and select “View Pixel Code”:
The pixel code should look something like this:
<!-- Facebook Pixel Code -->
This is the pixel base code and this is used to measure pageview. When configuring events for conversion tracking, the base code must be loaded as well.
Installing the Facebook Pixel
Now that you’ve found the pixel code, you can now – very quickly – install the code on your website through Google Tag Manager.
To do this:
- Log into Google Tag Manager
- Create a new tag
- Select ‘Custom HTML Tag’ as the tag type
- Paste the Facebook Pixel code into the text area
- Apply the ‘All Pages’ trigger to the tag and save the tag
Once you’ve configured your tag, it should look like this:
TIP: Like with any other tags in Google Tag Manager it’s important to preview changes before publishing the container. To assist with testing, Facebook have created the FB Pixel Helper Chrome extension to validate pixel codes when they load.
So you’ve now installed the Facebook Pixel on your website, what next?
Track conversions with standard events
In addition to the base pixel code, the Facebook Pixel can also track the number of other user interactions beyond the simple pageview – this is very similar to Google Analytics’ event tracking. The Facebook Pixel uses these standard events to measure conversions whenever the standard event is tracked. The table below lists all of the standard events that can be used with the Facebook Pixel.
| Name | Description | Event Code |
|---|---|---|
| ViewContent | Track important pageviews | <script> fbq('track', 'ViewContent'); </script> |
| AddToCart | Track add to cart interaction | <script> fbq('track', 'AddToCart'); </script> |
| Search | Track site searches | <script> fbq('track', 'Search'); </script> |
| AddToWishlist | Track when items are added to a wish list | <script> fbq('track', 'AddToWishlist'); </script> |
| InitiateCheckout | Tracks when users begin the checkout process | <script> fbq('track', 'InitiateCheckout'); </script> |
| AddPaymentInfo | Tracks when users add their payment details | <script> fbq('track', 'AddPaymentInfo'); </script> |
| Purchase | Tracks the completion of the checkout funnel | <script> fbq('track', 'Purchase', {value: '0.00', currency:'AUD'})); </script> |
| Lead | Tracks when a user expresses interest in an offering | <script> fbq('track', 'Lead'); </script> |
| CompleteRegistration | Tracks when a user completes a registration form | <script> fbq('track', 'CompleteRegistration'); </script> |
Google Tag Manager setup
To set up a standard event:
- Create a new Custom HTML tag
- Insert any of the standard event codes in the table above that you want to track
- Apply a trigger to the tag that’s appropriate for the specific event
The screenshot below is an example of how you may set up the ViewContent standard event:
IMPORTANT: when deploying standard events in Google Tag Manager, the base pixel code must be loaded first. Never apply the “All Pages” trigger to any of the standard event tags as this will treat every pageview as a conversion.
Campaign setup
Now that you’ve installed the Facebook Pixel code on your website, you can now set up website conversions for your campaigns. So let’s set up a new campaign!
Step 1: For the campaign objective, regardless of whether you want to create an auction based, or a reach and frequency based campaign, the option “Increase conversions on your website” will be available for both. Select this option and give your campaign a meaningful name:
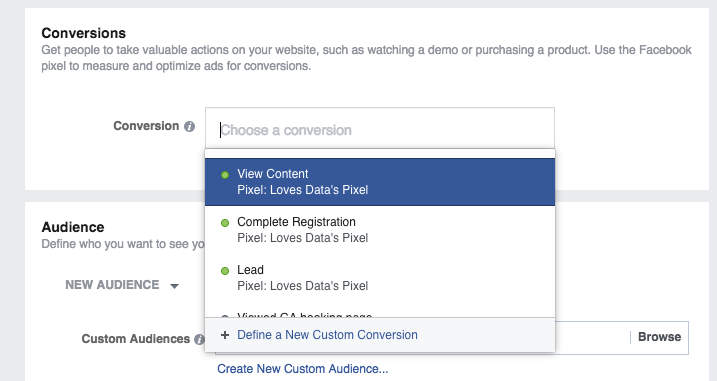
Step 2: Enter the conversion event. If you’ve already configured the pixel on your website, it should show in the auto-suggestions menu (as shown below).
Finally, configure your audience targeting, budgets, and ads sets as you would for any other campaign and you’re all set!
Comments