Wordpress + Google Analytics + Content Grouping = Blog Insights
Loves Data
Learn how to setup Google Analytics Content Grouping to gain valuable insights about your WordPress blog Google Analytics and WordPress get along like best friends – you can get deep insights into your blog’s audience and the content that they are engaging with, giving you rich feedback about what content you should be writing next. But with a little bit of effort (and not too much technical pain) you can customise the content reports for even richer insights.
You’ve probably used the ‘All Pages’ report that shows you a long list of all your posts along with ‘Pageviews’, ‘Bounce Rate’ and other metrics, but have you heard of Content Grouping?
Content Grouping allows you to have a brilliantly clean, lovely report that shows you the performance of your content by post category and even tags. Once you’ve set up content grouping you will be able to create a report like this:
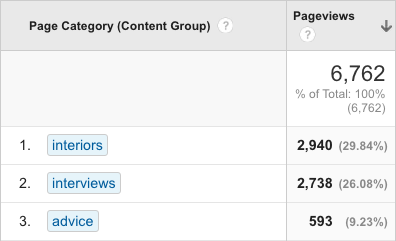
Instead of only being able to view individual pages like this:
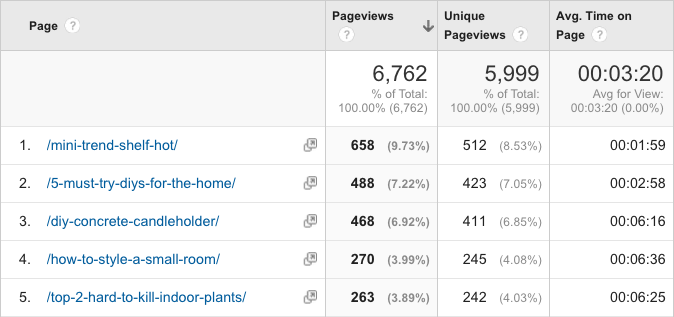
There are three ways to set up Content Grouping within Google Analytics, I’m going to show you how you can do this using Google Tag Manager and a Google Tag Manager plugin on your WordPress site. If you haven’t heard of Google Tag Manager (or aren’t using it yet) you might want to quickly cover off on the basics of Google Tag Manager before continuing – however we do cover basic Google Tag Manager in this post.
Once you’ve taken the time to implement Content Grouping on your blog you will be able to:
- View performance of your top-level content themes
- View posts by category and tags
- Segment your data by Content Groupings
- Apply Content Groupings to the Flow reports
- Create Custom Reports using Content Groupings
You’ll also have the additional bonus on having Google Tag Manager setup on your blog which comes with some extra benefits like:
- Centrally manage all your tracking tags
- Install other third party tags, like AddThis and SumoMe
- Automate other tracking, like clicks on internal banners
Important:
For this post I’m assuming that you have a standard Google Analytics implementation on your blog – or in other words you haven’t done any customisation (things like event tracking). If you have customised Google Analytics, then you’ll need to replicate these using Google Tag Manager and/or play with the Google Tag Manager WordPress plugin so that you continue to capture your custom data into your reports.
Getting Ready with Google Analytics
The first thing we need to do is find your Google Analytics tracking ID. Jump into Google Analytics, navigate to ‘Admin’, select ‘Tracking ID’ and then ‘Tracking Code’ under the ‘Property’ column. Your tracking ID will look something like UA-123456-1 – note this down as we’ll need it later. (This should be the same tracking ID that you’re currently using on your blog.)
Navigate back to ‘Admin’ and under the ‘View’ column select ‘Content Grouping’. Click ‘New Content Grouping’ and name the group ‘Post Categories’. Under ‘Group by Tracking Code’ click ‘Enable Tracking Code’ and note down the number under ‘Select Index’ (this should be ‘1’ unless you’ve already set up another group). Click ‘Done’ and then ‘Save’.
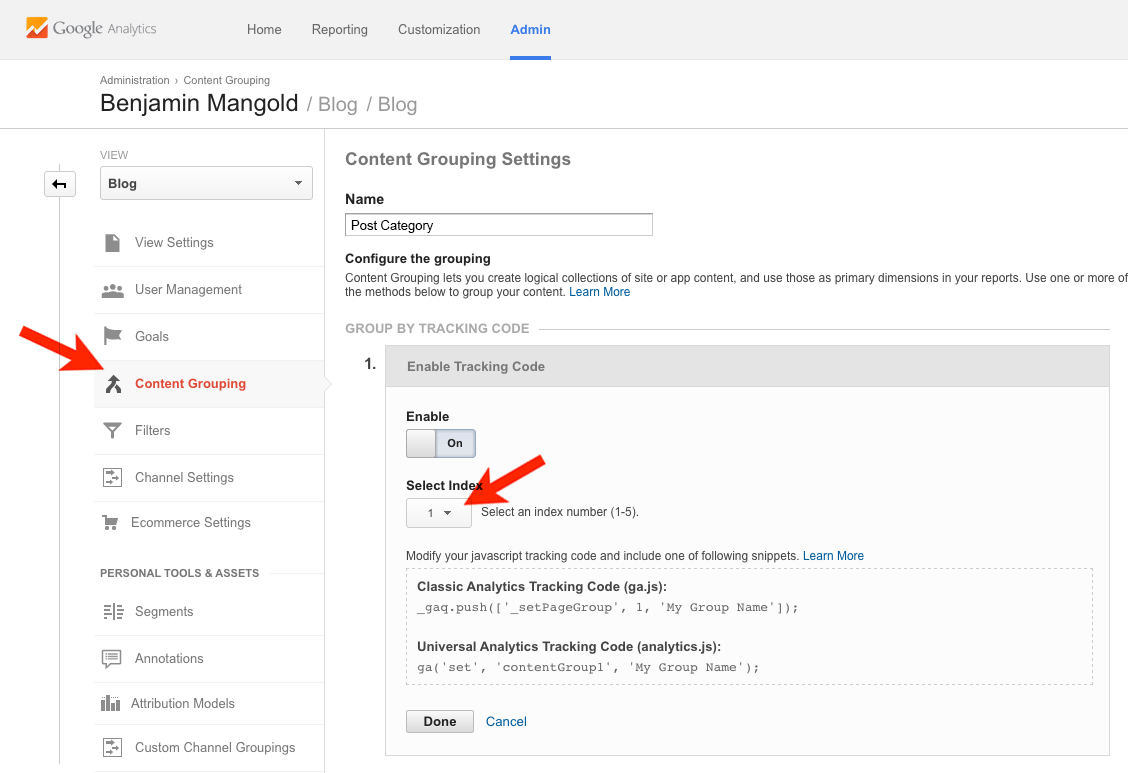
Repeat the steps to create another group, but this time name the new group ‘Post Tags’ and again note down the index number. Now it’s time to create your Google Tag Manager account.
Setting up Google Tag Manager
Head to Google Tag Manager, name your account, enter your domain name and select ‘Web’ as the container type. You’ll now be given the Google Tag Manager code – we’ll be using a plugin to get the code on our blog, so we can skip that. What we will need is the Google Tag Manager container ID. You’ll find this on the top left corner of the Google Tag Manager interface and it will look something like GTM-B4321A, again note this down.
Now we need to configure Google Tag Manager to include our Google Analytics tracking code. Click ‘Add a new tag’, name the tag (at the top) – lets go with ‘Google Analytics’ and then select ‘Google Analytics’ as the ‘Product’. Now select ‘Universal Analytics’ and paste your Google Analytics tracking ID into the ‘Tracking ID’ field.
Tip:
You can use a Variable (Constant) instead of hardcoding your Tracking ID inside the Google Tag Manager Tag. This allows you to reuse the Tracking ID in different Tags.
Click ‘More Settings’, then ‘Content Groups’ and then ‘Add Content Group’. Enter ‘1’ as the ‘Index’ and click the Lego-looking icon to the right of ‘Content Group’ (just to the left of the ‘Delete’ button), then click ‘New Variable’.
Name the variable ‘Post Categories’ and select ‘Data Layer Variable’ as the ‘Type’, enter ‘pageCategory’ as the ‘Data Layer Variable Name’ and click ‘Save’.
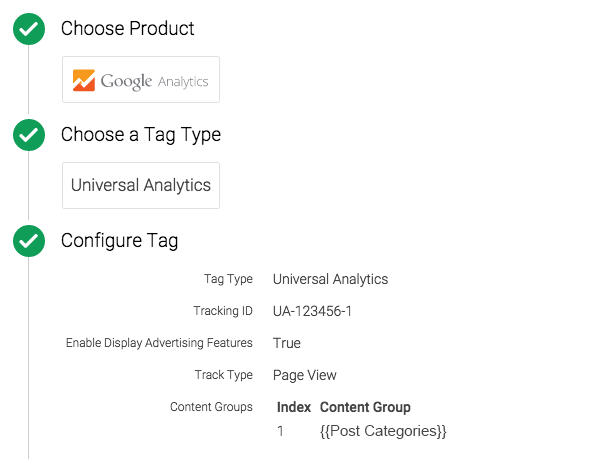
Click ‘Add Content Group’ again and repeat the steps, but name the variable ‘Post Tags’ and enter ‘pageAttributes’ as the ‘Data Layer Variable Name’.
Now click ‘Continue’ and select ‘All Pages’ under ‘Fire On’ and click ‘Create Tag’.
Google Tag Manager WordPress Plugin
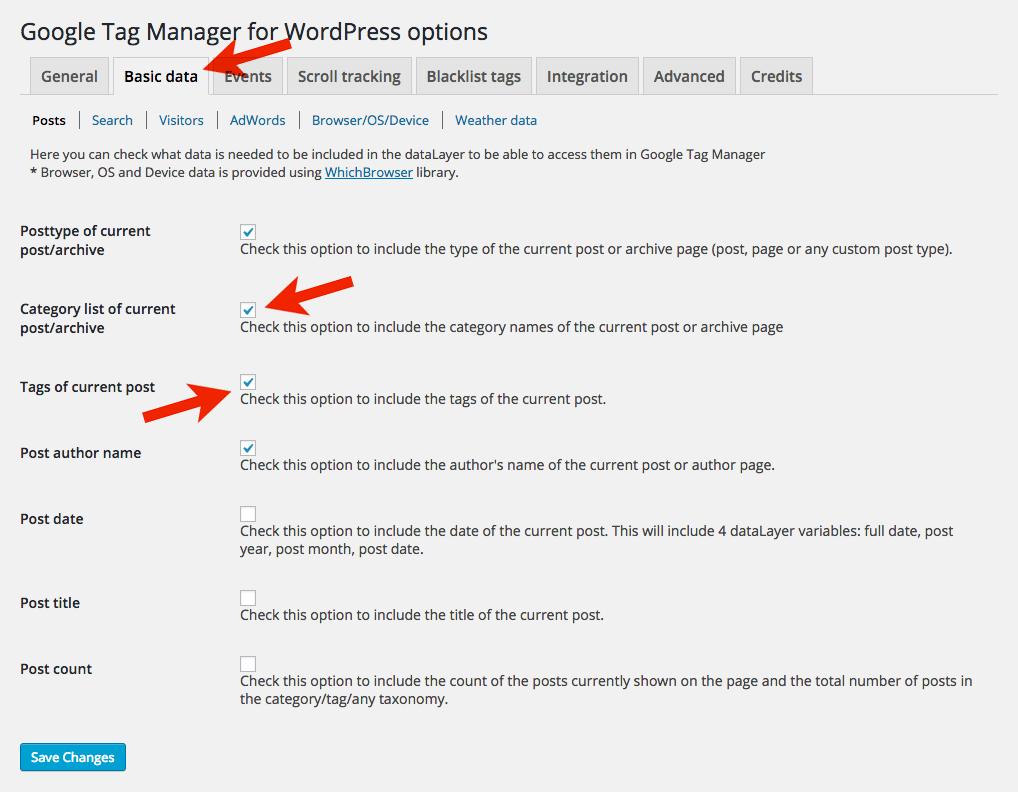
Next we need to head to WordPress and install the Google Tag Manager plugin by DuracellTomi. The plugin allows you to quickly get the Google Tag Manager code on all the pages of your blog. There are other ways to implement the code, but using the plugin allows you to easily do some really advanced things without having to touch your blog’s code.
Head to the settings for the plugin and enter your Google Tag Manager container ID.

Then select the ‘Basic Data’ tab and ensure that ‘Category list of current post/archive’ and ‘Tags of current post’ are both selected.
Tip:
The WordPress plugin automatically creates a Data Layer on your blog posts. This basically stores extra pieces of information (in our case, blog post categories and tags) which can then be used by Google Tag Manager for more advanced data collection and reporting. You can work with your web developer to do this too, but the plugin does all the magic for us.
Launch!
When you’re ready, head back to Google Tag Manager and click on ‘Publish’ and then ‘Publish Now’. This will push your Google Analytics tracking code live on your blog. At this point you will need to deactivate the Google Analytics plugin you’ve been using – if you don’t, then you’ll be double tracking into Google Analytics – which isn’t good.
Tip:
It’s always a good idea to test your Google Tag Manager implementation before publishing. You can use the ‘Preview’ option to view which tags are firing on your blog.
Reporting Loveliness
Phew! Now it’s time to jump into your reports. You will begin to see your pages grouped by category and tag moving forward (unfortunately this won’t include historical data). Head to the ‘All Pages’ report under ‘Behavior’ and ‘Site Content’. You will now have the option to select from your content groupings, just click on ‘None’ and you will see your groups.

You now have the ability to understand how your content it performing based the categories and tags you are using on your blog. This top-level view can be a powerful way to understand your top performing content quickly and easily without having to manually aggregate the data you see for individual pages. It can help inform your strategy – you might find that a particular category (or tag) is extremely popular on your blog, but this might have been hard to identify if you were just looking at the individual pages within the default report.
And there we have it – lovely data for your lovely blog.

Comments